> ## Documentation Index
> Fetch the complete documentation index at: https://docs.requestly.com/llms.txt
> Use this file to discover all available pages before exploring further.
# Create and Edit a Specification
> Write an OpenAPI 3.x document in Requestly with key completion, an outline that tracks your cursor, $ref navigation, and a live documentation preview.
The specification editor is a text editor for your OpenAPI document, with three things wrapped around it: an outline of the document in the sidebar, a documentation preview beside it, and problems flagged on the lines that caused them.
## Prerequisites
* A project is open. Specifications belong to a project, so there is nowhere to put one until you have picked a project.
* Your role can edit. On a read-only role the editor opens, but it will not accept typing and **Save** is disabled with the reason on hover.
## Create a specification
In the API Client sidebar, open **API Design** and click the `+` on the **Specs** header. Choose **OpenAPI 3.1 (default)** or **OpenAPI 3.0**.
You can also use **+ New → API spec** from the sidebar toolbar, which offers the same two versions.
The document opens in a new tab with the name in the breadcrumb focused. Type a name and press Enter. You can rename it later by clicking the name in the breadcrumb.
A new specification is seeded with a minimal valid document so the editor is never a blank page:
```yaml theme={null}
openapi: 3.1.0
info:
title: New spec
version: 0.0.0
paths: {}
```
Fill in `info`, then add servers, paths, and operations.
Press `Cmd/Ctrl + S`, or click **Save** in the tab header. A `• unsaved` marker sits next to the name until you do.
Once saved, the specification appears under **Specs** in the sidebar and expands into an outline of what you wrote.
## The editor at a glance
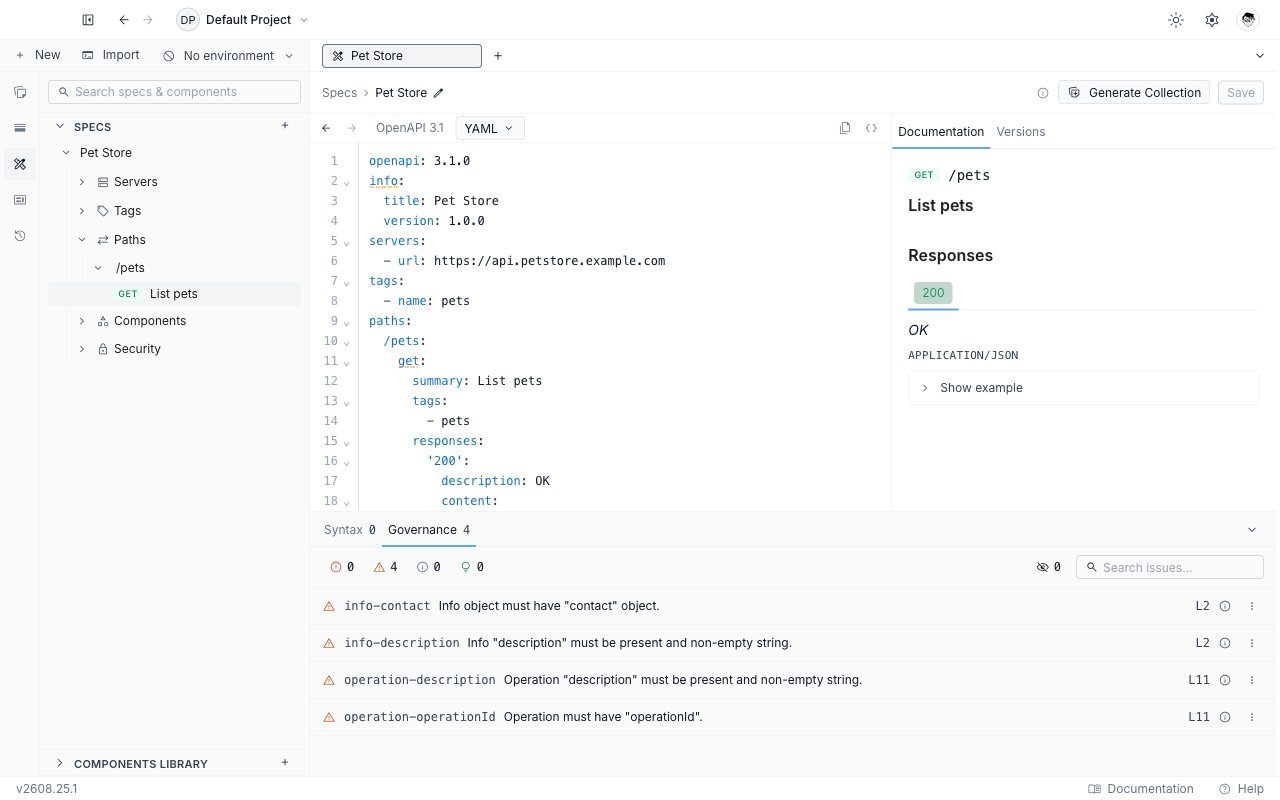
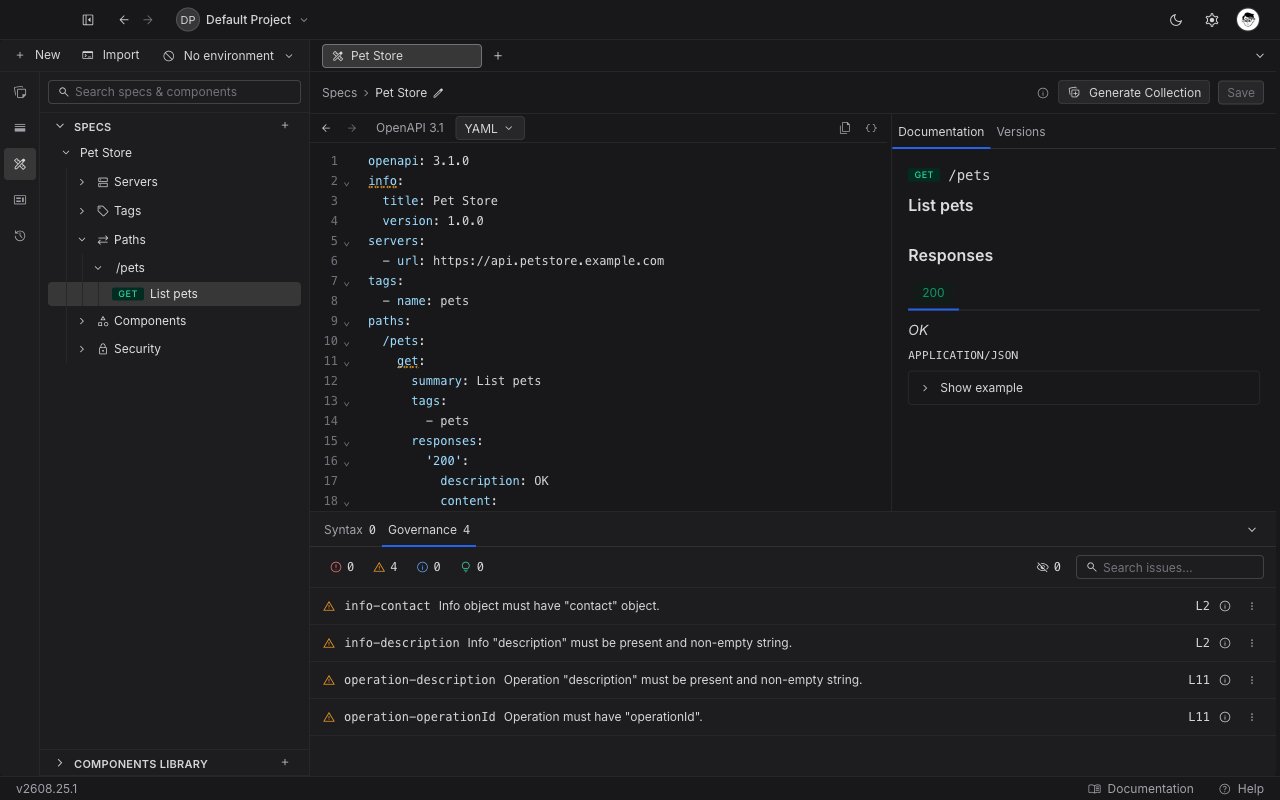 Four regions, all working on the same document:
* **The outline**, in the sidebar under the specification's name. The document's structure as a tree.
* **The document**, in the middle. Where you type.
* **The Documentation rail**, on the right. A rendered preview of whatever you are looking at.
* **The Issues panel**, below the editor. Everything currently wrong with the document. It can be docked to the bottom or the right, or collapsed out of the way. See [issues and governance](/api-client/api-design/issues-and-governance).
Drag the divider between the document and the rail to give either one more room.
## The toolbar
Above the document:
* **Back** and **forward** arrows. These walk your navigation history inside the document, so after following a `$ref` or clicking an outline row you can return to the exact line you left.
* The **OpenAPI version** of the specification, as a label. It is not a switcher.
* A **YAML / JSON** dropdown. Picking the other format converts the document in place.
* **Copy** and **Format**, on the right. Format runs Prettier over the document, in YAML as well as JSON.
Long lines are not wrapped. OpenAPI nests deeply, and wrapping breaks the indentation you are reading structure from, so the document scrolls sideways instead.
Converting YAML to JSON drops every comment in the document, because JSON has none. Converting back gives you valid YAML but not your original formatting. If the conversion fails because the document does not parse, Requestly tells you why and leaves the document untouched.
## Write with help from the editor
As you type inside the document, Requestly offers completions for the OpenAPI keys and values that are valid at the cursor, drawn from the OpenAPI 3.1 schema. HTTP methods and enum values are ranked above generic keys, so inside a path item the methods come first. Hover a key to read what it means.
Problems appear as you introduce them: a YAML or JSON syntax error, a structural violation, a broken reference, or a governance rule your project enforces. Each is underlined on the offending line and listed in the Issues panel.
## Add a section from the outline
The outline always shows the five top-level buckets, **Servers**, **Tags**, **Paths**, **Components**, and **Security**, even when the document has none of them yet. Empty ones read "No servers yet" and the like.
Hovering **Servers**, **Tags**, or **Paths** reveals a `+`. Click it and Requestly splices a starter entry into that block and scrolls the editor to it, ready for you to edit. On **Components** the `+` opens a submenu first, so you pick which component category the new entry goes into.
Section insertion writes YAML. On a document stored as JSON the `+` does nothing rather than reformat your file, so switch to YAML first if you want it.
## Move between the outline and the document
The outline and the cursor stay in step, in both directions.
* **Click an outline row** and the editor scrolls to that node and puts the cursor at its first line. Clicking the same row again scrolls back to it.
* **Move the cursor** in the document and the outline highlights the row you are now inside, and expands to reveal it.
Either way, the Documentation rail follows: land inside an operation and the rail renders that operation, land inside a component and it renders that component, click the specification's own name and the rail returns to the overview.
## Reference a component with `$ref`
Type `$ref:` followed by the first letters of the component's name, and Requestly offers every component you can point at, narrowing the list as you type. Two kinds appear in the same list, labelled in the right-hand column:
* **in-spec**, the components defined inside this document under `components:`. Selecting one inserts a JSON pointer such as `'#/components/schemas/Error'`.
* **library**, the project's shared [Component Library](/api-client/api-design/component-library) entries. Selecting one inserts the path to that entry, such as `'../../components/schemas/Pet.yaml'`.
Four regions, all working on the same document:
* **The outline**, in the sidebar under the specification's name. The document's structure as a tree.
* **The document**, in the middle. Where you type.
* **The Documentation rail**, on the right. A rendered preview of whatever you are looking at.
* **The Issues panel**, below the editor. Everything currently wrong with the document. It can be docked to the bottom or the right, or collapsed out of the way. See [issues and governance](/api-client/api-design/issues-and-governance).
Drag the divider between the document and the rail to give either one more room.
## The toolbar
Above the document:
* **Back** and **forward** arrows. These walk your navigation history inside the document, so after following a `$ref` or clicking an outline row you can return to the exact line you left.
* The **OpenAPI version** of the specification, as a label. It is not a switcher.
* A **YAML / JSON** dropdown. Picking the other format converts the document in place.
* **Copy** and **Format**, on the right. Format runs Prettier over the document, in YAML as well as JSON.
Long lines are not wrapped. OpenAPI nests deeply, and wrapping breaks the indentation you are reading structure from, so the document scrolls sideways instead.
Converting YAML to JSON drops every comment in the document, because JSON has none. Converting back gives you valid YAML but not your original formatting. If the conversion fails because the document does not parse, Requestly tells you why and leaves the document untouched.
## Write with help from the editor
As you type inside the document, Requestly offers completions for the OpenAPI keys and values that are valid at the cursor, drawn from the OpenAPI 3.1 schema. HTTP methods and enum values are ranked above generic keys, so inside a path item the methods come first. Hover a key to read what it means.
Problems appear as you introduce them: a YAML or JSON syntax error, a structural violation, a broken reference, or a governance rule your project enforces. Each is underlined on the offending line and listed in the Issues panel.
## Add a section from the outline
The outline always shows the five top-level buckets, **Servers**, **Tags**, **Paths**, **Components**, and **Security**, even when the document has none of them yet. Empty ones read "No servers yet" and the like.
Hovering **Servers**, **Tags**, or **Paths** reveals a `+`. Click it and Requestly splices a starter entry into that block and scrolls the editor to it, ready for you to edit. On **Components** the `+` opens a submenu first, so you pick which component category the new entry goes into.
Section insertion writes YAML. On a document stored as JSON the `+` does nothing rather than reformat your file, so switch to YAML first if you want it.
## Move between the outline and the document
The outline and the cursor stay in step, in both directions.
* **Click an outline row** and the editor scrolls to that node and puts the cursor at its first line. Clicking the same row again scrolls back to it.
* **Move the cursor** in the document and the outline highlights the row you are now inside, and expands to reveal it.
Either way, the Documentation rail follows: land inside an operation and the rail renders that operation, land inside a component and it renders that component, click the specification's own name and the rail returns to the overview.
## Reference a component with `$ref`
Type `$ref:` followed by the first letters of the component's name, and Requestly offers every component you can point at, narrowing the list as you type. Two kinds appear in the same list, labelled in the right-hand column:
* **in-spec**, the components defined inside this document under `components:`. Selecting one inserts a JSON pointer such as `'#/components/schemas/Error'`.
* **library**, the project's shared [Component Library](/api-client/api-design/component-library) entries. Selecting one inserts the path to that entry, such as `'../../components/schemas/Pet.yaml'`.
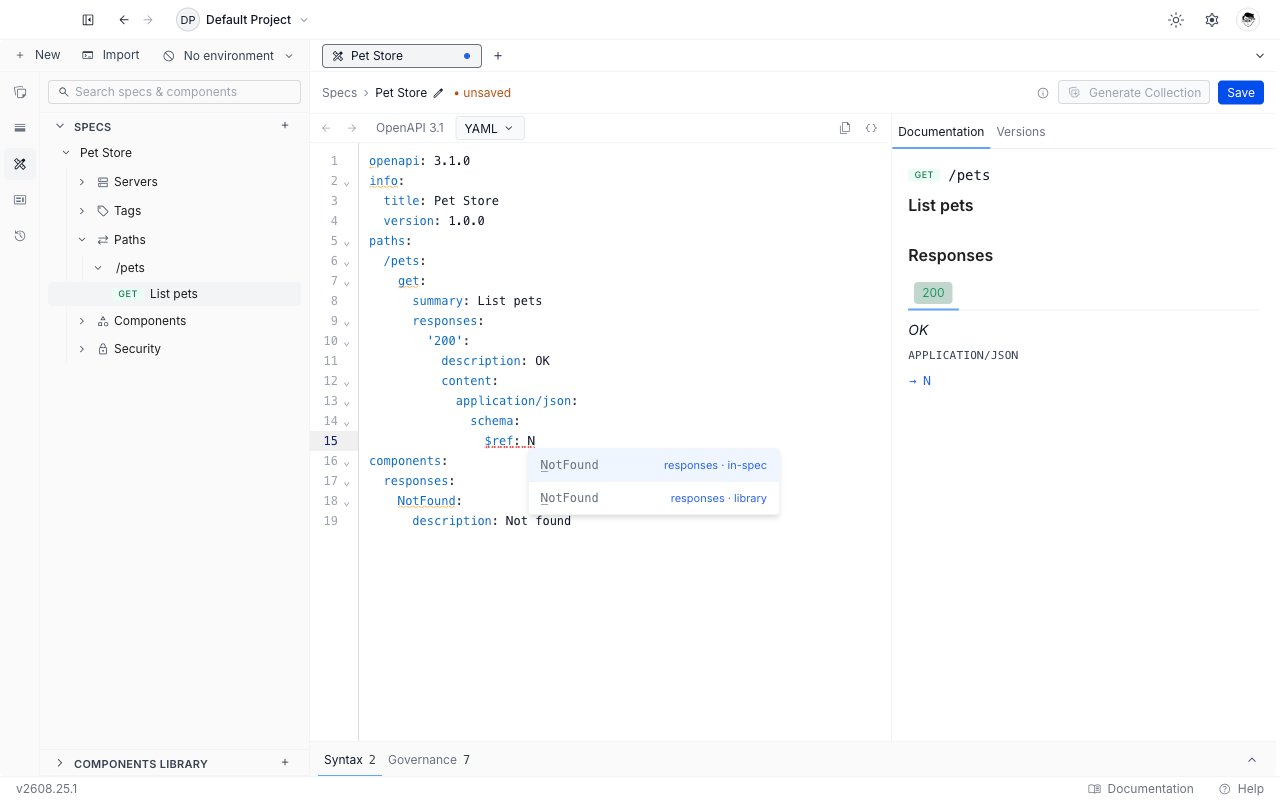
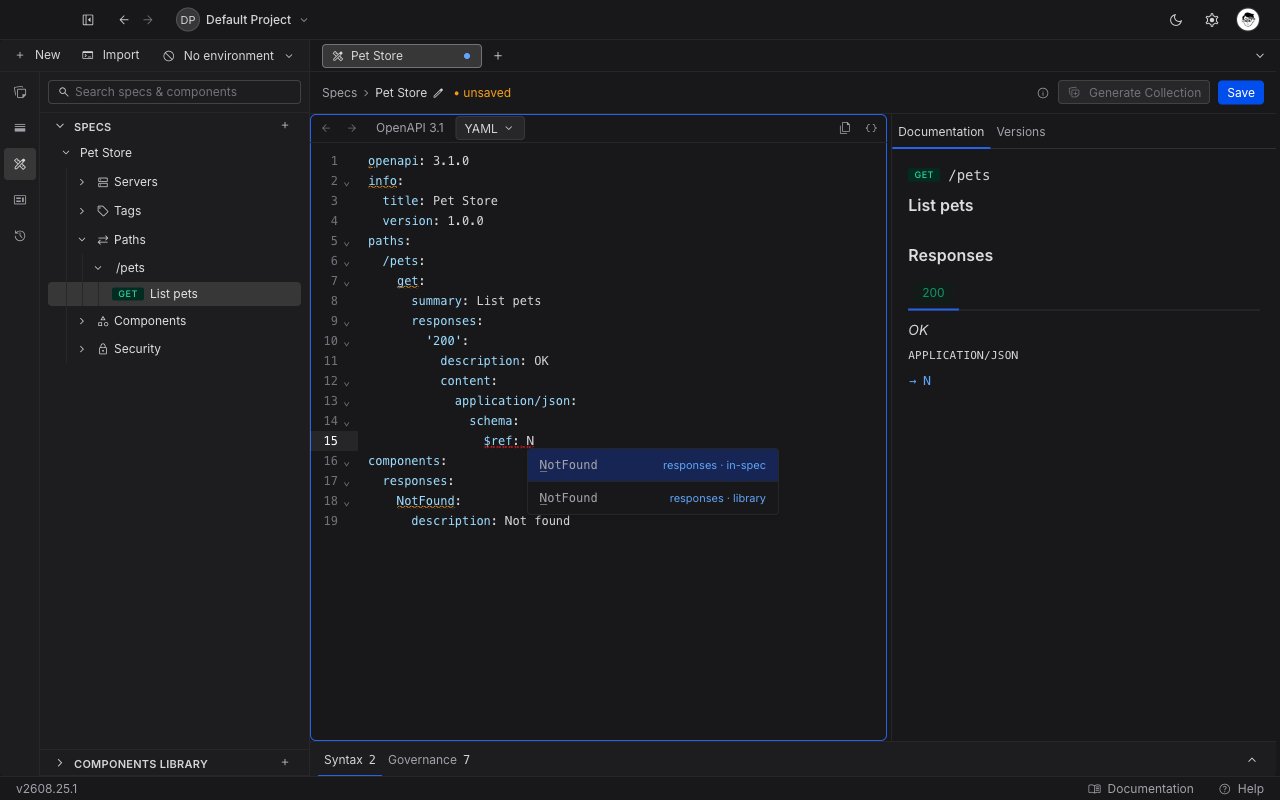 Completion only fires where `$ref` is a real key on the line, so a `$ref` mentioned inside a description string never triggers it.
### Reading and following a reference
A reference into the Component Library is drawn as a chip showing the entry's name and category, rather than the raw file path, so you can skim what a document points at. Hover the chip for the target's description and a preview of its body.
Completion only fires where `$ref` is a real key on the line, so a `$ref` mentioned inside a description string never triggers it.
### Reading and following a reference
A reference into the Component Library is drawn as a chip showing the entry's name and category, rather than the raw file path, so you can skim what a document points at. Hover the chip for the target's description and a preview of its body.
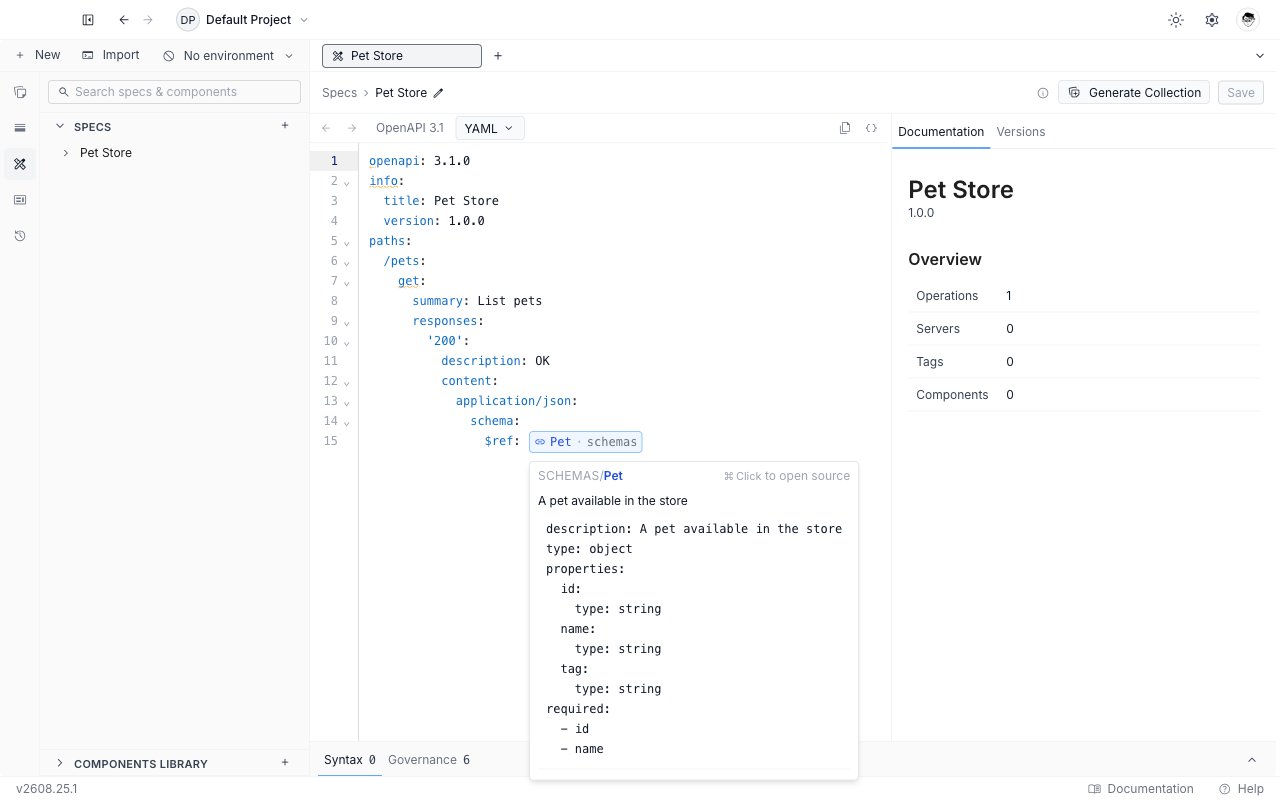
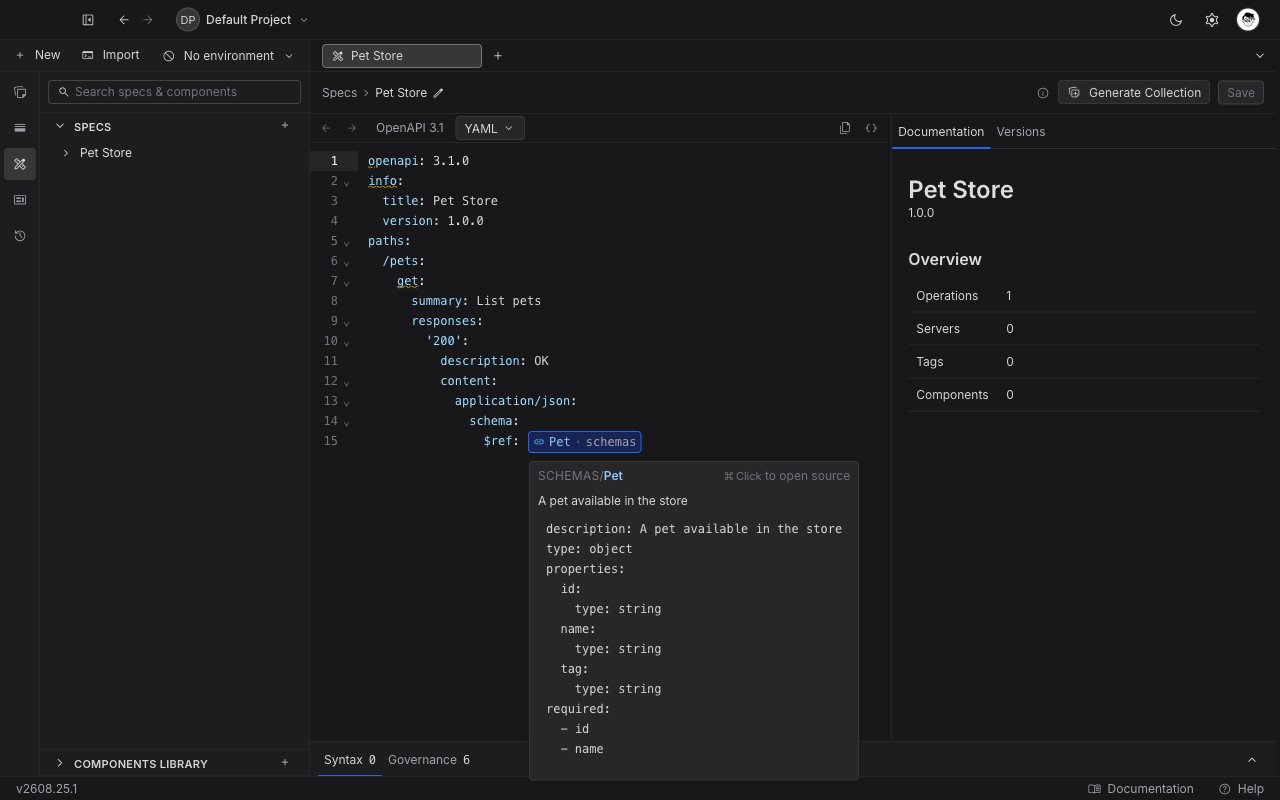 `Cmd/Ctrl + click` a reference to follow it:
* A **library** reference opens that component in its own tab.
* An **in-spec** reference scrolls this document to the definition.
In-spec references stay as plain text rather than becoming chips. `#/components/schemas/Error` is already short and tells you where the definition lives, and hiding it behind a chip would take that away. Either way, the toolbar's back arrow returns you to the line you followed the reference from.
## Read the documentation preview
The rail on the right renders the current selection as documentation: the operation's parameters, request body, and per-status responses, or a component's schema as an expandable tree. References inside the rail are resolved and expanded in place, so you read the real shape instead of a pointer.
The rail is a preview, not a second editor. Clicking around in it never changes what the document says.
`Cmd/Ctrl + click` a reference to follow it:
* A **library** reference opens that component in its own tab.
* An **in-spec** reference scrolls this document to the definition.
In-spec references stay as plain text rather than becoming chips. `#/components/schemas/Error` is already short and tells you where the definition lives, and hiding it behind a chip would take that away. Either way, the toolbar's back arrow returns you to the line you followed the reference from.
## Read the documentation preview
The rail on the right renders the current selection as documentation: the operation's parameters, request body, and per-status responses, or a component's schema as an expandable tree. References inside the rail are resolved and expanded in place, so you read the real shape instead of a pointer.
The rail is a preview, not a second editor. Clicking around in it never changes what the document says.
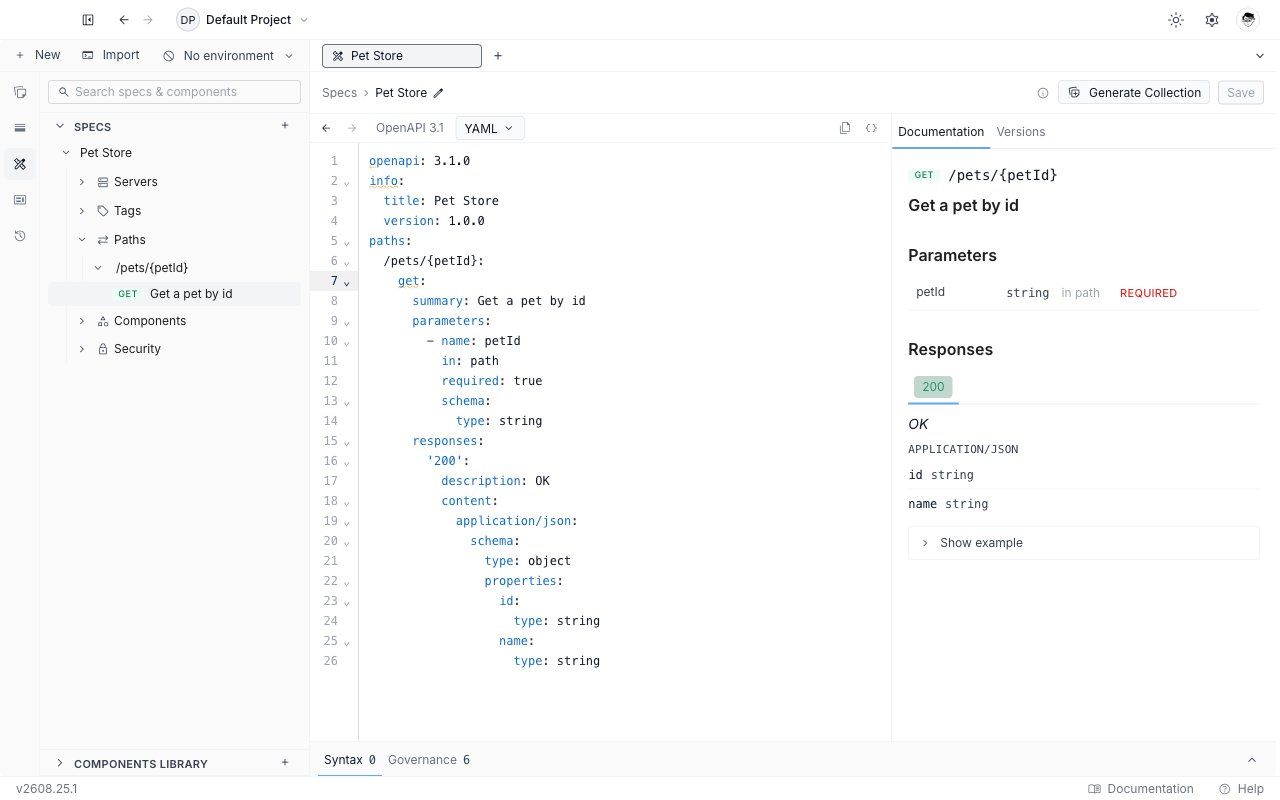
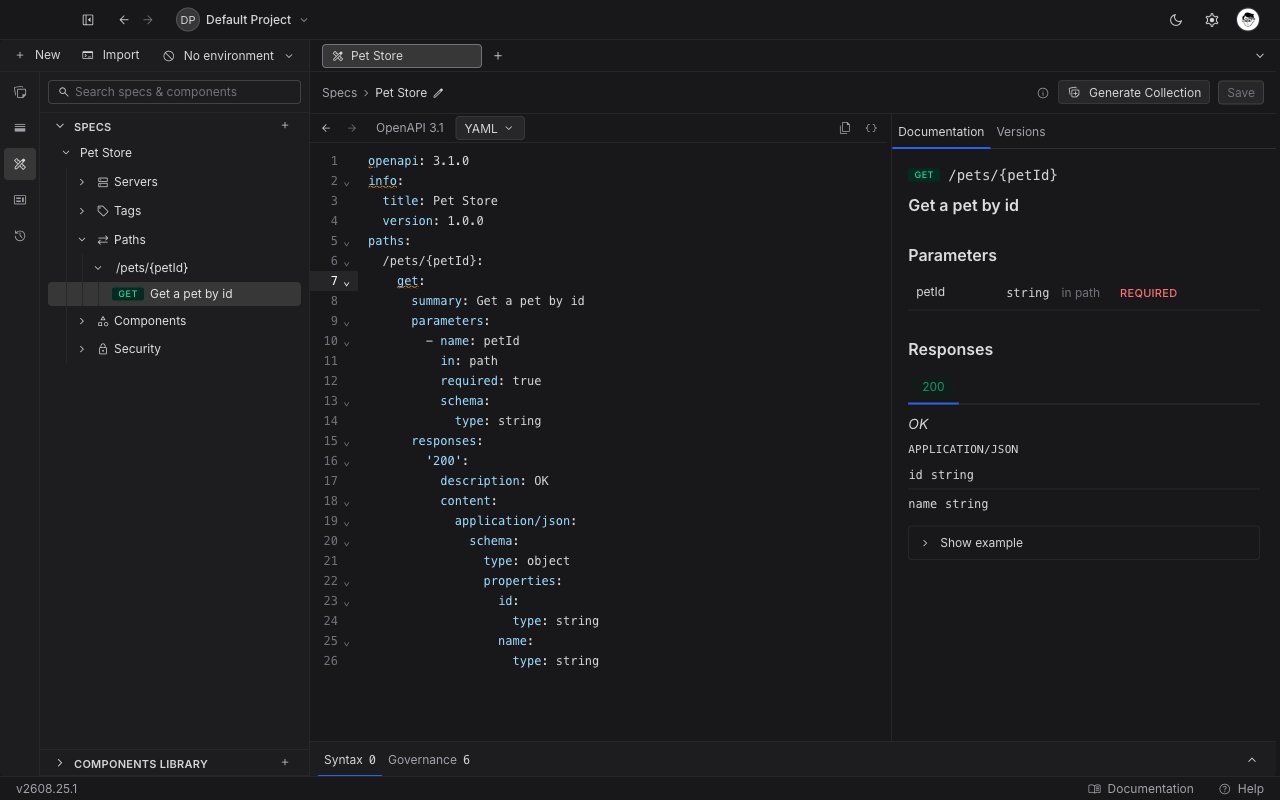 The rail also carries a **Versions** tab for the specification's releases, and on a team project a **Changelog** tab recording every save. Both are covered in [versions and releases](/api-client/api-design/versions-and-releases).
## Rename or delete a specification
Both live on the specification's row in the sidebar, under the `⋯` menu, and renaming is also available by clicking the name in the breadcrumb. A rename changes the specification's name in Requestly and, in a local project, the file it is stored in. It does not rewrite `info.title` inside the document, so update that yourself if you want the two to match.
Deleting asks for confirmation first and cannot be undone.
The rail also carries a **Versions** tab for the specification's releases, and on a team project a **Changelog** tab recording every save. Both are covered in [versions and releases](/api-client/api-design/versions-and-releases).
## Rename or delete a specification
Both live on the specification's row in the sidebar, under the `⋯` menu, and renaming is also available by clicking the name in the breadcrumb. A rename changes the specification's name in Requestly and, in a local project, the file it is stored in. It does not rewrite `info.title` inside the document, so update that yourself if you want the two to match.
Deleting asks for confirmation first and cannot be undone.