> ## Documentation Index
> Fetch the complete documentation index at: https://docs.requestly.com/llms.txt
> Use this file to discover all available pages before exploring further.
# Request Headers
> Learn how to configure HTTP headers for authentication, content types, and custom metadata in your API requests.
HTTP headers are key-value pairs that provide additional information about your request. They're essential for authentication, specifying content types, and sending custom metadata to the API.
## Understanding Headers
Headers serve multiple purposes in HTTP requests:
Pass tokens, API keys, or credentials to authenticate with the API
Tell the server what format your data is in (JSON, XML, etc.)
Specify what response format you expect from the server
Send additional information like user agent, tracking IDs, or custom flags
***
## Adding Headers
The **Headers** tab allows you to add Request Headers in your API request.
Each header consists of:
* **Key**: The header name (e.g., `Authorization`, `Content-Type`)
* **Value**: The header value
* **Description** (optional): Internal documentation to explain the purpose of this header
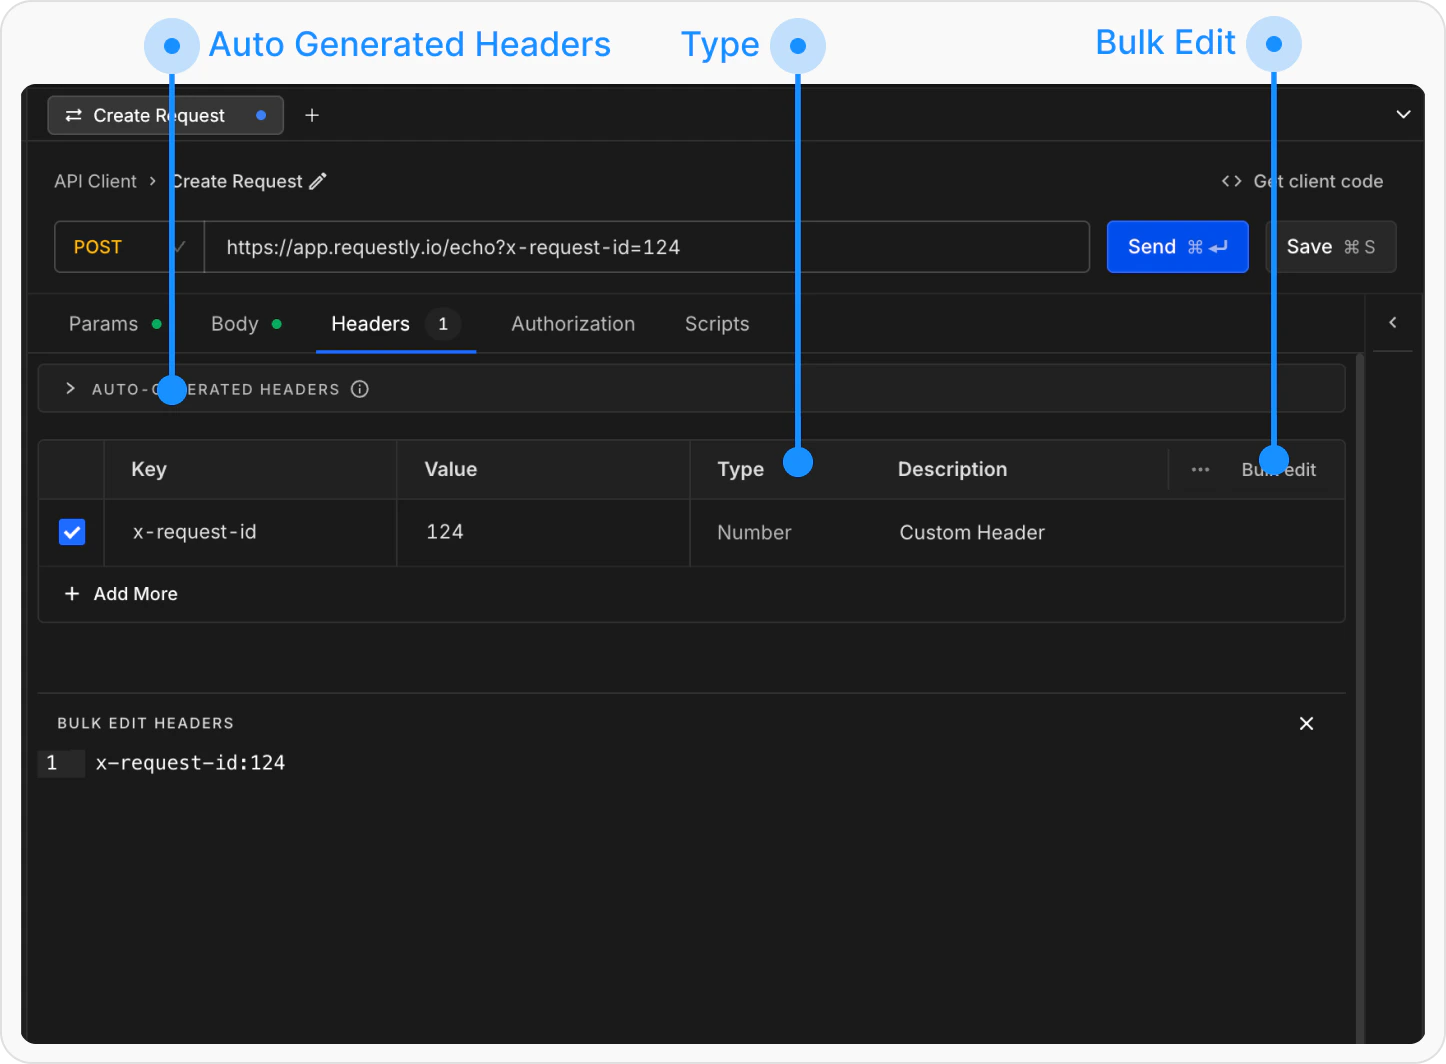 The checkboxes next to each header let you include or exclude them without deleting them. This is useful for testing with and without certain headers.
### Bulk Edit Headers
You can also manage headers using **Bulk Edit**. This allows you to add or update multiple headers at once in a `key:value` format.
**How to use:**
1. Click the **Bulk Edit** button in the Headers tab
2. Add one header per line
3. Separate keys and values using a colon `:`
4. Prefix any line with `//` to disable that header
**Example:**
```
Content-Type:application/json
Authorization:Bearer {{token}}
X-API-Version:v2
// X-Debug:true
```
Bulk Edit is especially useful when copying headers from documentation or sharing with team members.
## Using Variables in Headers
You can use variables in header values to make them dynamic:
```
Key: Authorization
Value: Bearer {{authToken}}
```
Learn more about using variables in [Variables and Environments](/api-client/environments-and-variables).
## Header Inheritance
Headers can be inherited from collections, making it easy to apply common headers across multiple requests:
**Collection-Level Headers** → **Request-Level Headers** → **Authorization Tab**
* **Collection-Level Headers**: Set headers at the collection level to apply them to all requests in that collection.
* **Request-Level Headers**: Override collection-level headers with the same key. Request-level headers have the highest priority.
* **Authorization Tab**: Headers set in the Authorization tab are applied in addition to manual headers and do not override them.
Headers are resolved from most-specific to least-specific. Request-level headers always win over collection-level headers when both define the same key.
## What's Next?
Use the Authorization tab for easier authentication setup
Dynamically generate headers with pre-request scripts
Learn how to use variables in headers
The checkboxes next to each header let you include or exclude them without deleting them. This is useful for testing with and without certain headers.
### Bulk Edit Headers
You can also manage headers using **Bulk Edit**. This allows you to add or update multiple headers at once in a `key:value` format.
**How to use:**
1. Click the **Bulk Edit** button in the Headers tab
2. Add one header per line
3. Separate keys and values using a colon `:`
4. Prefix any line with `//` to disable that header
**Example:**
```
Content-Type:application/json
Authorization:Bearer {{token}}
X-API-Version:v2
// X-Debug:true
```
Bulk Edit is especially useful when copying headers from documentation or sharing with team members.
## Using Variables in Headers
You can use variables in header values to make them dynamic:
```
Key: Authorization
Value: Bearer {{authToken}}
```
Learn more about using variables in [Variables and Environments](/api-client/environments-and-variables).
## Header Inheritance
Headers can be inherited from collections, making it easy to apply common headers across multiple requests:
**Collection-Level Headers** → **Request-Level Headers** → **Authorization Tab**
* **Collection-Level Headers**: Set headers at the collection level to apply them to all requests in that collection.
* **Request-Level Headers**: Override collection-level headers with the same key. Request-level headers have the highest priority.
* **Authorization Tab**: Headers set in the Authorization tab are applied in addition to manual headers and do not override them.
Headers are resolved from most-specific to least-specific. Request-level headers always win over collection-level headers when both define the same key.
## What's Next?
Use the Authorization tab for easier authentication setup
Dynamically generate headers with pre-request scripts
Learn how to use variables in headers