> ## Documentation Index
> Fetch the complete documentation index at: https://docs.requestly.com/llms.txt
> Use this file to discover all available pages before exploring further.
# MQTT Request
> Connect to an MQTT broker in Requestly, publish messages, subscribe to topic filters, and read the live message timeline.
MQTT is a lightweight publish/subscribe protocol used by IoT fleets, telemetry pipelines, and anything else that keeps one long-lived connection open instead of sending a request at a time. In Requestly you connect to a broker once, then publish messages to topics and subscribe to topic filters while that session stays open. Everything that leaves or arrives lands in a live message timeline beside the editor.
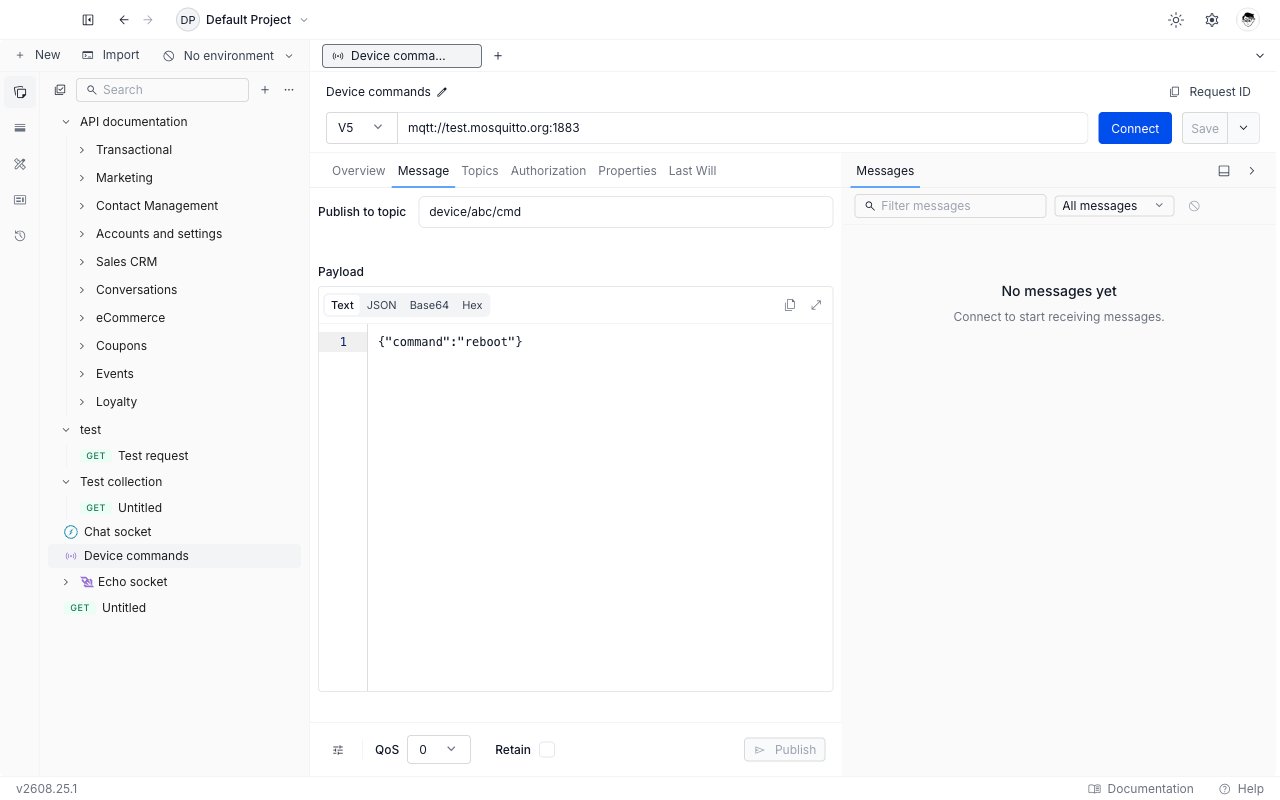
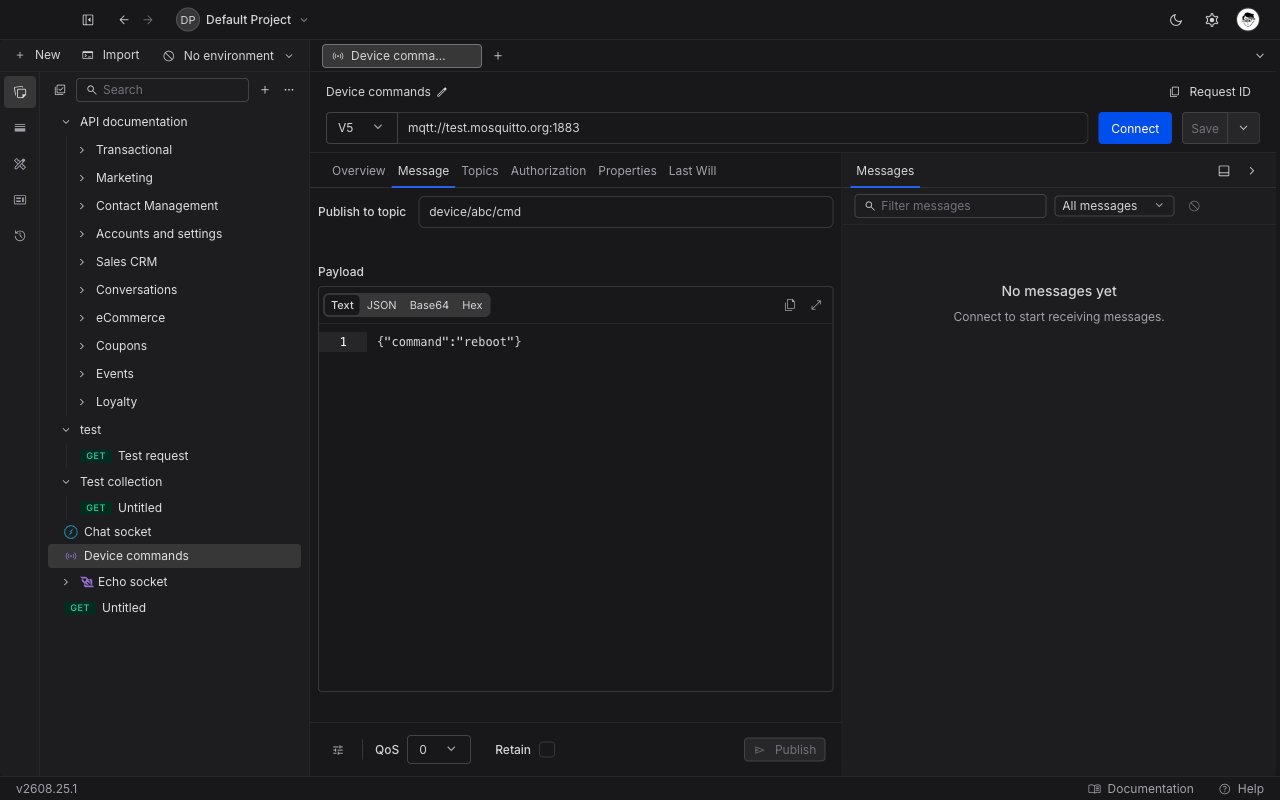 **Availability:** MQTT connections open from the **Requestly Desktop App**. In the web app you can create, edit, and save an MQTT request, but **Connect** is disabled with the note "This protocol requires the desktop app."
## Create an MQTT request
Click `+ New` and select **MQTT request**. You can also click the **+** on a collection in the sidebar and choose **MQTT Request** to create it directly inside that collection.
Type your broker address into the URL bar. Requestly connects over four transports:
| Scheme | Transport |
| ---------- | ---------------------------- |
| `mqtt://` | MQTT over plain TCP |
| `mqtts://` | MQTT over TLS |
| `ws://` | MQTT over WebSocket |
| `wss://` | MQTT over WebSocket with TLS |
A public test broker is handy while you are getting your bearings:
```text theme={null}
mqtt://test.mosquitto.org:1883
```
If you type a host with no scheme, Requestly adds `mqtt://` when you leave the field and nudges you to switch to `mqtts://` if you want TLS. An unsupported scheme or a port outside 1 to 65535 shows an inline error and keeps **Connect** disabled.
Use the version selector to the left of the URL bar. **V5** is MQTT 5.0 and is the default for a new request; **V3** is MQTT 3.1.1.
Click **Connect**. A status dot appears at the right edge of the URL bar (amber while connecting, green once connected, red on failure), the button turns into **Disconnect**, and the timeline records a **Connected** entry.
Click **Save**. The request is stored in your project and appears in the collection tree with a signal icon rather than an HTTP method badge, so you can spot MQTT requests at a glance.
Press `Cmd`/`Ctrl` + `Enter` to connect when you are disconnected, and to publish the current message once you are connected. Disconnecting is always a deliberate click on the URL bar button.
## Use variables in the broker URL
The URL bar accepts `{{variables}}` from your environment and collection scopes, including a bare placeholder that holds the whole address:
```text theme={null}
{{brokerUrl}}
```
Requestly leaves a placeholder like that unvalidated and resolves it when you connect, so a single variable can point every request at a staging or production broker. Variables also resolve in publish topics, message payloads, topic filters, and the Authorization fields at the moment you send.
## What locks while you are connected
The broker URL, the protocol version, and the **Authorization**, **Properties**, and **Last Will** tabs are all fixed at the moment of the handshake. While a session is live those fields go read-only and each of the three tabs shows a banner naming the broker you are connected to. Click **Disconnect**, change what you need, and connect again.
The **Message** and **Topics** tabs stay editable throughout, because publishing and subscribing are exactly what a live session is for.
## The editor tabs
An MQTT request opens on **Message**. Alongside it are **Topics**, **Authorization**, **Properties** (on MQTT 5.0 only), and **Last Will**, plus an **Overview** tab where you can write a description of the request for your team.
### Message
The Message tab is where you compose and send a single publish.
Enter the topic in **Publish to topic**, for example `device/abc/cmd`. Publish topics must be exact: the `+` and `#` wildcards belong in subscribe filters, and Requestly flags them here with an inline error.
Type the message body into the **Payload** editor and pick how you are entering it: **Text**, **JSON**, **Base64**, or **Hex**. Requestly validates Base64 and Hex as you type and converts them to bytes when it sends.
Set the delivery guarantee with **QoS** (`0` at most once, `1` at least once, `2` exactly once) and tick **Retain** if you want the broker to hold the message as the topic's last known value for future subscribers.
Click **Publish**. The button is enabled only while you are connected and the topic and payload are valid. The message appears in the timeline with an up arrow, and its status dot fills in once the broker acknowledges it.
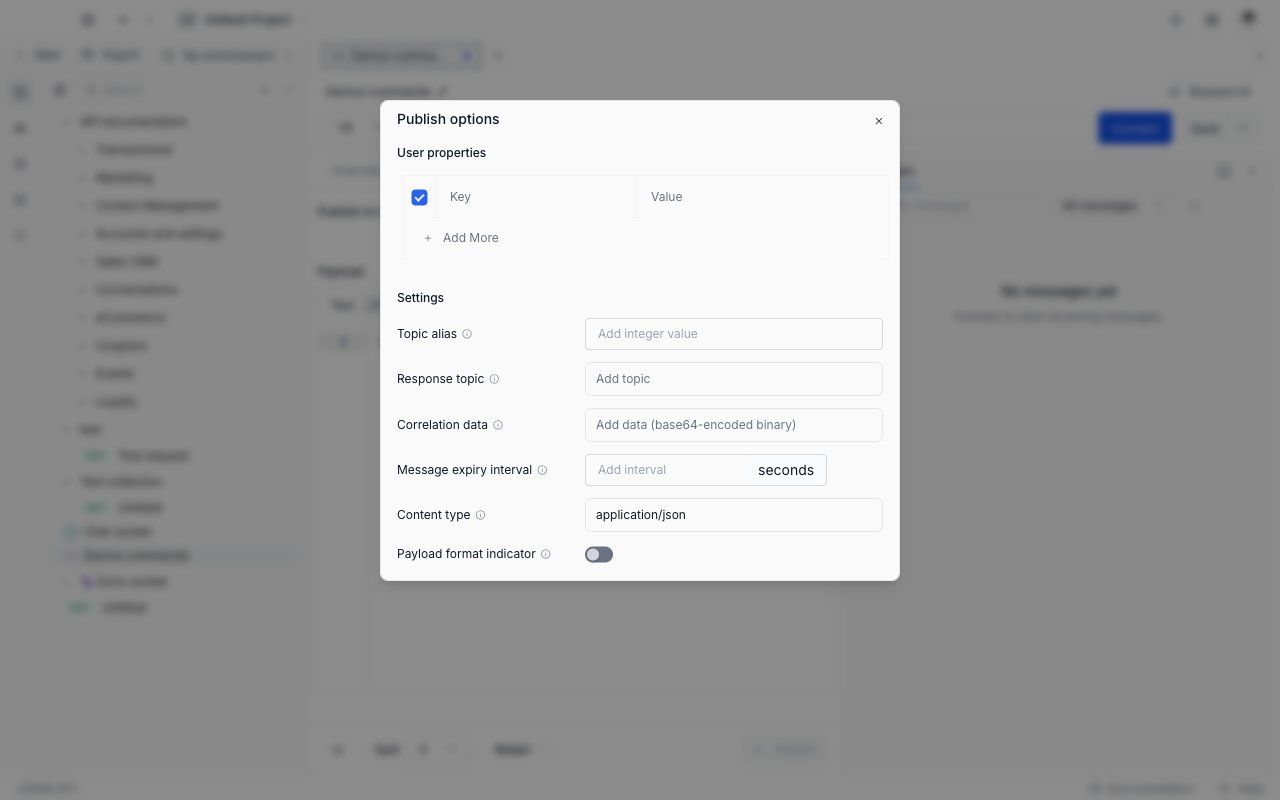
On MQTT 5.0 the tune icon at the bottom left of the tab opens **Publish options**, which carries the 5.0 message properties:
* **Topic alias** replaces a repeated topic string with a small integer to shrink packets.
* **Response topic** and **Correlation data** together let you do request/response over pub/sub.
* **Message expiry interval** tells the broker how long to keep trying to deliver.
* **Content type** labels the payload, for example `application/json`.
* **Payload format indicator** flags the payload as UTF-8 text rather than opaque bytes.
* **User properties** attach arbitrary key/value metadata to the message.
**Availability:** MQTT connections open from the **Requestly Desktop App**. In the web app you can create, edit, and save an MQTT request, but **Connect** is disabled with the note "This protocol requires the desktop app."
## Create an MQTT request
Click `+ New` and select **MQTT request**. You can also click the **+** on a collection in the sidebar and choose **MQTT Request** to create it directly inside that collection.
Type your broker address into the URL bar. Requestly connects over four transports:
| Scheme | Transport |
| ---------- | ---------------------------- |
| `mqtt://` | MQTT over plain TCP |
| `mqtts://` | MQTT over TLS |
| `ws://` | MQTT over WebSocket |
| `wss://` | MQTT over WebSocket with TLS |
A public test broker is handy while you are getting your bearings:
```text theme={null}
mqtt://test.mosquitto.org:1883
```
If you type a host with no scheme, Requestly adds `mqtt://` when you leave the field and nudges you to switch to `mqtts://` if you want TLS. An unsupported scheme or a port outside 1 to 65535 shows an inline error and keeps **Connect** disabled.
Use the version selector to the left of the URL bar. **V5** is MQTT 5.0 and is the default for a new request; **V3** is MQTT 3.1.1.
Click **Connect**. A status dot appears at the right edge of the URL bar (amber while connecting, green once connected, red on failure), the button turns into **Disconnect**, and the timeline records a **Connected** entry.
Click **Save**. The request is stored in your project and appears in the collection tree with a signal icon rather than an HTTP method badge, so you can spot MQTT requests at a glance.
Press `Cmd`/`Ctrl` + `Enter` to connect when you are disconnected, and to publish the current message once you are connected. Disconnecting is always a deliberate click on the URL bar button.
## Use variables in the broker URL
The URL bar accepts `{{variables}}` from your environment and collection scopes, including a bare placeholder that holds the whole address:
```text theme={null}
{{brokerUrl}}
```
Requestly leaves a placeholder like that unvalidated and resolves it when you connect, so a single variable can point every request at a staging or production broker. Variables also resolve in publish topics, message payloads, topic filters, and the Authorization fields at the moment you send.
## What locks while you are connected
The broker URL, the protocol version, and the **Authorization**, **Properties**, and **Last Will** tabs are all fixed at the moment of the handshake. While a session is live those fields go read-only and each of the three tabs shows a banner naming the broker you are connected to. Click **Disconnect**, change what you need, and connect again.
The **Message** and **Topics** tabs stay editable throughout, because publishing and subscribing are exactly what a live session is for.
## The editor tabs
An MQTT request opens on **Message**. Alongside it are **Topics**, **Authorization**, **Properties** (on MQTT 5.0 only), and **Last Will**, plus an **Overview** tab where you can write a description of the request for your team.
### Message
The Message tab is where you compose and send a single publish.
Enter the topic in **Publish to topic**, for example `device/abc/cmd`. Publish topics must be exact: the `+` and `#` wildcards belong in subscribe filters, and Requestly flags them here with an inline error.
Type the message body into the **Payload** editor and pick how you are entering it: **Text**, **JSON**, **Base64**, or **Hex**. Requestly validates Base64 and Hex as you type and converts them to bytes when it sends.
Set the delivery guarantee with **QoS** (`0` at most once, `1` at least once, `2` exactly once) and tick **Retain** if you want the broker to hold the message as the topic's last known value for future subscribers.
Click **Publish**. The button is enabled only while you are connected and the topic and payload are valid. The message appears in the timeline with an up arrow, and its status dot fills in once the broker acknowledges it.
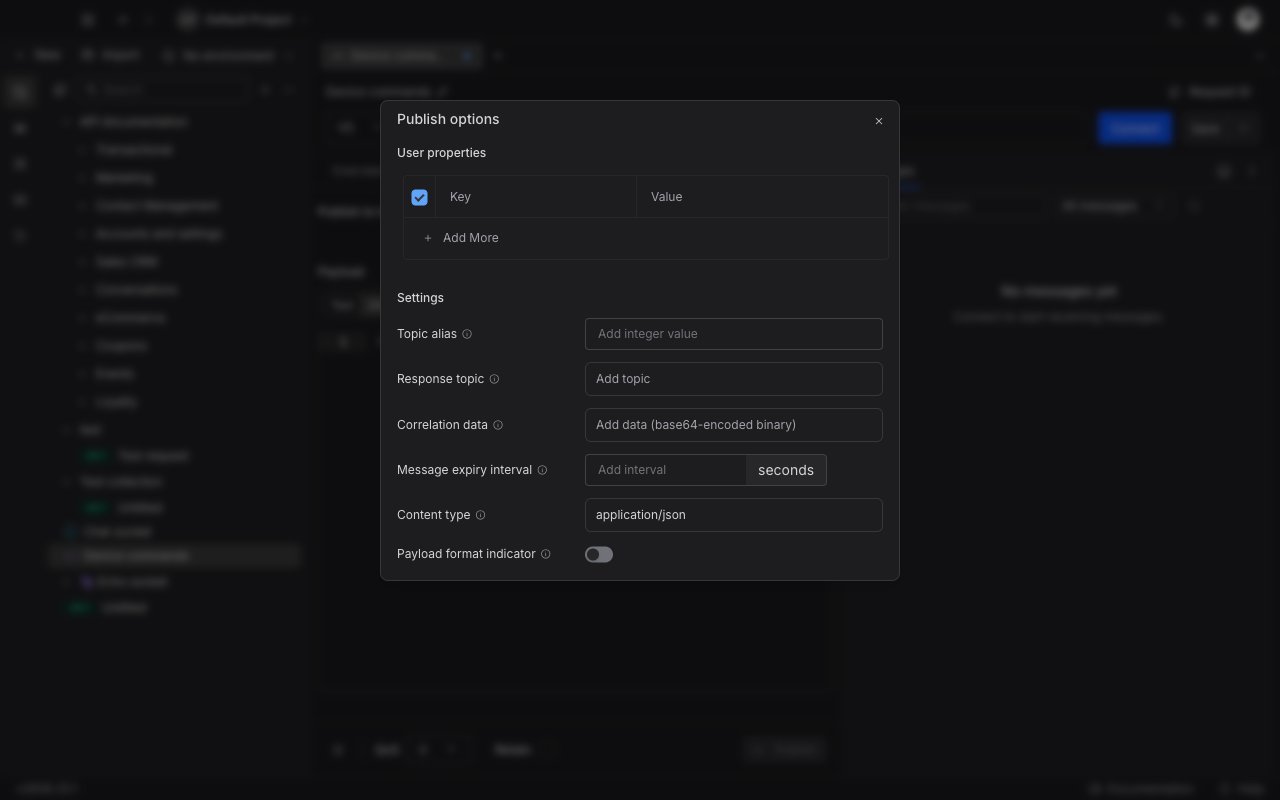
On MQTT 5.0 the tune icon at the bottom left of the tab opens **Publish options**, which carries the 5.0 message properties:
* **Topic alias** replaces a repeated topic string with a small integer to shrink packets.
* **Response topic** and **Correlation data** together let you do request/response over pub/sub.
* **Message expiry interval** tells the broker how long to keep trying to deliver.
* **Content type** labels the payload, for example `application/json`.
* **Payload format indicator** flags the payload as UTF-8 text rather than opaque bytes.
* **User properties** attach arbitrary key/value metadata to the message.
 ### Topics
The Topics tab holds the subscriptions that belong to this request. Each row is one topic filter with its own QoS, an optional description, and a **Subscribe** toggle.
Click **Add topic** and enter a filter. Wildcards are allowed here: `+` matches one level (`sensor/+/temperature`) and `#` matches everything below a level (`sensor/#`).
Pick the QoS you want the broker to grant for this filter. Once the subscription is live, the status dot's tooltip tells you the QoS the broker actually granted, which can be lower than the one you asked for.
Flip **Subscribe**. If you are already connected, Requestly sends the subscription right away. If you are not, the row waits and shows a "queued" dot, then subscribes as soon as you connect.
### Topics
The Topics tab holds the subscriptions that belong to this request. Each row is one topic filter with its own QoS, an optional description, and a **Subscribe** toggle.
Click **Add topic** and enter a filter. Wildcards are allowed here: `+` matches one level (`sensor/+/temperature`) and `#` matches everything below a level (`sensor/#`).
Pick the QoS you want the broker to grant for this filter. Once the subscription is live, the status dot's tooltip tells you the QoS the broker actually granted, which can be lower than the one you asked for.
Flip **Subscribe**. If you are already connected, Requestly sends the subscription right away. If you are not, the row waits and shows a "queued" dot, then subscribes as soon as you connect.
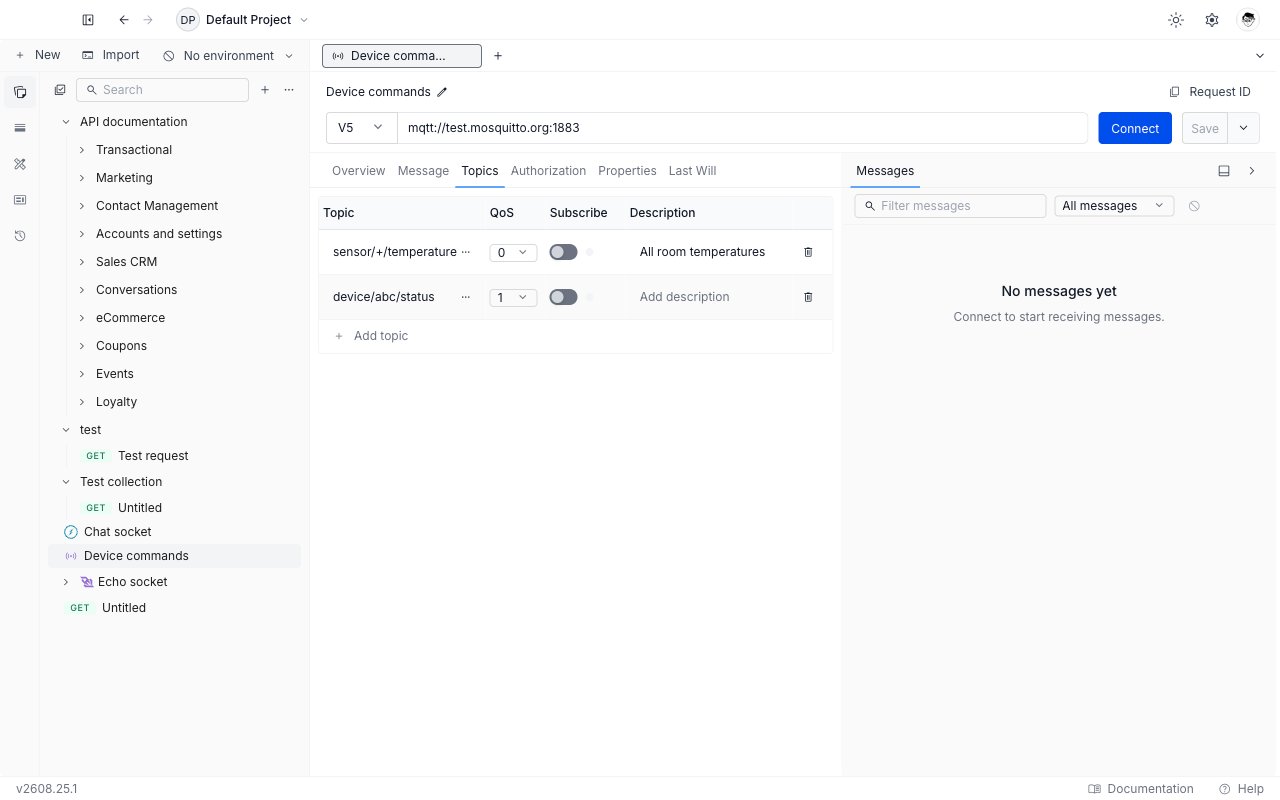
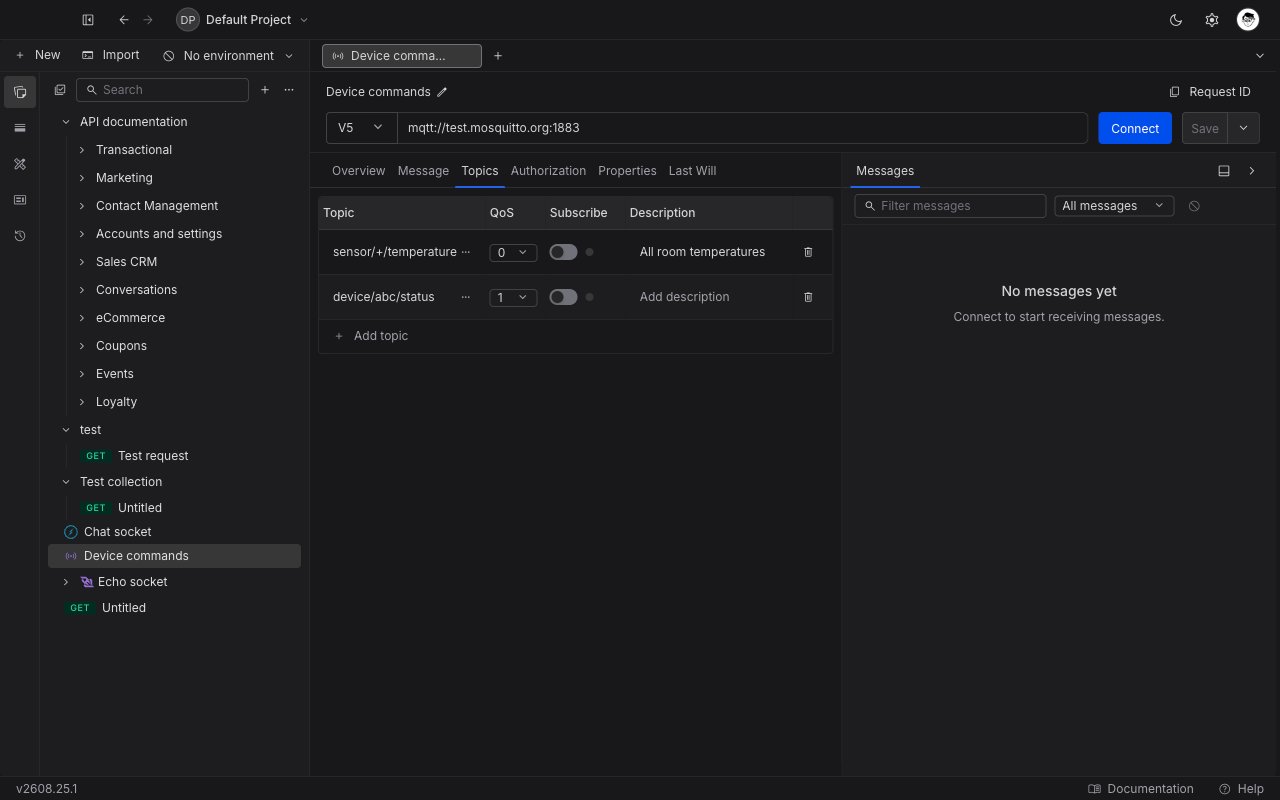 The dot beside each toggle is the row's live state: grey for not subscribed, amber while the subscribe or unsubscribe is in flight or queued, green once the broker has granted it, and red if the broker rejected it. A red dot is clickable, so a rejected subscription can be retried in place.
Your subscriptions are saved with the request, so they survive a reload, a tab switch, and a reconnect. On every reconnect Requestly reconciles: rows you left switched on are subscribed again, and rows that are already live are skipped, so reconnecting does not stack up duplicate subscriptions on the broker. Editing a row's filter, QoS, or description is blocked while that row is live on the broker, since the broker holds the values that are actually in effect. Toggle the row off to edit it.
If two rows end up with the same filter, Requestly marks the earlier one with a warning icon, switches it off, and keeps the newest row as the live subscription.
On MQTT 5.0, the `...` button at the right of a topic row opens **Subscription options** for that single filter: a **Subscription identifier** the broker echoes back on matching messages, per-filter **User properties**, **Filter local messages** (so the broker does not send you back your own publishes), **Retain as published**, and **Retain handling** (whether retained messages arrive when you subscribe).
### Authorization
MQTT requests authenticate with a username and password on connect. Choose **Basic auth** and fill in the two fields, or leave the tab on **Inherit** to use the authorization configured on the parent collection. Both fields accept `{{variables}}`, so credentials can come from an environment rather than being typed into the request.
Those are the two options an MQTT connect supports. If the request inherits a different authorization type from its collection, the tab tells you that the connect will be sent without authentication and asks you to switch to **Basic auth**.
### Properties
The **Properties** tab carries **User properties** for the connection itself: key/value metadata sent with the connect packet, which brokers commonly use for tenant tags, client metadata, or routing hints.
This tab exists only on MQTT 5.0. User properties are a 5.0 feature, so switching a request to **V3** removes the tab entirely, and if Properties was the tab you were on, the editor drops you back to **Message**.
Switching from V5 to V3 hides the Properties tab and every 5.0-only option, and those values are not sent to a 3.1.1 broker. They are kept on the request, so switching back to V5 brings them into view again.
### Last Will
A Last Will is the message you want the broker to publish on your behalf if your connection drops without a clean disconnect, which is how a fleet learns that a device went offline.
The tab starts empty. Click **Configure Last Will**, then set the **Will topic**, the **Will message** (with the same Text, JSON, Base64, and Hex modes as a publish payload), **Will QoS**, and **Will retain**. **Remove Will** clears it again.
On MQTT 5.0 the tune icon opens **Will options**, which adds a **Will delay interval**: the number of seconds the broker waits after your client disconnects before publishing the Will, so a brief reconnect can suppress it entirely. The same 5.0 message properties available on a publish apply here too.
A Last Will with an empty topic counts as not configured and is left out of the connect entirely.
## Read the message timeline
The panel to the right of the editor is the live record of the session, newest entry first. It carries three kinds of row:
* **Messages you published**, marked with an up arrow and a status dot that fills in when the broker acknowledges the publish.
* **Messages you received**, marked with a down arrow, on any topic you are subscribed to.
* **Connection and subscription events**: connected, server disconnect, and each subscribe or unsubscribe acknowledgement, including the broker's reason when it rejects one.
The dot beside each toggle is the row's live state: grey for not subscribed, amber while the subscribe or unsubscribe is in flight or queued, green once the broker has granted it, and red if the broker rejected it. A red dot is clickable, so a rejected subscription can be retried in place.
Your subscriptions are saved with the request, so they survive a reload, a tab switch, and a reconnect. On every reconnect Requestly reconciles: rows you left switched on are subscribed again, and rows that are already live are skipped, so reconnecting does not stack up duplicate subscriptions on the broker. Editing a row's filter, QoS, or description is blocked while that row is live on the broker, since the broker holds the values that are actually in effect. Toggle the row off to edit it.
If two rows end up with the same filter, Requestly marks the earlier one with a warning icon, switches it off, and keeps the newest row as the live subscription.
On MQTT 5.0, the `...` button at the right of a topic row opens **Subscription options** for that single filter: a **Subscription identifier** the broker echoes back on matching messages, per-filter **User properties**, **Filter local messages** (so the broker does not send you back your own publishes), **Retain as published**, and **Retain handling** (whether retained messages arrive when you subscribe).
### Authorization
MQTT requests authenticate with a username and password on connect. Choose **Basic auth** and fill in the two fields, or leave the tab on **Inherit** to use the authorization configured on the parent collection. Both fields accept `{{variables}}`, so credentials can come from an environment rather than being typed into the request.
Those are the two options an MQTT connect supports. If the request inherits a different authorization type from its collection, the tab tells you that the connect will be sent without authentication and asks you to switch to **Basic auth**.
### Properties
The **Properties** tab carries **User properties** for the connection itself: key/value metadata sent with the connect packet, which brokers commonly use for tenant tags, client metadata, or routing hints.
This tab exists only on MQTT 5.0. User properties are a 5.0 feature, so switching a request to **V3** removes the tab entirely, and if Properties was the tab you were on, the editor drops you back to **Message**.
Switching from V5 to V3 hides the Properties tab and every 5.0-only option, and those values are not sent to a 3.1.1 broker. They are kept on the request, so switching back to V5 brings them into view again.
### Last Will
A Last Will is the message you want the broker to publish on your behalf if your connection drops without a clean disconnect, which is how a fleet learns that a device went offline.
The tab starts empty. Click **Configure Last Will**, then set the **Will topic**, the **Will message** (with the same Text, JSON, Base64, and Hex modes as a publish payload), **Will QoS**, and **Will retain**. **Remove Will** clears it again.
On MQTT 5.0 the tune icon opens **Will options**, which adds a **Will delay interval**: the number of seconds the broker waits after your client disconnects before publishing the Will, so a brief reconnect can suppress it entirely. The same 5.0 message properties available on a publish apply here too.
A Last Will with an empty topic counts as not configured and is left out of the connect entirely.
## Read the message timeline
The panel to the right of the editor is the live record of the session, newest entry first. It carries three kinds of row:
* **Messages you published**, marked with an up arrow and a status dot that fills in when the broker acknowledges the publish.
* **Messages you received**, marked with a down arrow, on any topic you are subscribed to.
* **Connection and subscription events**: connected, server disconnect, and each subscribe or unsubscribe acknowledgement, including the broker's reason when it rejects one.
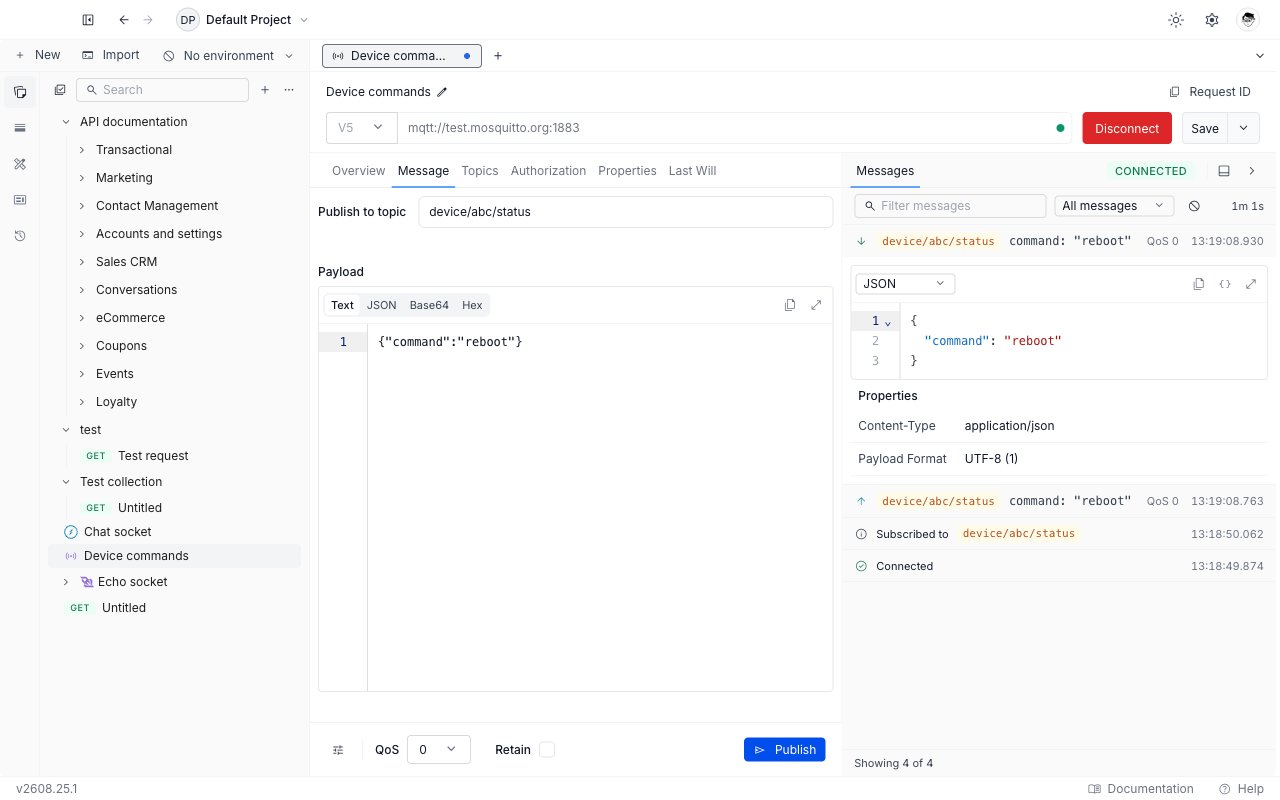
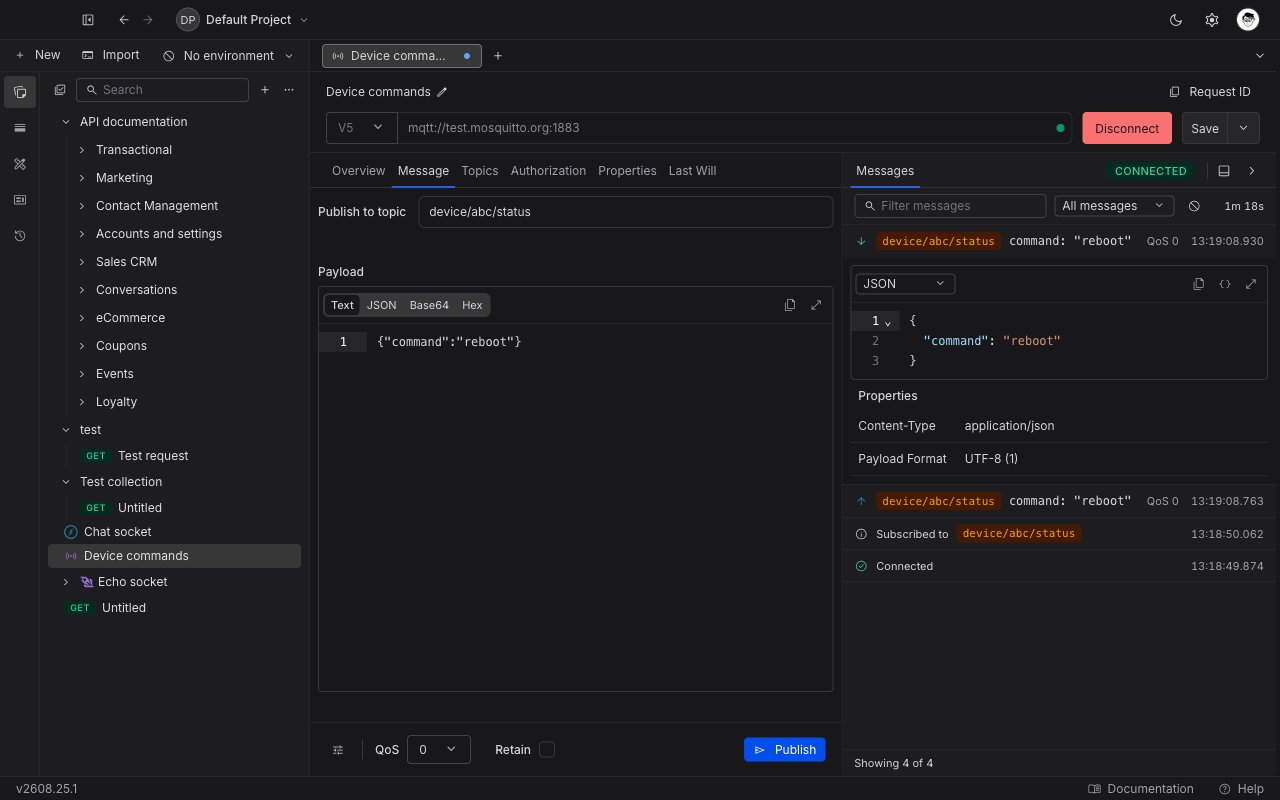 Every row shows the topic, a one-line payload preview, the QoS, and a millisecond timestamp. A lock icon marks a message that carried the retain flag. The panel header shows the connection status and, while connected, how long the session has been up. You can move the panel to the bottom of the editor or collapse it out of the way.
### Filter and search
The filter bar above the list narrows what you see. Type into the **Filter messages** box to match on topic, payload, or the text of an event, and use the dropdown to show **All messages**, only **Received**, only **Sent**, or only **Others** (the connection and subscription events). The two combine, and a counter at the foot of the list tells you how many of the total entries are showing. The clear button empties the timeline.
Requestly keeps the most recent 10,000 entries rather than growing without bound. When a long-running session passes the cap, the oldest entries are dropped and the counter reports how many were evicted.
### Expand a message
Click a published or received message to open it. The expanded row shows:
* **The payload**, in a read-only editor with its own **Text**, **JSON**, **Base64**, and **Hex** switcher. Requestly inspects the actual bytes to pick the opening format, so a JSON payload opens as JSON, plain text as text, and anything that is not valid UTF-8 opens as Base64 with its size. On MQTT 5.0 a `Content-Type` of `application/json` refines that guess. Switching formats re-decodes the same bytes, so you can read a binary payload as Hex without touching the message.
* **A Retain marker** in the editor header when the message carried the retain flag.
* **MQTT 5.0 properties** the message arrived with or was sent with: Content-Type, Response Topic, Correlation Data, Message Expiry, Topic Alias, Payload Format, the Subscription Id the broker matched, and any User Properties. MQTT 3.1.1 messages never carry properties, so nothing is shown for them.
* **A failure banner** if the broker rejected your publish, with the reason in plain language.
Because MQTT shows a message timeline rather than a single response body, the action that turns a response value into a variable is not available on MQTT requests.
## Save and reuse MQTT examples
An example is a saved snapshot of an MQTT request's configuration: the broker URL, the protocol version, the subscriptions, the publish message, the authorization, the properties, and the Last Will. Use them to keep a set of named scenarios (a staging broker, a malformed payload, a QoS 2 publish) beside the request they belong to. Examples work on both cloud projects and local projects.
With the MQTT request saved, open the dropdown next to **Save** and choose **Save as example**. You can also right-click the request in the sidebar and choose **Add Example**. The example opens in its own tab and appears in the sidebar underneath its parent request.
An example opens on the same tabs as the request, bound to the snapshot instead of the live request. Change whatever you need and click **Save**.
An example holds no broker session of its own, so its primary button is **Try It** rather than **Connect**. Clicking it opens a new draft MQTT request pre-filled from the example, and you connect, publish, and subscribe there.
Because an MQTT session is a stream of messages rather than one response, an MQTT example stores the request side only. There is no captured response attached to it. For the general behaviour of examples, see [Request Examples](/api-client/examples).
## Import and export MQTT requests
MQTT requests round-trip through Requestly's own export format. Export a collection to a `.json` file and its MQTT requests, their subscriptions, publish messages, Last Wills, MQTT 5.0 properties, and their examples all travel with it. Import that file into another project or onto another machine and they come back intact. The steps are the same as for any collection: see [Import / Export Collections](/api-client/import-export/import-export-api-collections).
Other formats have no vocabulary for MQTT. Exporting a collection to Postman's format skips MQTT requests and lists them among the skipped items, so use Requestly's own format when MQTT requests need to come along.
## MQTT requests in the Collection Runner
The [Collection Runner](/api-client/collection-runner) runs a collection's requests in sequence. You can select an MQTT request in the run order and it appears with an **MQTT** badge, but it does not connect: the runner executes one request at a time and waits for it to finish, which a long-lived broker session never does.
Each MQTT request in a run is recorded as **skipped**, with the reason shown on the result row reading "not supported in runner". Skipped requests are counted in the run summary and listed under the **Skipped** tab, so a run stays green and you can see exactly what was left out. Connect to brokers from the request editor instead.
Scheduled Runs behave the same way. See [Scheduled Runs](/api-client/scheduled-runs).
## What's next?
Point one request at different brokers with environment and collection variables
Group MQTT requests with the rest of the APIs they belong to
Keep named MQTT scenarios beside the request they belong to
Every row shows the topic, a one-line payload preview, the QoS, and a millisecond timestamp. A lock icon marks a message that carried the retain flag. The panel header shows the connection status and, while connected, how long the session has been up. You can move the panel to the bottom of the editor or collapse it out of the way.
### Filter and search
The filter bar above the list narrows what you see. Type into the **Filter messages** box to match on topic, payload, or the text of an event, and use the dropdown to show **All messages**, only **Received**, only **Sent**, or only **Others** (the connection and subscription events). The two combine, and a counter at the foot of the list tells you how many of the total entries are showing. The clear button empties the timeline.
Requestly keeps the most recent 10,000 entries rather than growing without bound. When a long-running session passes the cap, the oldest entries are dropped and the counter reports how many were evicted.
### Expand a message
Click a published or received message to open it. The expanded row shows:
* **The payload**, in a read-only editor with its own **Text**, **JSON**, **Base64**, and **Hex** switcher. Requestly inspects the actual bytes to pick the opening format, so a JSON payload opens as JSON, plain text as text, and anything that is not valid UTF-8 opens as Base64 with its size. On MQTT 5.0 a `Content-Type` of `application/json` refines that guess. Switching formats re-decodes the same bytes, so you can read a binary payload as Hex without touching the message.
* **A Retain marker** in the editor header when the message carried the retain flag.
* **MQTT 5.0 properties** the message arrived with or was sent with: Content-Type, Response Topic, Correlation Data, Message Expiry, Topic Alias, Payload Format, the Subscription Id the broker matched, and any User Properties. MQTT 3.1.1 messages never carry properties, so nothing is shown for them.
* **A failure banner** if the broker rejected your publish, with the reason in plain language.
Because MQTT shows a message timeline rather than a single response body, the action that turns a response value into a variable is not available on MQTT requests.
## Save and reuse MQTT examples
An example is a saved snapshot of an MQTT request's configuration: the broker URL, the protocol version, the subscriptions, the publish message, the authorization, the properties, and the Last Will. Use them to keep a set of named scenarios (a staging broker, a malformed payload, a QoS 2 publish) beside the request they belong to. Examples work on both cloud projects and local projects.
With the MQTT request saved, open the dropdown next to **Save** and choose **Save as example**. You can also right-click the request in the sidebar and choose **Add Example**. The example opens in its own tab and appears in the sidebar underneath its parent request.
An example opens on the same tabs as the request, bound to the snapshot instead of the live request. Change whatever you need and click **Save**.
An example holds no broker session of its own, so its primary button is **Try It** rather than **Connect**. Clicking it opens a new draft MQTT request pre-filled from the example, and you connect, publish, and subscribe there.
Because an MQTT session is a stream of messages rather than one response, an MQTT example stores the request side only. There is no captured response attached to it. For the general behaviour of examples, see [Request Examples](/api-client/examples).
## Import and export MQTT requests
MQTT requests round-trip through Requestly's own export format. Export a collection to a `.json` file and its MQTT requests, their subscriptions, publish messages, Last Wills, MQTT 5.0 properties, and their examples all travel with it. Import that file into another project or onto another machine and they come back intact. The steps are the same as for any collection: see [Import / Export Collections](/api-client/import-export/import-export-api-collections).
Other formats have no vocabulary for MQTT. Exporting a collection to Postman's format skips MQTT requests and lists them among the skipped items, so use Requestly's own format when MQTT requests need to come along.
## MQTT requests in the Collection Runner
The [Collection Runner](/api-client/collection-runner) runs a collection's requests in sequence. You can select an MQTT request in the run order and it appears with an **MQTT** badge, but it does not connect: the runner executes one request at a time and waits for it to finish, which a long-lived broker session never does.
Each MQTT request in a run is recorded as **skipped**, with the reason shown on the result row reading "not supported in runner". Skipped requests are counted in the run summary and listed under the **Skipped** tab, so a run stays green and you can see exactly what was left out. Connect to brokers from the request editor instead.
Scheduled Runs behave the same way. See [Scheduled Runs](/api-client/scheduled-runs).
## What's next?
Point one request at different brokers with environment and collection variables
Group MQTT requests with the rest of the APIs they belong to
Keep named MQTT scenarios beside the request they belong to