> ## Documentation Index
> Fetch the complete documentation index at: https://docs.requestly.com/llms.txt
> Use this file to discover all available pages before exploring further.
# WebSocket Request
> Open a WebSocket connection from Requestly, send and receive messages on a live timeline, and save reusable WebSocket requests in your collections.
A WebSocket connection stays open. Instead of sending one request and reading one response, you connect once and then exchange messages in both directions for as long as the connection lives. A WebSocket request in Requestly stores everything needed to open that connection (the URL, handshake headers, query params, authorization, and connection settings) plus the payloads you want to send, so you can reopen the same session tomorrow without retyping anything.
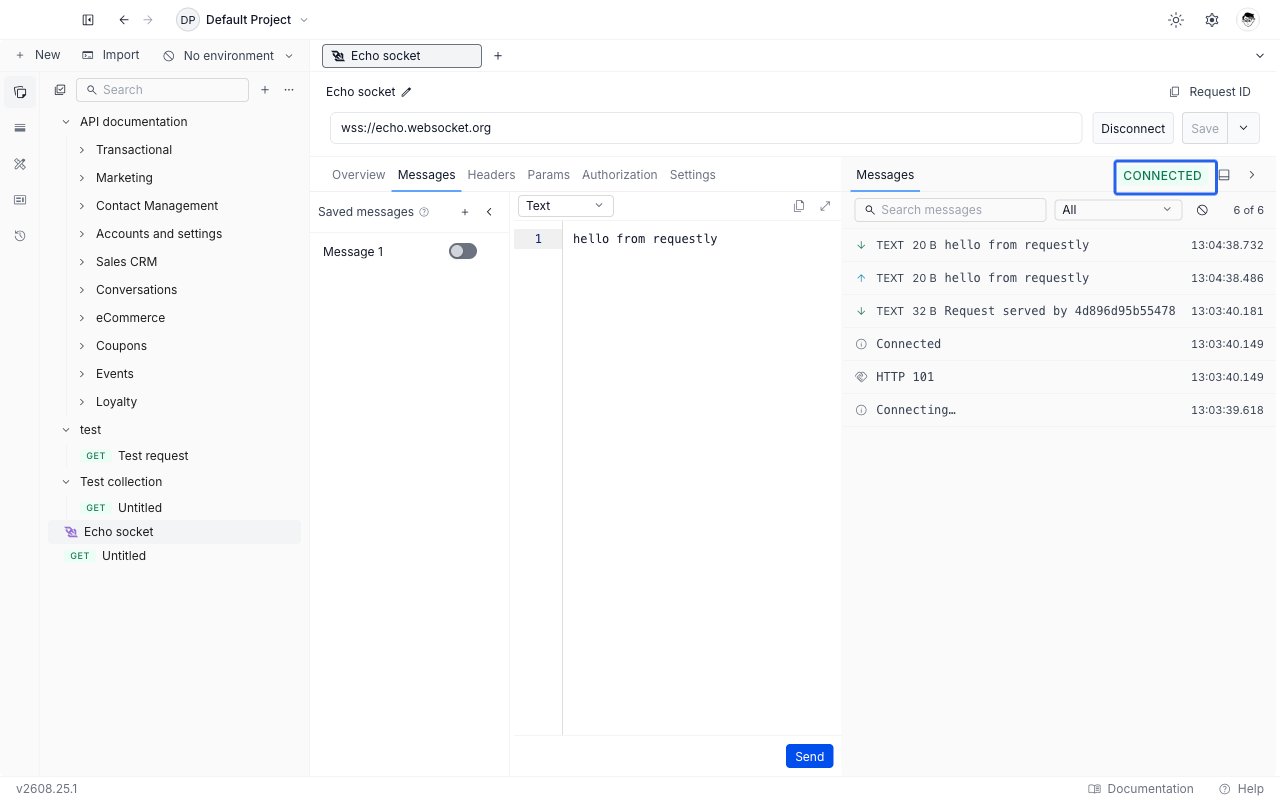
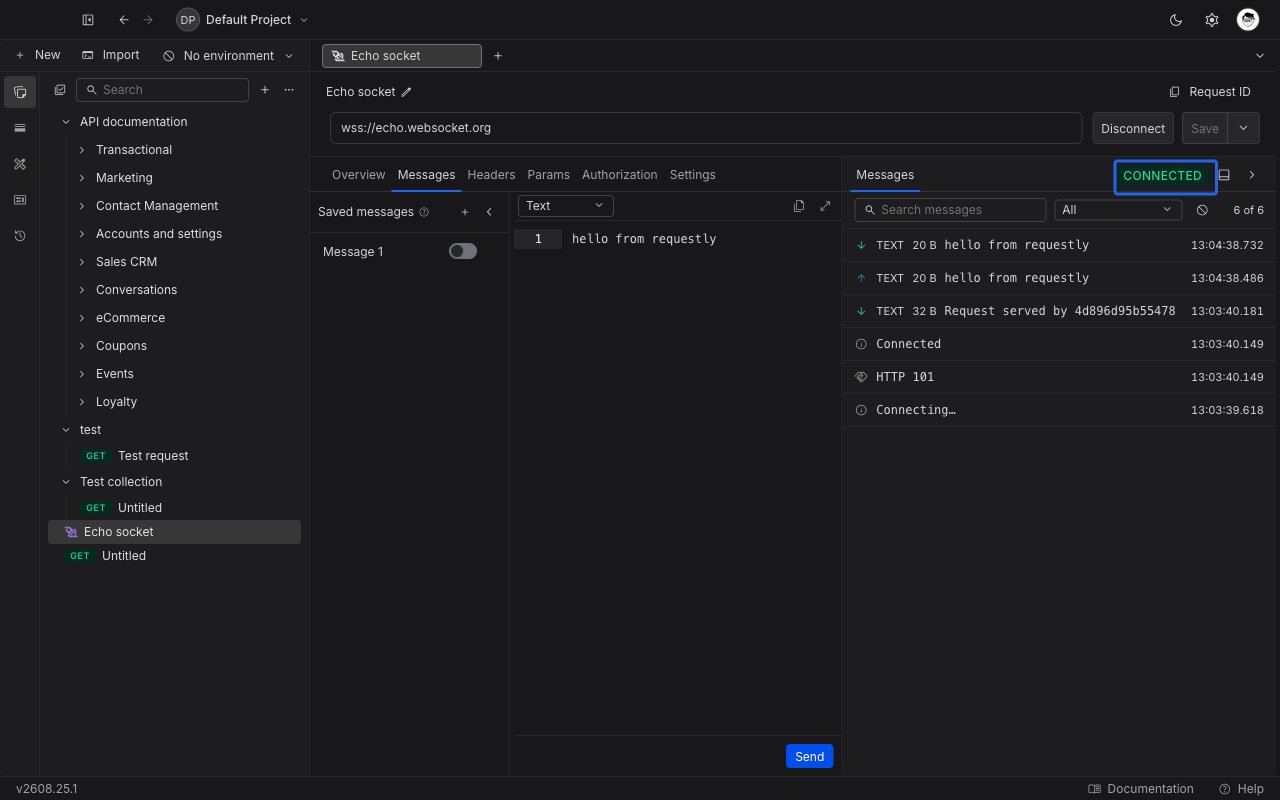 **Availability:** WebSocket connections open from the **Requestly Desktop App**. In the web app you can create, edit, and save a WebSocket request, but **Connect** is disabled with the note "This protocol requires the desktop app."
## Create a WebSocket request
Click the `+ New` button in the API Client sidebar and choose **WebSocket request**.
To put the request straight into a collection instead, hover the collection in the sidebar, click its `+` icon, and choose **WebSocket Request**. The request is created inside that collection and inherits the collection's variables and authorization.
Click the name in the breadcrumb at the top of the editor and type a descriptive name, then press **Enter**. The request appears in the sidebar under its collection alongside your HTTP and GraphQL requests.
A new request is pre-filled with `wss://echo.websocket.org`, a public echo server, so you have something that answers immediately. Replace it with your own endpoint when you are ready.
The URL must start with `ws://` or `wss://`. Anything else is rejected inline with "WebSocket URL must start with ws\:// or wss\://", and a URL with the right scheme but no usable host is rejected with "Enter a valid WebSocket URL."
Click **Connect**. A status badge appears at the top of the Timeline panel and moves from **Connecting...** to **Connected**.
Open the **Messages** tab, select a saved message on the left, type a payload into the editor, and click **Send**. The message and anything the server sends back appear in the Timeline panel on the right.
Press `Ctrl`/`Cmd` + `Enter` to connect when you are disconnected, and to send the current message once you are connected.
## The URL bar
The URL bar holds the address and every connection-level action.
* **Connect** opens the connection. It is shown while you are idle, disconnected, or sitting on a failed attempt.
* **Cancel** replaces Connect while the handshake is in flight, so you are not stuck waiting on an unreachable host.
* **Disconnect** replaces Connect once the socket is open, and closes it.
* **Save** stores your edits. On a saved request the arrow next to it offers **Save as new**, which writes a copy instead of overwriting.
While a connection is active, the URL and the **Settings** tab become read-only. The **Messages**, **Headers**, **Params**, and **Authorization** tabs stay editable, so you can adjust what you send next without dropping the socket.
### When a connection fails
A failed attempt names the cause rather than resetting to a blank state. The status badge holds the reason until you connect again, and the Timeline panel records a matching error row. Reasons include **Connection refused**, **DNS failure**, **Offline**, **TLS handshake failed**, **Handshake timeout**, **Handshake rejected**, **Auth rejected**, **Auth token expired**, **Reconnect attempts exhausted**, **Server closed connection**, **Connection lost**, and **Protocol error**.
## Editor tabs
### Overview
A free-text description of the request, written in Markdown. Useful for recording which environment the endpoint belongs to or what the server expects first.
### Messages
The Messages tab is a saved-payload library plus a composer. The left pane lists **Saved messages** that persist with the request, so a payload you use often is one click away on every future session. The right pane is the editor for the message you selected.
* The format dropdown under the editor switches between **Text**, **JSON**, **XML**, **HTML**, and **Binary**. JSON, XML, and HTML get syntax highlighting and a format button. Choosing Binary adds a second dropdown for **Base64** or **Hex** encoding.
* The toggle on each saved row auto-sends that message immediately after the connection opens. Use it for a subscribe or authenticate frame that always has to go first.
* The `...` menu on each row renames the message, adds a description, or deletes it.
* **Send** sits at the bottom right of the editor and is enabled only while you are connected.
A new request already contains one saved message called `Message 1`. If you connect with an empty list, Requestly adds a starter message so you always have somewhere to type.
### Headers
Headers here are sent on the WebSocket handshake, the HTTP request that upgrades the connection. Add key and value pairs, use the checkbox to turn individual rows off without deleting them, and switch to bulk edit to paste several at once. Values accept `{{variable}}` references, which resolve from your environment and collection variables when you connect.
If your server negotiates a subprotocol, write it here as a plain `Sec-WebSocket-Protocol` header.
### Params
Query params attached to the handshake URL. This tab and the URL bar are two views of the same data: typing `?token=abc` into the URL bar adds a `token` row here, and editing a row rewrites the URL bar's query string. Disabled rows stay in the list but are left out of the URL.
### Authorization
The same authorization editor the HTTP and GraphQL editors use, with the full set of types available, including inheriting from the parent collection. Whatever it produces is applied to the handshake.
### Settings
Per-request connection tuning:
| Setting | Default | What it does |
| -------------------------- | ------- | -------------------------------------------------------------------------------------------------------- |
| Verify server certificate | On | Validates the TLS certificate. Disabled automatically on a `ws://` URL, where there is no TLS to verify. |
| Handshake timeout (ms) | 30000 | How long to wait for the upgrade to complete before giving up. |
| Max message size (MB) | 0 | Largest message to accept. `0` means uncapped. |
| Reconnection attempts | 3 | How many times to retry after the connection drops. `0` disables reconnection. |
| Reconnection interval (ms) | 1000 | Wait between retries. |
| Keep-alive interval (ms) | 0 | How often to send a keep-alive frame. `0` disables it. |
**Availability:** WebSocket connections open from the **Requestly Desktop App**. In the web app you can create, edit, and save a WebSocket request, but **Connect** is disabled with the note "This protocol requires the desktop app."
## Create a WebSocket request
Click the `+ New` button in the API Client sidebar and choose **WebSocket request**.
To put the request straight into a collection instead, hover the collection in the sidebar, click its `+` icon, and choose **WebSocket Request**. The request is created inside that collection and inherits the collection's variables and authorization.
Click the name in the breadcrumb at the top of the editor and type a descriptive name, then press **Enter**. The request appears in the sidebar under its collection alongside your HTTP and GraphQL requests.
A new request is pre-filled with `wss://echo.websocket.org`, a public echo server, so you have something that answers immediately. Replace it with your own endpoint when you are ready.
The URL must start with `ws://` or `wss://`. Anything else is rejected inline with "WebSocket URL must start with ws\:// or wss\://", and a URL with the right scheme but no usable host is rejected with "Enter a valid WebSocket URL."
Click **Connect**. A status badge appears at the top of the Timeline panel and moves from **Connecting...** to **Connected**.
Open the **Messages** tab, select a saved message on the left, type a payload into the editor, and click **Send**. The message and anything the server sends back appear in the Timeline panel on the right.
Press `Ctrl`/`Cmd` + `Enter` to connect when you are disconnected, and to send the current message once you are connected.
## The URL bar
The URL bar holds the address and every connection-level action.
* **Connect** opens the connection. It is shown while you are idle, disconnected, or sitting on a failed attempt.
* **Cancel** replaces Connect while the handshake is in flight, so you are not stuck waiting on an unreachable host.
* **Disconnect** replaces Connect once the socket is open, and closes it.
* **Save** stores your edits. On a saved request the arrow next to it offers **Save as new**, which writes a copy instead of overwriting.
While a connection is active, the URL and the **Settings** tab become read-only. The **Messages**, **Headers**, **Params**, and **Authorization** tabs stay editable, so you can adjust what you send next without dropping the socket.
### When a connection fails
A failed attempt names the cause rather than resetting to a blank state. The status badge holds the reason until you connect again, and the Timeline panel records a matching error row. Reasons include **Connection refused**, **DNS failure**, **Offline**, **TLS handshake failed**, **Handshake timeout**, **Handshake rejected**, **Auth rejected**, **Auth token expired**, **Reconnect attempts exhausted**, **Server closed connection**, **Connection lost**, and **Protocol error**.
## Editor tabs
### Overview
A free-text description of the request, written in Markdown. Useful for recording which environment the endpoint belongs to or what the server expects first.
### Messages
The Messages tab is a saved-payload library plus a composer. The left pane lists **Saved messages** that persist with the request, so a payload you use often is one click away on every future session. The right pane is the editor for the message you selected.
* The format dropdown under the editor switches between **Text**, **JSON**, **XML**, **HTML**, and **Binary**. JSON, XML, and HTML get syntax highlighting and a format button. Choosing Binary adds a second dropdown for **Base64** or **Hex** encoding.
* The toggle on each saved row auto-sends that message immediately after the connection opens. Use it for a subscribe or authenticate frame that always has to go first.
* The `...` menu on each row renames the message, adds a description, or deletes it.
* **Send** sits at the bottom right of the editor and is enabled only while you are connected.
A new request already contains one saved message called `Message 1`. If you connect with an empty list, Requestly adds a starter message so you always have somewhere to type.
### Headers
Headers here are sent on the WebSocket handshake, the HTTP request that upgrades the connection. Add key and value pairs, use the checkbox to turn individual rows off without deleting them, and switch to bulk edit to paste several at once. Values accept `{{variable}}` references, which resolve from your environment and collection variables when you connect.
If your server negotiates a subprotocol, write it here as a plain `Sec-WebSocket-Protocol` header.
### Params
Query params attached to the handshake URL. This tab and the URL bar are two views of the same data: typing `?token=abc` into the URL bar adds a `token` row here, and editing a row rewrites the URL bar's query string. Disabled rows stay in the list but are left out of the URL.
### Authorization
The same authorization editor the HTTP and GraphQL editors use, with the full set of types available, including inheriting from the parent collection. Whatever it produces is applied to the handshake.
### Settings
Per-request connection tuning:
| Setting | Default | What it does |
| -------------------------- | ------- | -------------------------------------------------------------------------------------------------------- |
| Verify server certificate | On | Validates the TLS certificate. Disabled automatically on a `ws://` URL, where there is no TLS to verify. |
| Handshake timeout (ms) | 30000 | How long to wait for the upgrade to complete before giving up. |
| Max message size (MB) | 0 | Largest message to accept. `0` means uncapped. |
| Reconnection attempts | 3 | How many times to retry after the connection drops. `0` disables reconnection. |
| Reconnection interval (ms) | 1000 | Wait between retries. |
| Keep-alive interval (ms) | 0 | How often to send a keep-alive frame. `0` disables it. |
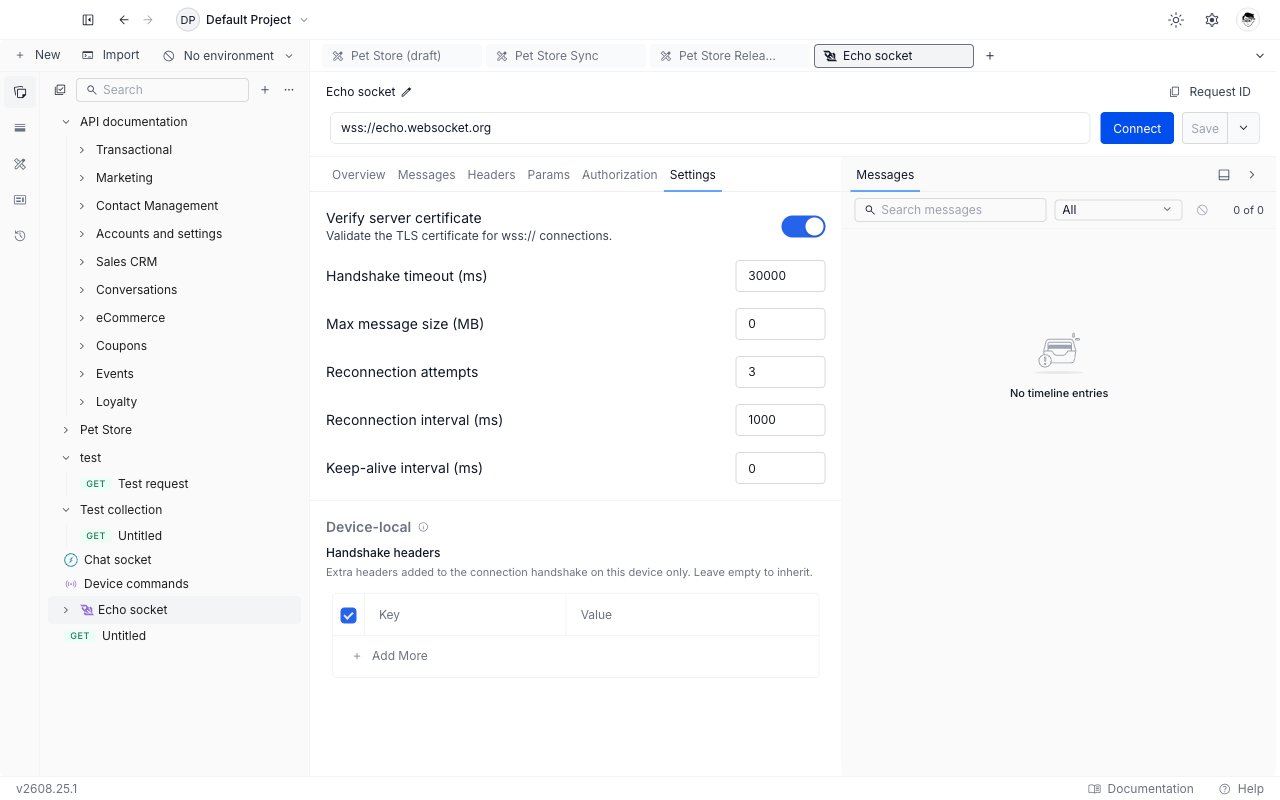
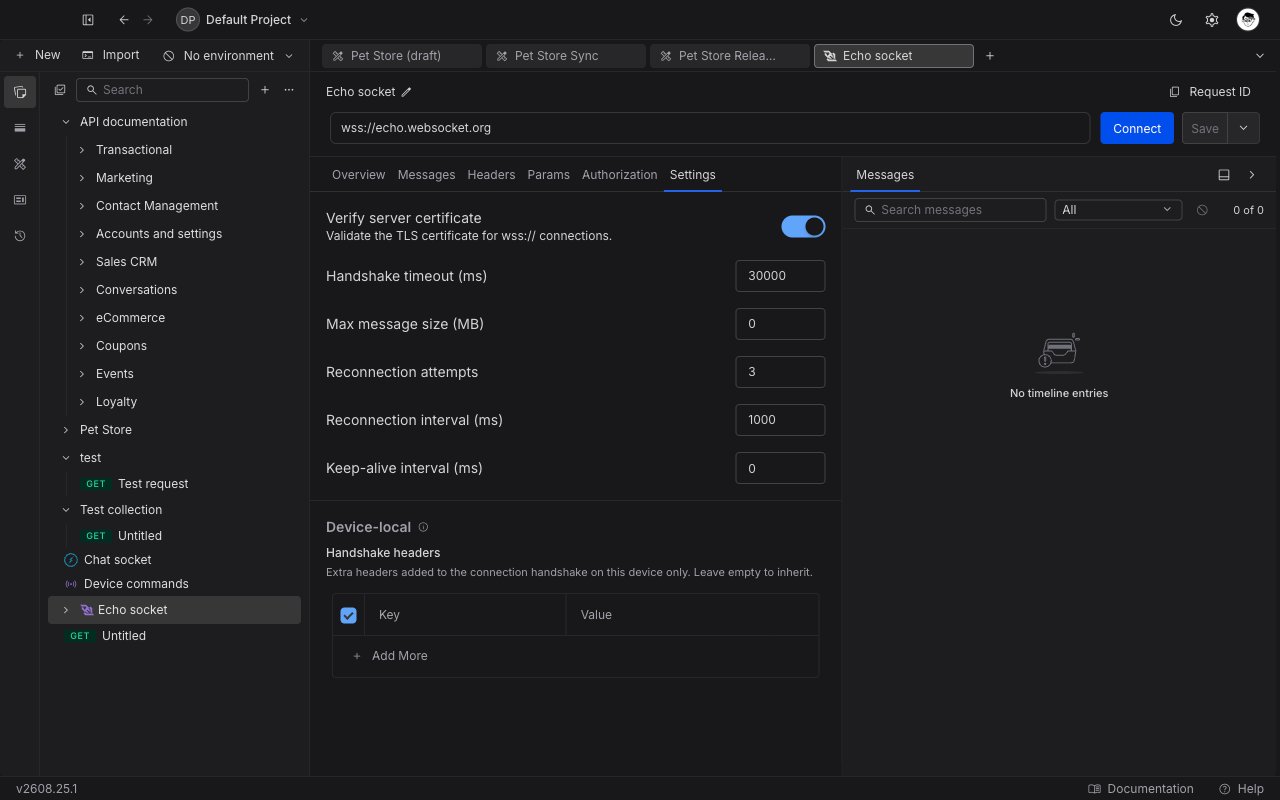 Below those settings is a **Device-local** section with a **Handshake headers** table. Headers added there are sent on the handshake from this machine only and are never synced to your team. That makes it the right place for a personal credential: values accept both `{{variable}}` and `{{vault:KEY}}` references, so you can point at a [Vault](/api-client/vault/vault) secret instead of pasting the secret itself.
## The Timeline panel
The Timeline panel on the right is the record of the session. Every message you send, every message the server sends, and every connection event lands there, newest first.
Each row shows a direction arrow (up for sent, down for received), the payload preview, its size, and a local timestamp down to the millisecond. Click a row to expand it into a read-only editor with the full payload and a language picker, so you can read a JSON frame as JSON even if it arrived as text.
Beyond messages, the timeline records:
* **Handshake** rows carrying the upgrade response status and headers.
* **Lifecycle** rows for connecting, connected, reconnecting, and disconnected, including the close code and its standard name (for example `1000 NORMAL_CLOSURE` or `1006 ABNORMAL_CLOSURE`).
* **Error** rows carrying the failure reason.
To narrow the list, use the **Search messages** box to match on payload content, and the dropdown to show **All**, **Sent**, or **Received**. A counter on the right reads how many rows match out of the total. The clear button empties the timeline without touching your filters.
The timeline keeps the most recent 5000 rows. Past that the oldest rows are dropped and a row is inserted saying how many were discarded.
Use the controls in the panel's header bar to move it to the bottom of the editor instead of the right side, or to collapse it out of the way.
## Save and reuse examples
An **example** is a saved snapshot of a request's configuration. For WebSocket requests it captures the URL, handshake headers, query params, authorization, connection settings, and saved messages. It carries no response, because a WebSocket session has no single response to capture.
Right-click the WebSocket request in the sidebar and choose **Add Example**. The example opens in a new tab and appears nested under the request in the sidebar.
The example tab shows the same tabs as the request editor. Change the URL, headers, params, authorization, settings, or saved messages, then click **Save**.
The example tab's primary button reads **Try It** rather than Connect. Clicking it opens a **new draft request** pre-filled with the example's configuration, parented to the example's own collection so collection variables still resolve. Connect from that draft.
Below those settings is a **Device-local** section with a **Handshake headers** table. Headers added there are sent on the handshake from this machine only and are never synced to your team. That makes it the right place for a personal credential: values accept both `{{variable}}` and `{{vault:KEY}}` references, so you can point at a [Vault](/api-client/vault/vault) secret instead of pasting the secret itself.
## The Timeline panel
The Timeline panel on the right is the record of the session. Every message you send, every message the server sends, and every connection event lands there, newest first.
Each row shows a direction arrow (up for sent, down for received), the payload preview, its size, and a local timestamp down to the millisecond. Click a row to expand it into a read-only editor with the full payload and a language picker, so you can read a JSON frame as JSON even if it arrived as text.
Beyond messages, the timeline records:
* **Handshake** rows carrying the upgrade response status and headers.
* **Lifecycle** rows for connecting, connected, reconnecting, and disconnected, including the close code and its standard name (for example `1000 NORMAL_CLOSURE` or `1006 ABNORMAL_CLOSURE`).
* **Error** rows carrying the failure reason.
To narrow the list, use the **Search messages** box to match on payload content, and the dropdown to show **All**, **Sent**, or **Received**. A counter on the right reads how many rows match out of the total. The clear button empties the timeline without touching your filters.
The timeline keeps the most recent 5000 rows. Past that the oldest rows are dropped and a row is inserted saying how many were discarded.
Use the controls in the panel's header bar to move it to the bottom of the editor instead of the right side, or to collapse it out of the way.
## Save and reuse examples
An **example** is a saved snapshot of a request's configuration. For WebSocket requests it captures the URL, handshake headers, query params, authorization, connection settings, and saved messages. It carries no response, because a WebSocket session has no single response to capture.
Right-click the WebSocket request in the sidebar and choose **Add Example**. The example opens in a new tab and appears nested under the request in the sidebar.
The example tab shows the same tabs as the request editor. Change the URL, headers, params, authorization, settings, or saved messages, then click **Save**.
The example tab's primary button reads **Try It** rather than Connect. Clicking it opens a **new draft request** pre-filled with the example's configuration, parented to the example's own collection so collection variables still resolve. Connect from that draft.
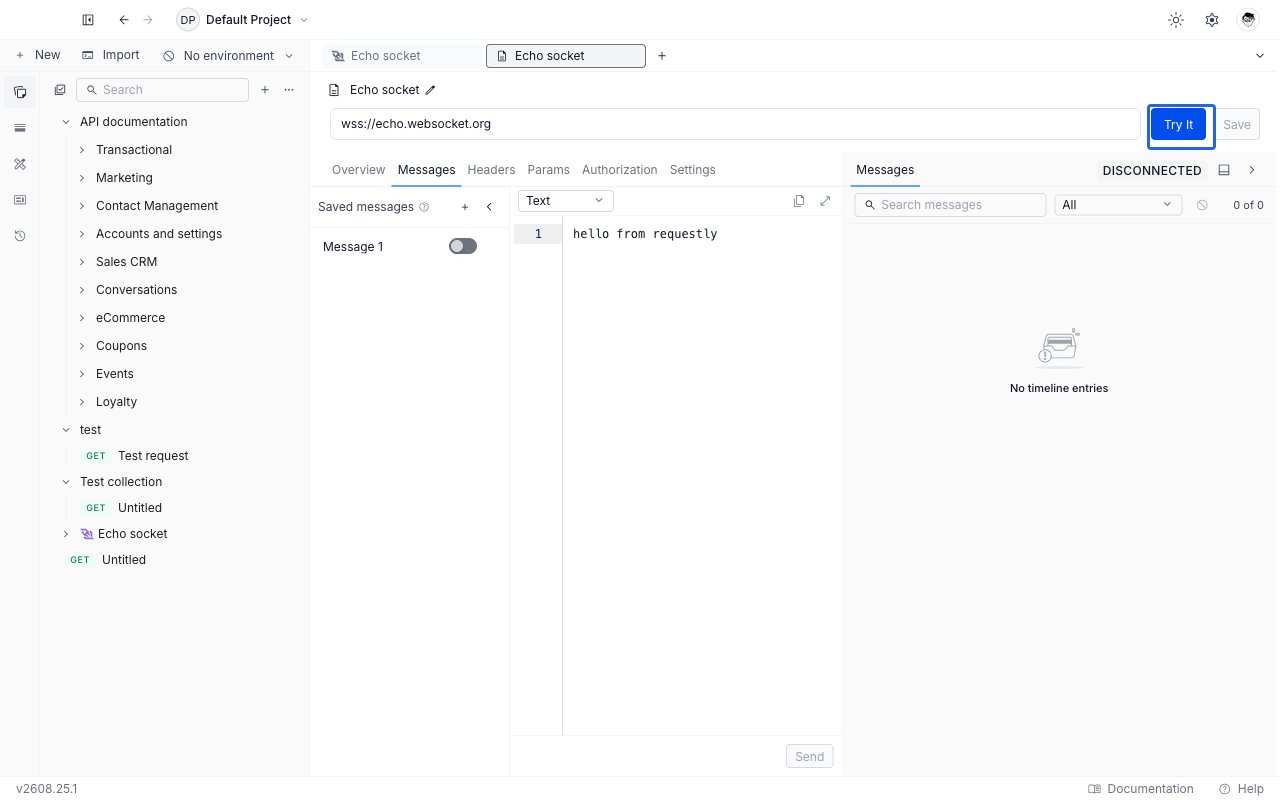
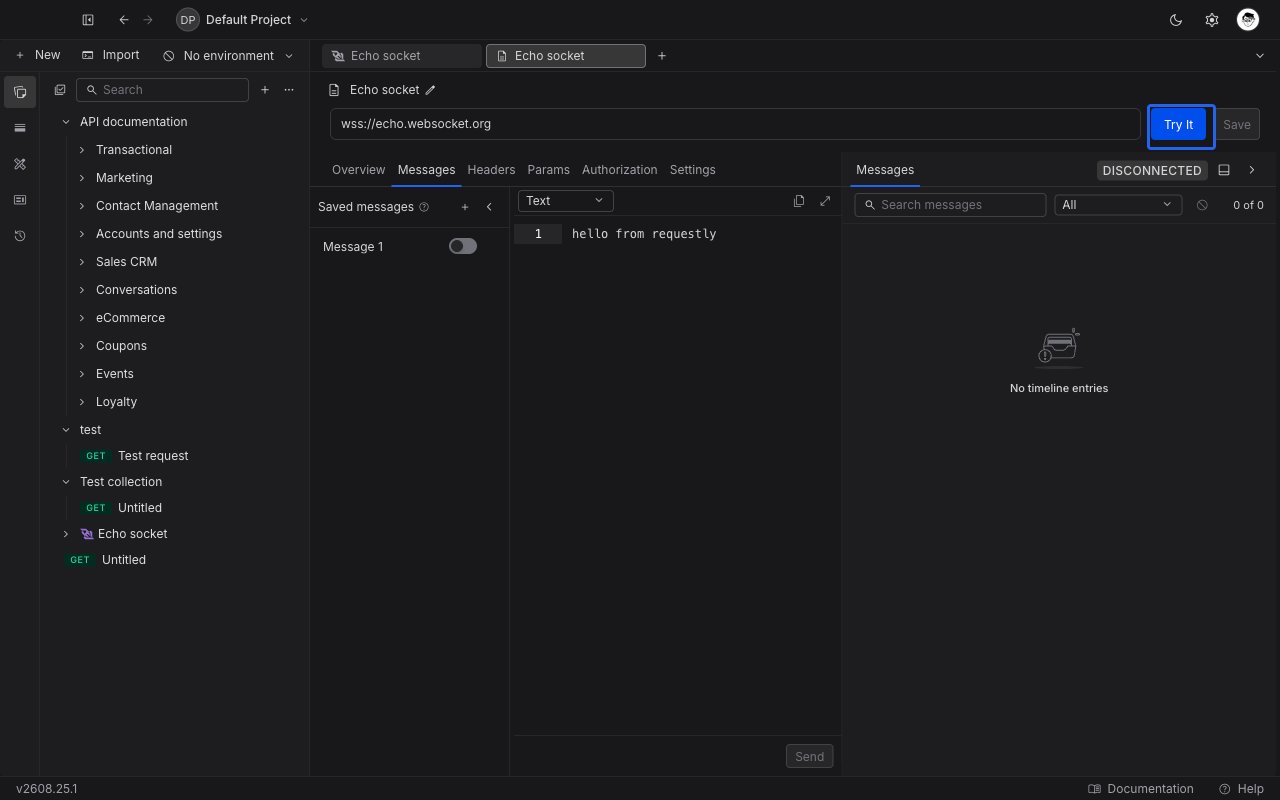 An example tab never holds a live connection itself. That is deliberate: the example stays a stable reference, and the session runs in the draft that Try It spawns.
See [Create Request & Response Examples](/api-client/examples) for renaming, duplicating, and deleting examples.
## Import and export
WebSocket requests are carried in full by Requestly's own collection format. Exporting a collection as a Requestly `.json` file includes every WebSocket request with its URL, headers, params, authorization, settings, and saved messages, and importing that file back restores them exactly. Examples ride along with their parent request.
Other formats cannot represent them:
* **Postman.** Exporting a collection as a Postman v2.1 collection leaves WebSocket requests out, because the format has no shape for them. The export dialog tells you how many were excluded before you download.
* **OpenAPI.** WebSocket requests are skipped, since OpenAPI describes HTTP operations.
* **HAR.** Importing a `.har` capture skips `ws://` and `wss://` entries.
See [Import & Export](/api-client/import-export) for the full matrix.
## WebSocket requests in the Collection Runner
The [Collection Runner](/api-client/collection-runner) runs a collection's requests in sequence. You can select a WebSocket request in the run order and it appears with a **WS** badge, but it does not connect: the runner executes one request at a time and waits for it to finish, which a long-lived connection never does.
Each WebSocket request in a run is recorded as **skipped**, with the reason shown on the result row reading "not supported in runner". Skipped requests are counted in the run summary and listed under the **Skipped** tab, so a run stays green and you can see exactly what was left out. Connect to WebSocket endpoints from the request editor instead.
Scheduled Runs behave the same way. See [Scheduled Runs](/api-client/scheduled-runs).
## What's next?
Work with Socket.IO's named events, acknowledgements, and protocol versions
Make URLs, headers, and payloads dynamic across environments
Group related WebSocket requests with the rest of your API
An example tab never holds a live connection itself. That is deliberate: the example stays a stable reference, and the session runs in the draft that Try It spawns.
See [Create Request & Response Examples](/api-client/examples) for renaming, duplicating, and deleting examples.
## Import and export
WebSocket requests are carried in full by Requestly's own collection format. Exporting a collection as a Requestly `.json` file includes every WebSocket request with its URL, headers, params, authorization, settings, and saved messages, and importing that file back restores them exactly. Examples ride along with their parent request.
Other formats cannot represent them:
* **Postman.** Exporting a collection as a Postman v2.1 collection leaves WebSocket requests out, because the format has no shape for them. The export dialog tells you how many were excluded before you download.
* **OpenAPI.** WebSocket requests are skipped, since OpenAPI describes HTTP operations.
* **HAR.** Importing a `.har` capture skips `ws://` and `wss://` entries.
See [Import & Export](/api-client/import-export) for the full matrix.
## WebSocket requests in the Collection Runner
The [Collection Runner](/api-client/collection-runner) runs a collection's requests in sequence. You can select a WebSocket request in the run order and it appears with a **WS** badge, but it does not connect: the runner executes one request at a time and waits for it to finish, which a long-lived connection never does.
Each WebSocket request in a run is recorded as **skipped**, with the reason shown on the result row reading "not supported in runner". Skipped requests are counted in the run summary and listed under the **Skipped** tab, so a run stays green and you can see exactly what was left out. Connect to WebSocket endpoints from the request editor instead.
Scheduled Runs behave the same way. See [Scheduled Runs](/api-client/scheduled-runs).
## What's next?
Work with Socket.IO's named events, acknowledgements, and protocol versions
Make URLs, headers, and payloads dynamic across environments
Group related WebSocket requests with the rest of your API