> ## Documentation Index
> Fetch the complete documentation index at: https://docs.requestly.com/llms.txt
> Use this file to discover all available pages before exploring further.

# Team projects

> Learn how to set up a team project in Requestly

Requestly’s **team and shared projects** make collaboration easy by **syncing** all **project data** so members can work together on **HTTP rules, mock APIs, the API client, and sessions**. Whether you're debugging, testing, or managing API workflows, a shared project keeps your team in sync and productive.

### Setting up a shared project

Let's create a shared project and invite teammates to collaborate in real time. Follow these simple steps to get started.

<iframe className="w-full aspect-video rounded-xl" src="https://www.youtube.com/embed/Lv19_pZQ6gg" />

### Create a project

<Steps>
  <Step title="Open project switcher">
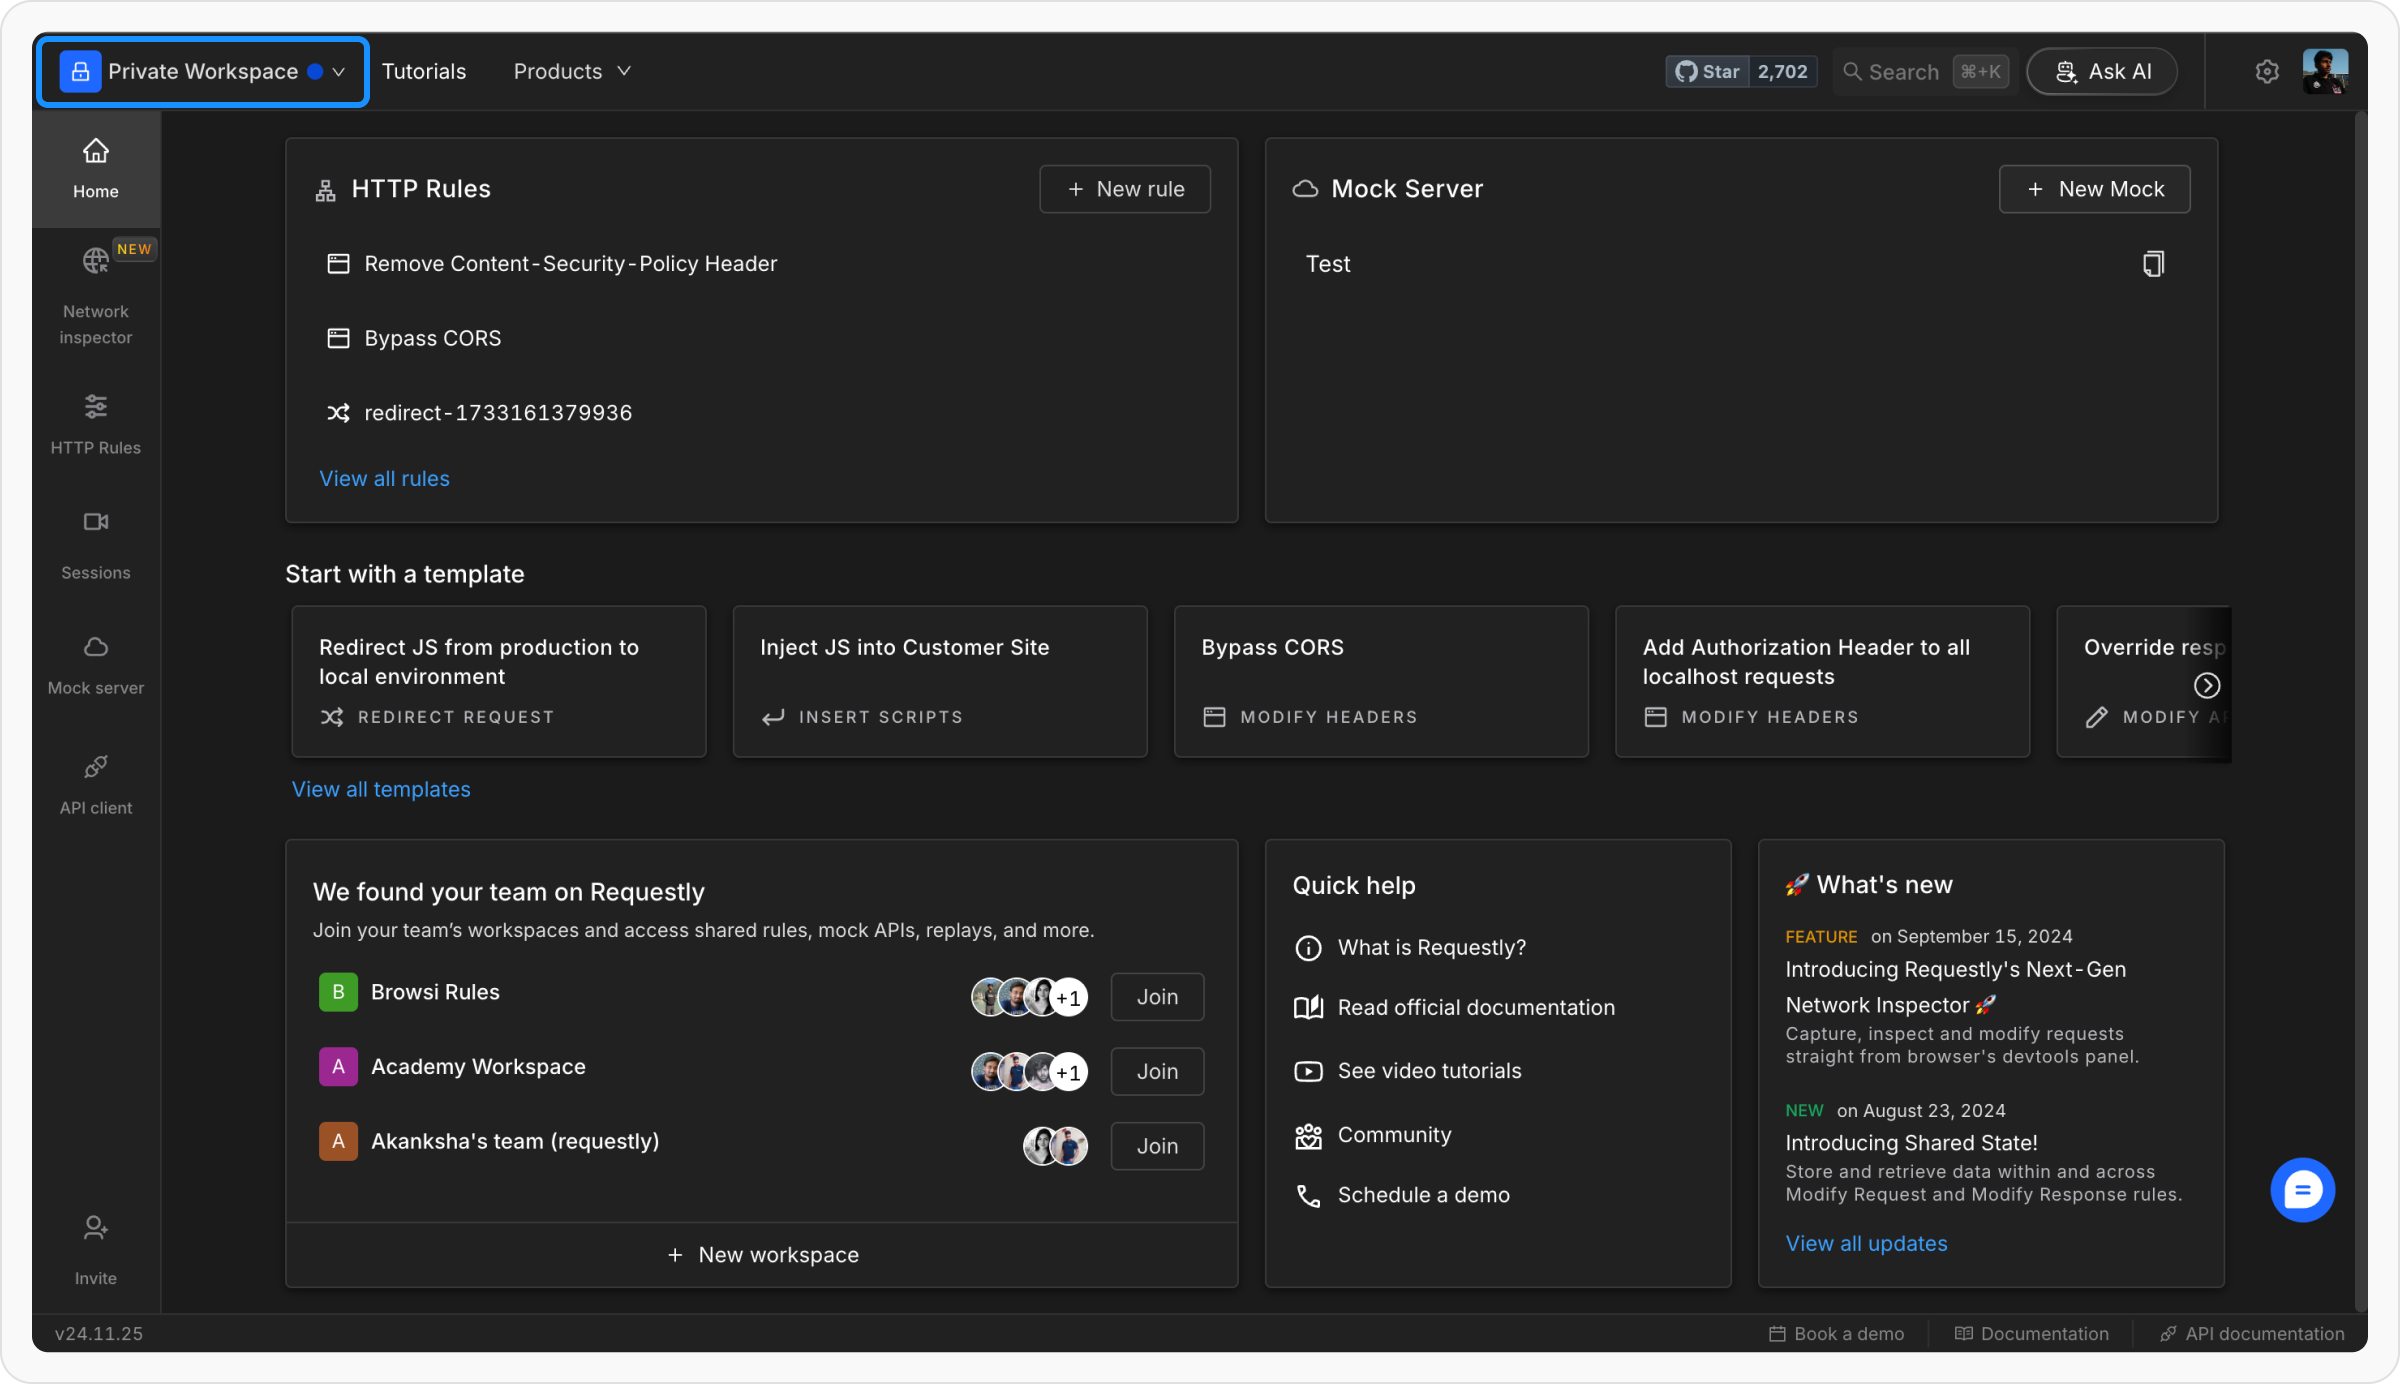
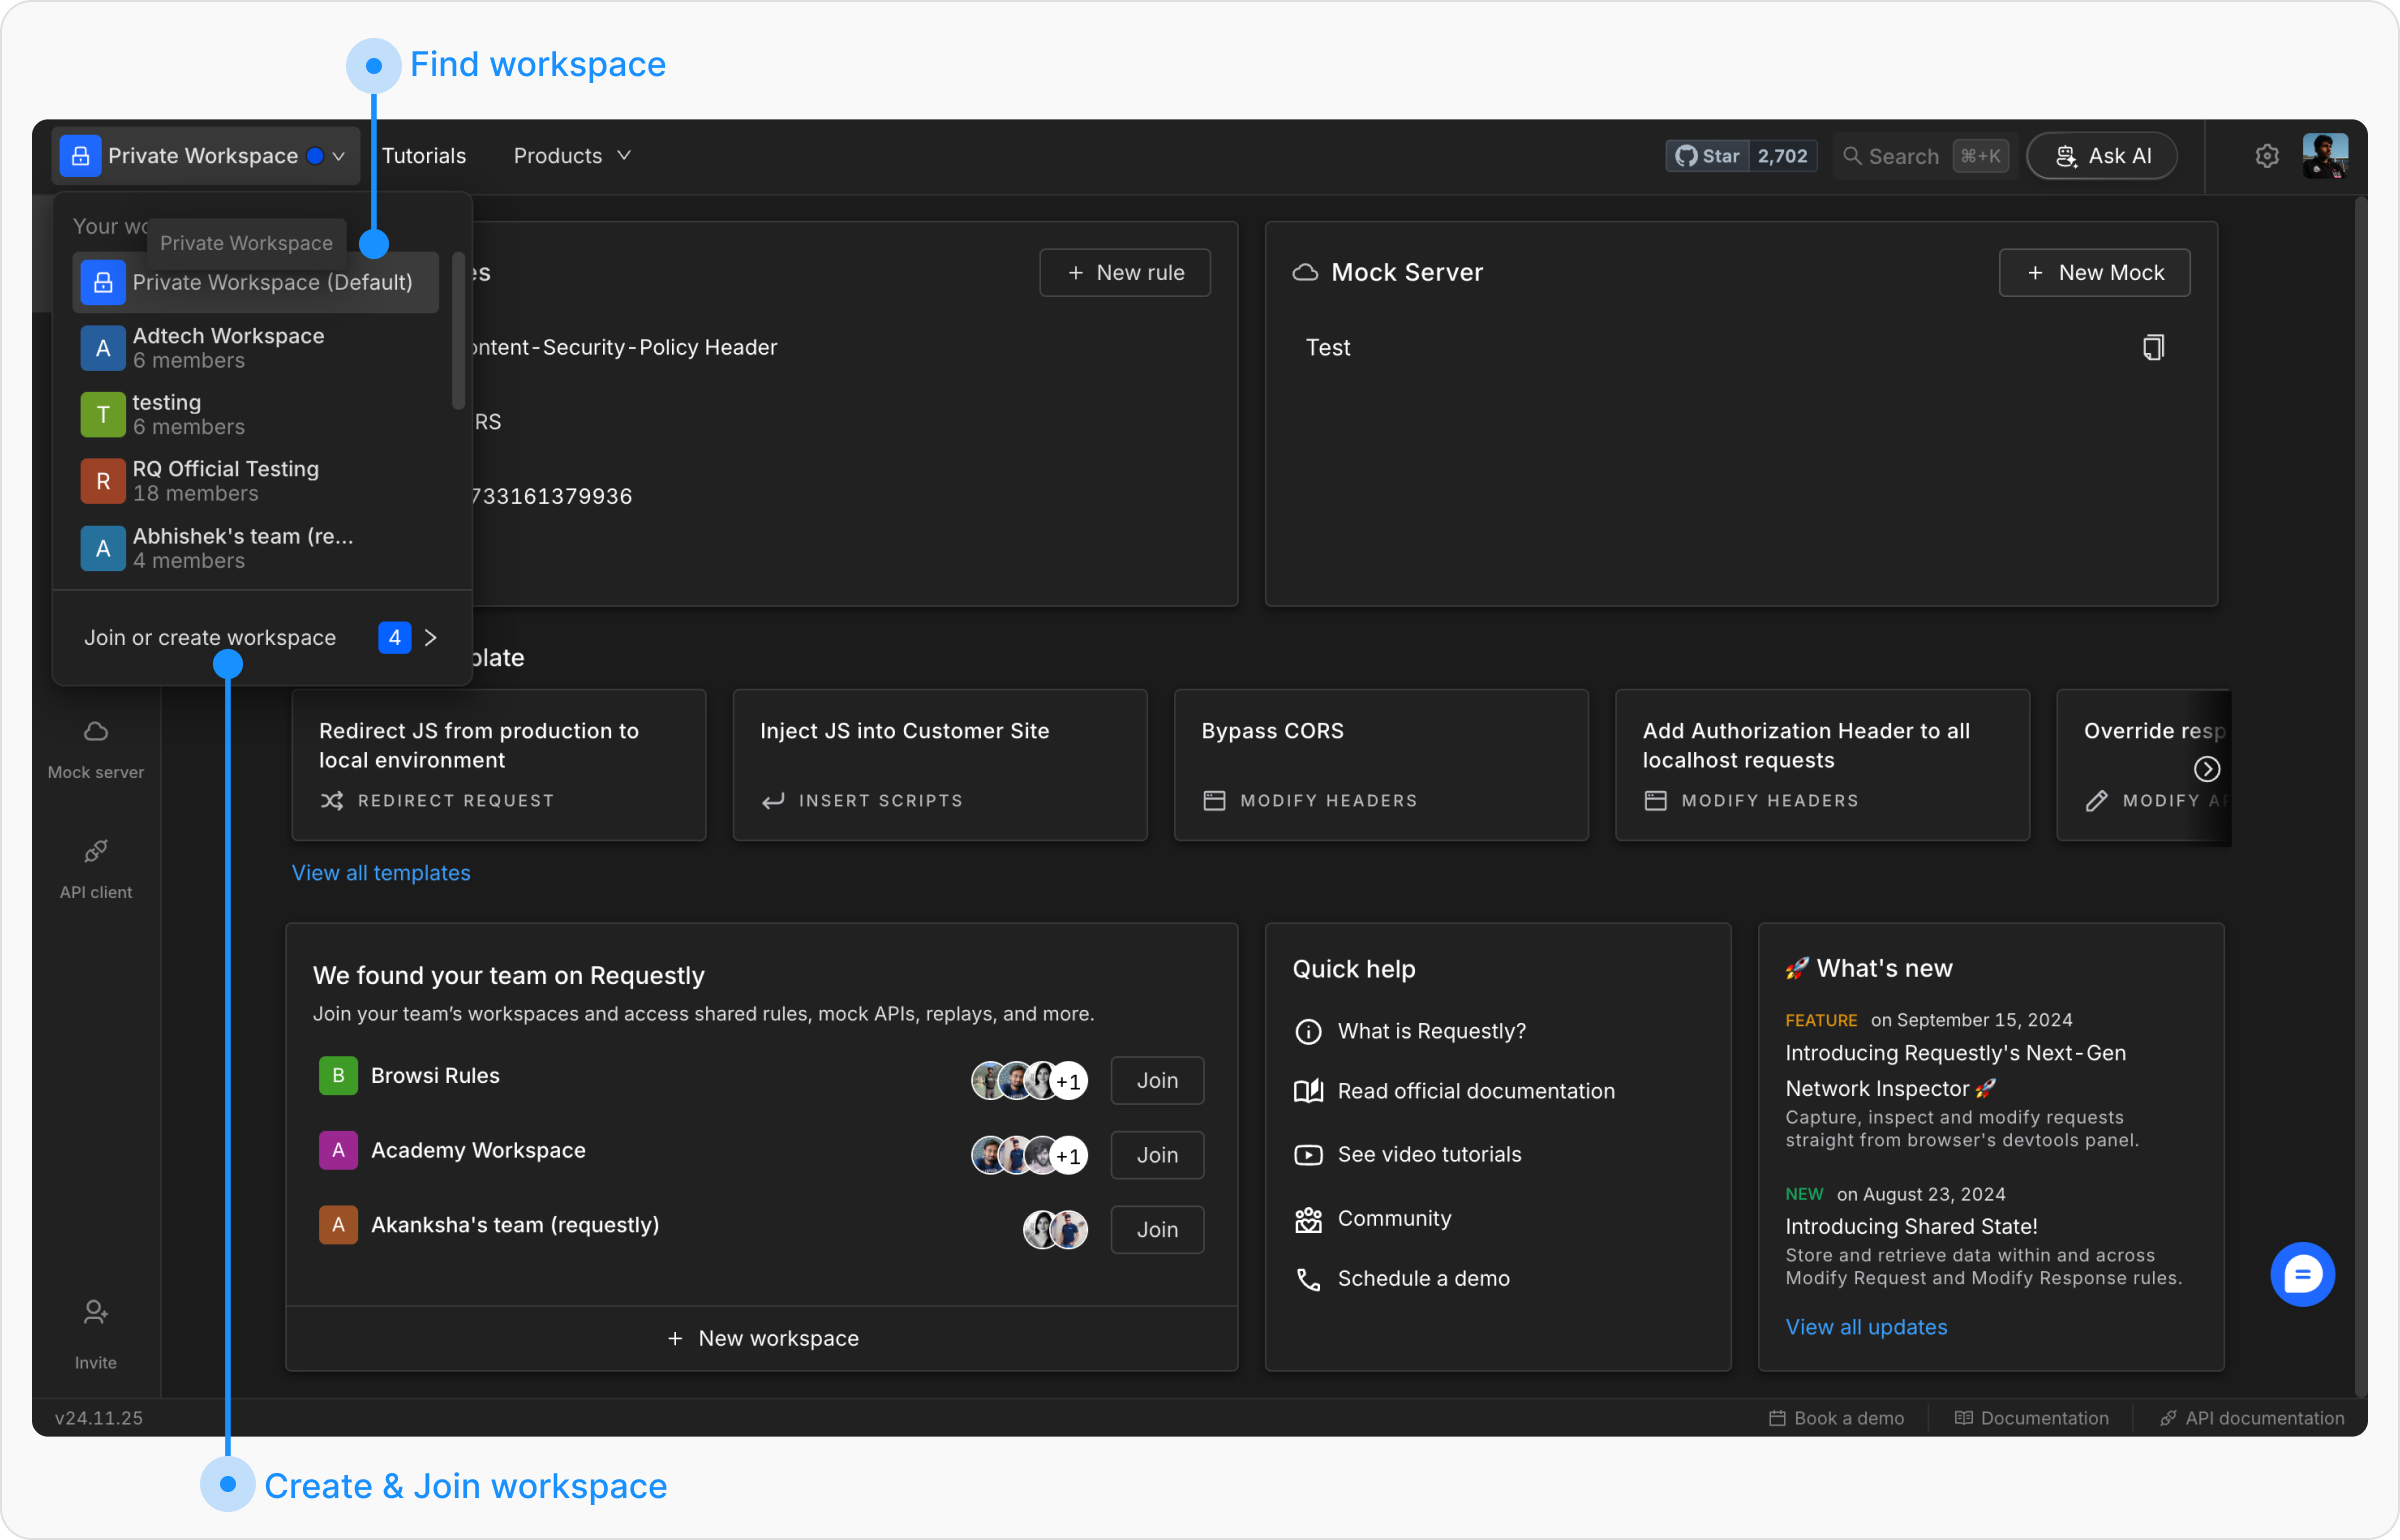
    In the top-left corner of the sidebar, find the project dropdown (the default option is **Private project**).

    <img src="https://mintcdn.com/requestly/J2qFDsPkU9iKOyXZ/images/how-to-get-started-with-shared-workspace/3bf05219-44ea-43a1-847e-3e0c7f90f852.png?fit=max&auto=format&n=J2qFDsPkU9iKOyXZ&q=85&s=92f185480edadf7c34c4dcec026f94ea" alt="" align="left" fullwidth="true" width="2400" height="1384" data-path="images/how-to-get-started-with-shared-workspace/3bf05219-44ea-43a1-847e-3e0c7f90f852.png" />
  </Step>

  <Step title="Access the project options">
    Click on the project dropdown and select the option **Join or Create Project**.

    <img src="https://mintcdn.com/requestly/J2qFDsPkU9iKOyXZ/images/how-to-get-started-with-shared-workspace/d9a760e4-9511-415e-bce6-1a2b2052047f.png?fit=max&auto=format&n=J2qFDsPkU9iKOyXZ&q=85&s=7eaa36ec07531c5f37b149be29398fa1" alt="" align="left" fullwidth="true" width="2400" height="1540" data-path="images/how-to-get-started-with-shared-workspace/d9a760e4-9511-415e-bce6-1a2b2052047f.png" />
  </Step>

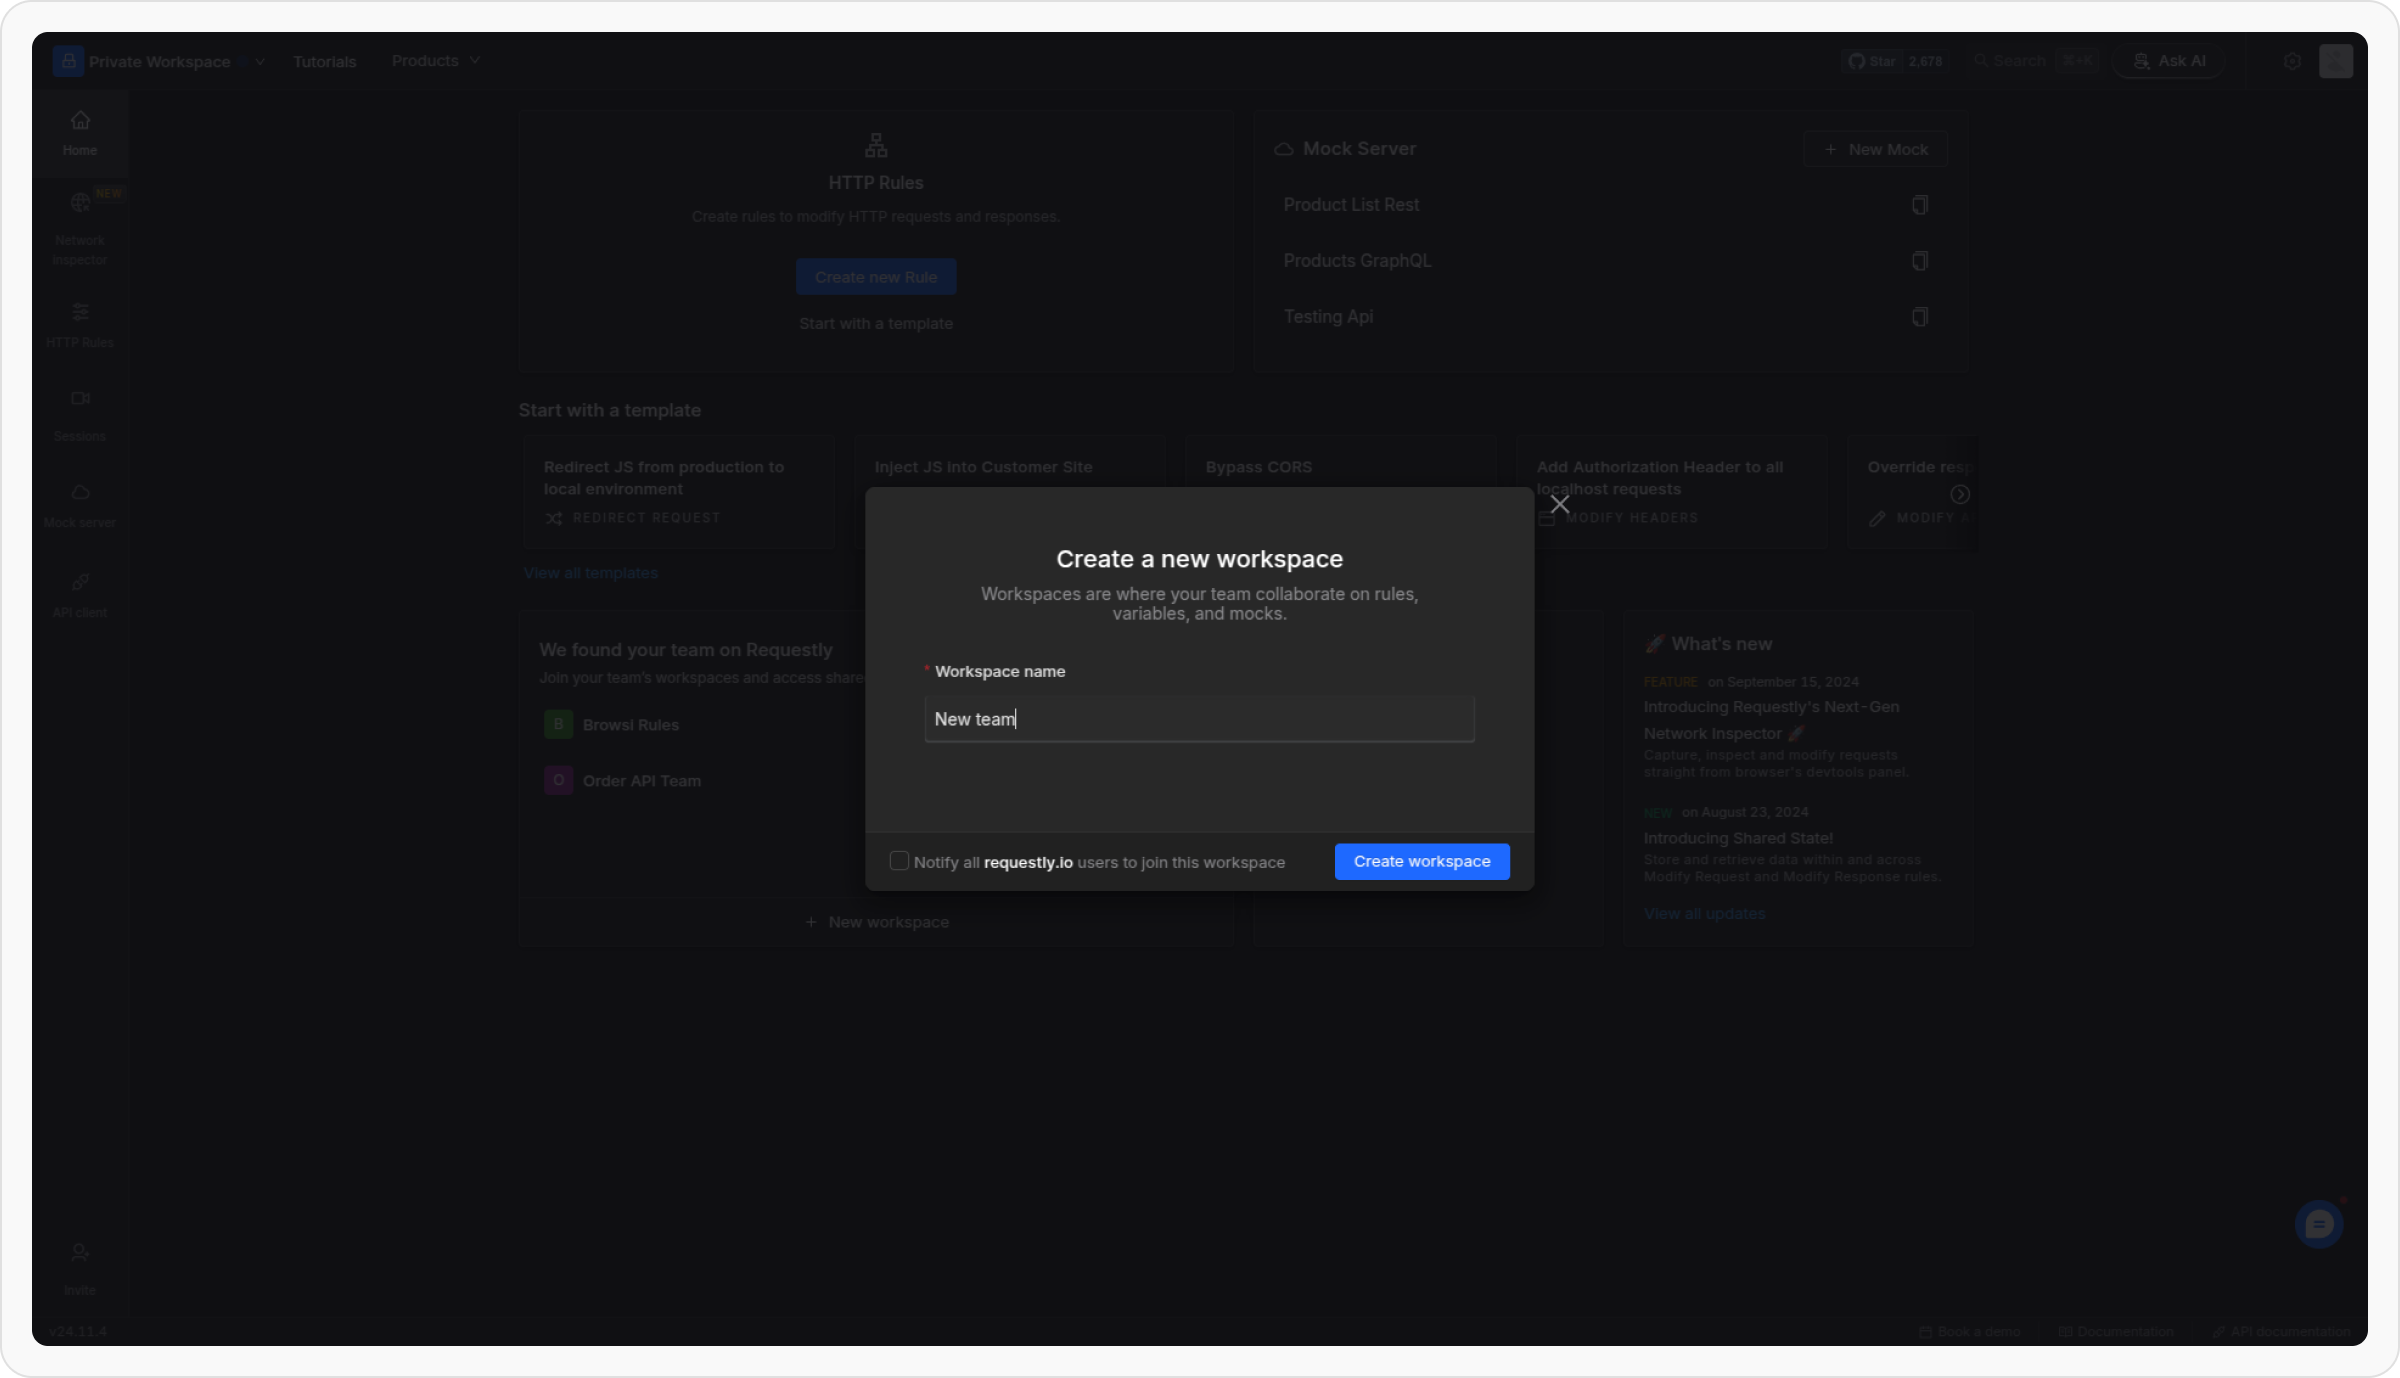
  <Step title="Create a new project">
    Click on **Create New Project** from the options. Enter a name for your project in the provided field and click **Create Project**.

    <img src="https://mintcdn.com/requestly/J2qFDsPkU9iKOyXZ/images/how-to-get-started-with-shared-workspace/81a0eeee-4622-4de1-b15e-dd48a798ddac.png?fit=max&auto=format&n=J2qFDsPkU9iKOyXZ&q=85&s=c8190607d902e52aa35527511ee4c568" alt="" align="left" fullwidth="true" width="2400" height="1378" data-path="images/how-to-get-started-with-shared-workspace/81a0eeee-4622-4de1-b15e-dd48a798ddac.png" />

    <Tip>
      You can also check the checkbox at the bottom of this popup to invite your entire team while creating the project.
    </Tip>
  </Step>
</Steps>

## Managing team members

To effectively manage access, admins can add team members, update their roles, or remove team members within a project. Below are the steps to perform these actions.

### Adding new members

<Steps>
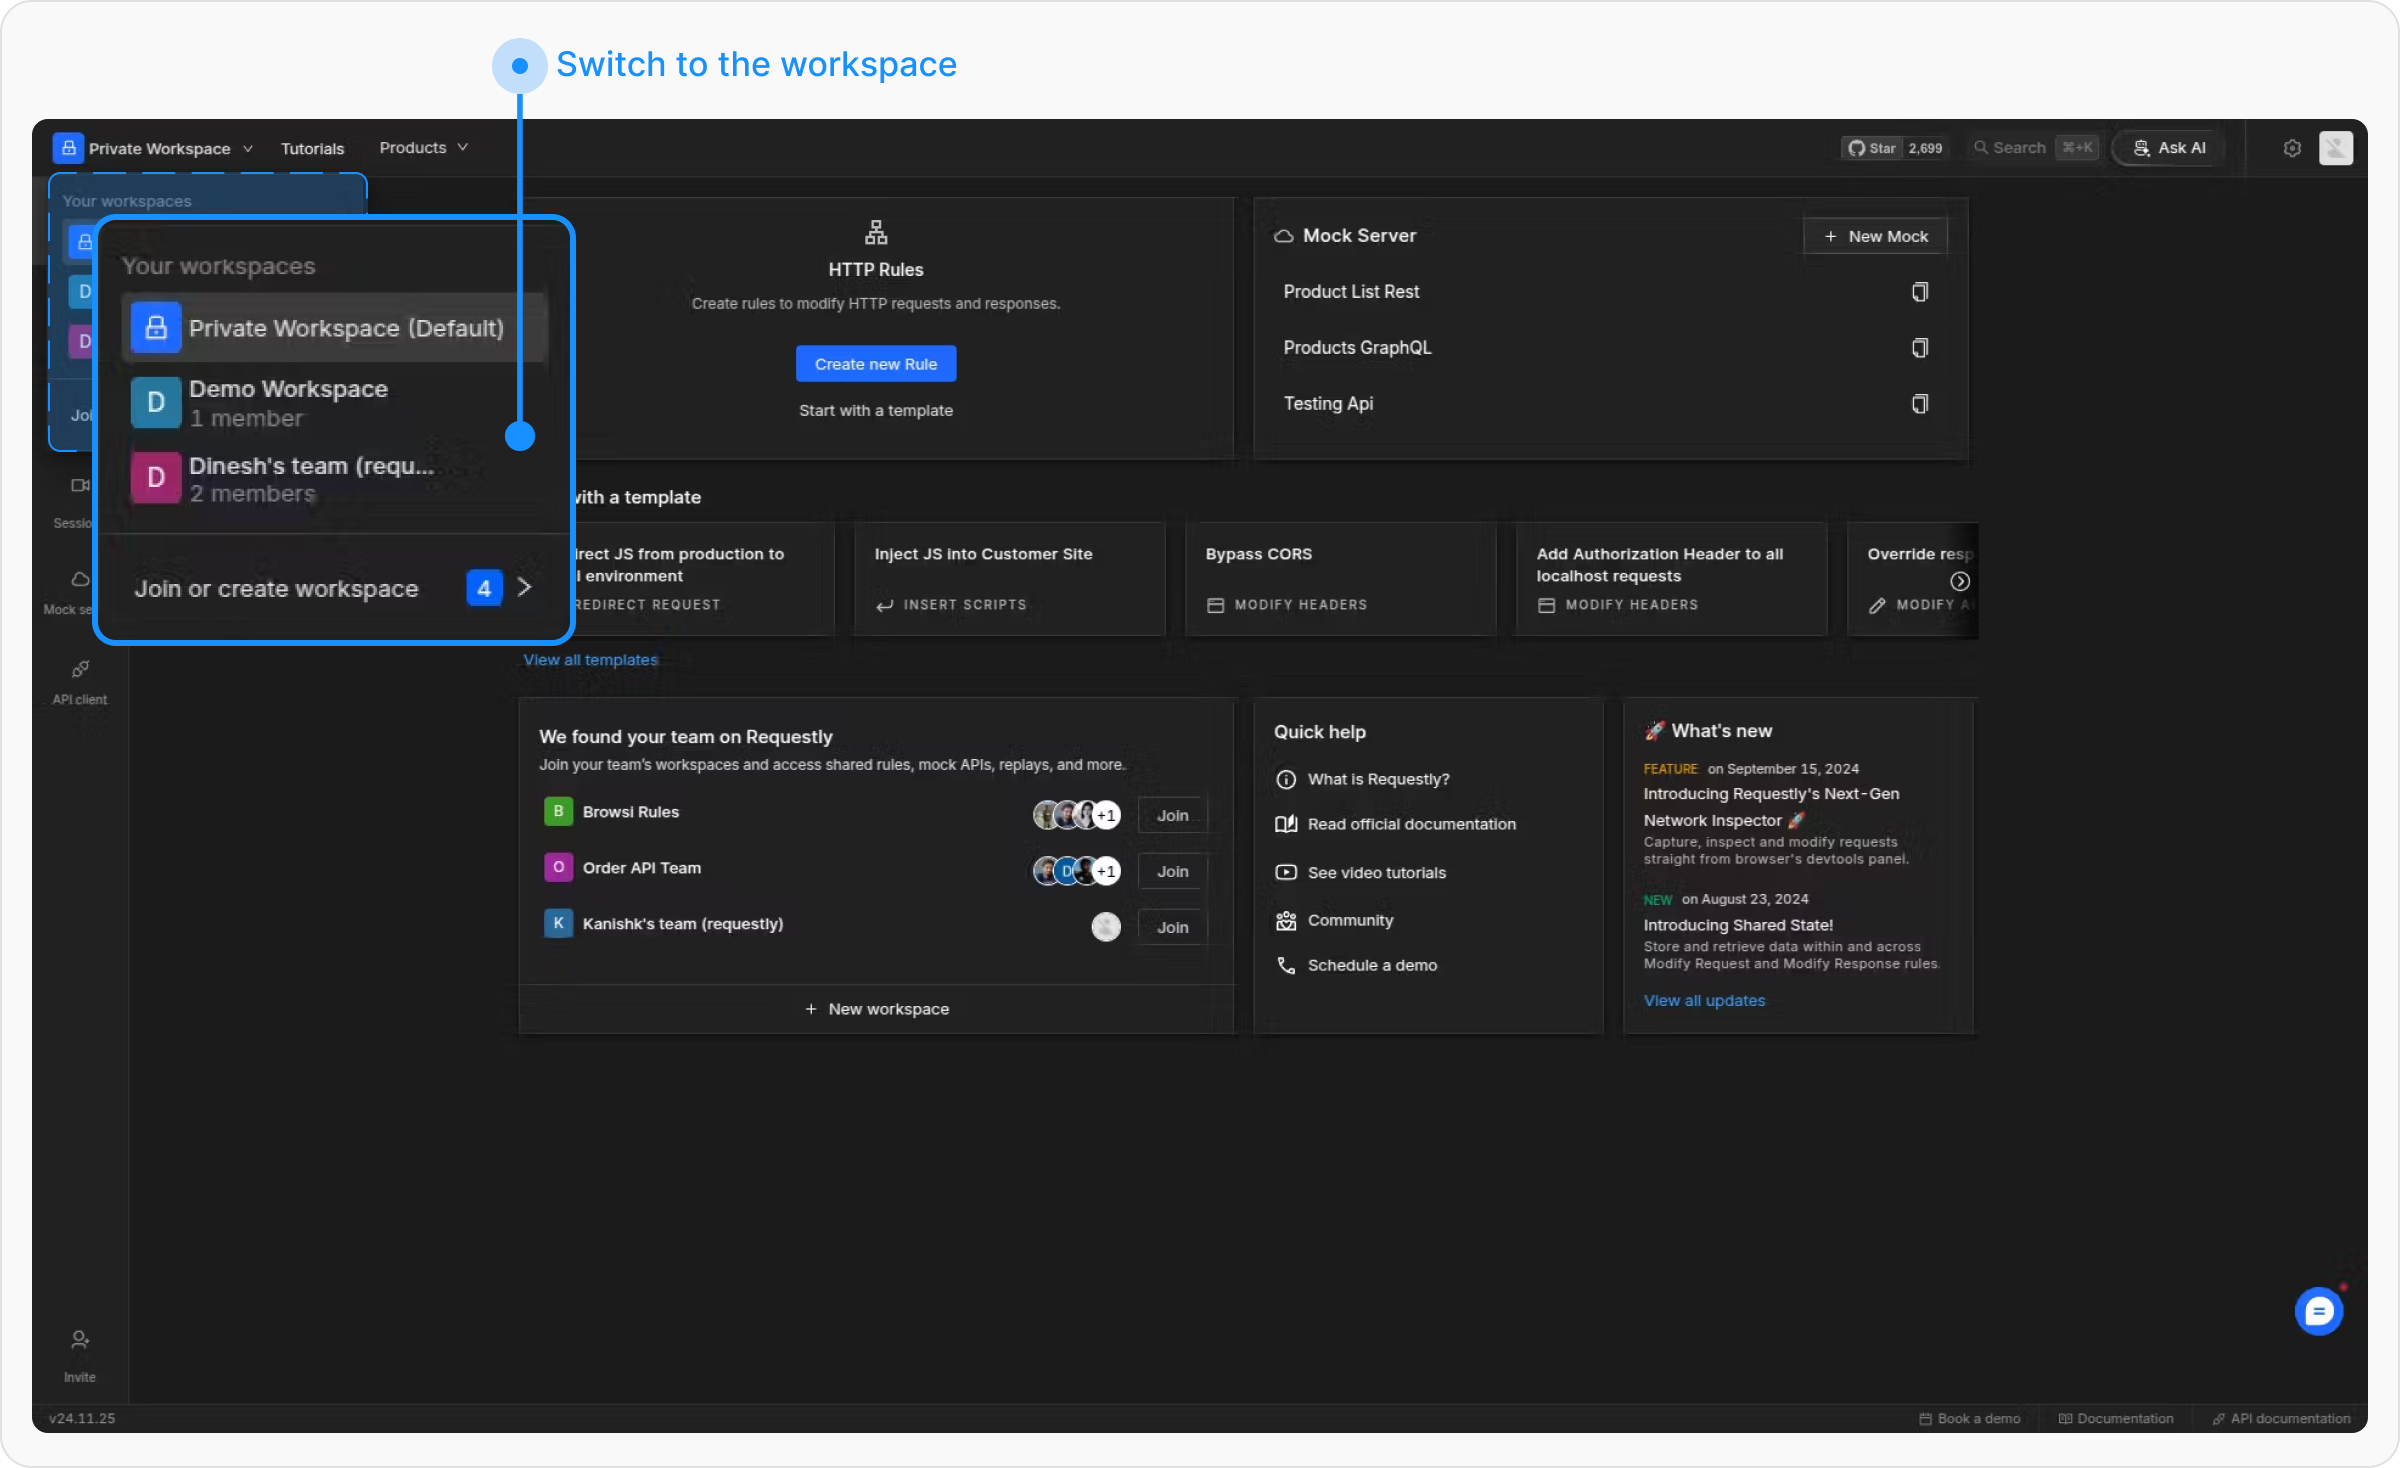
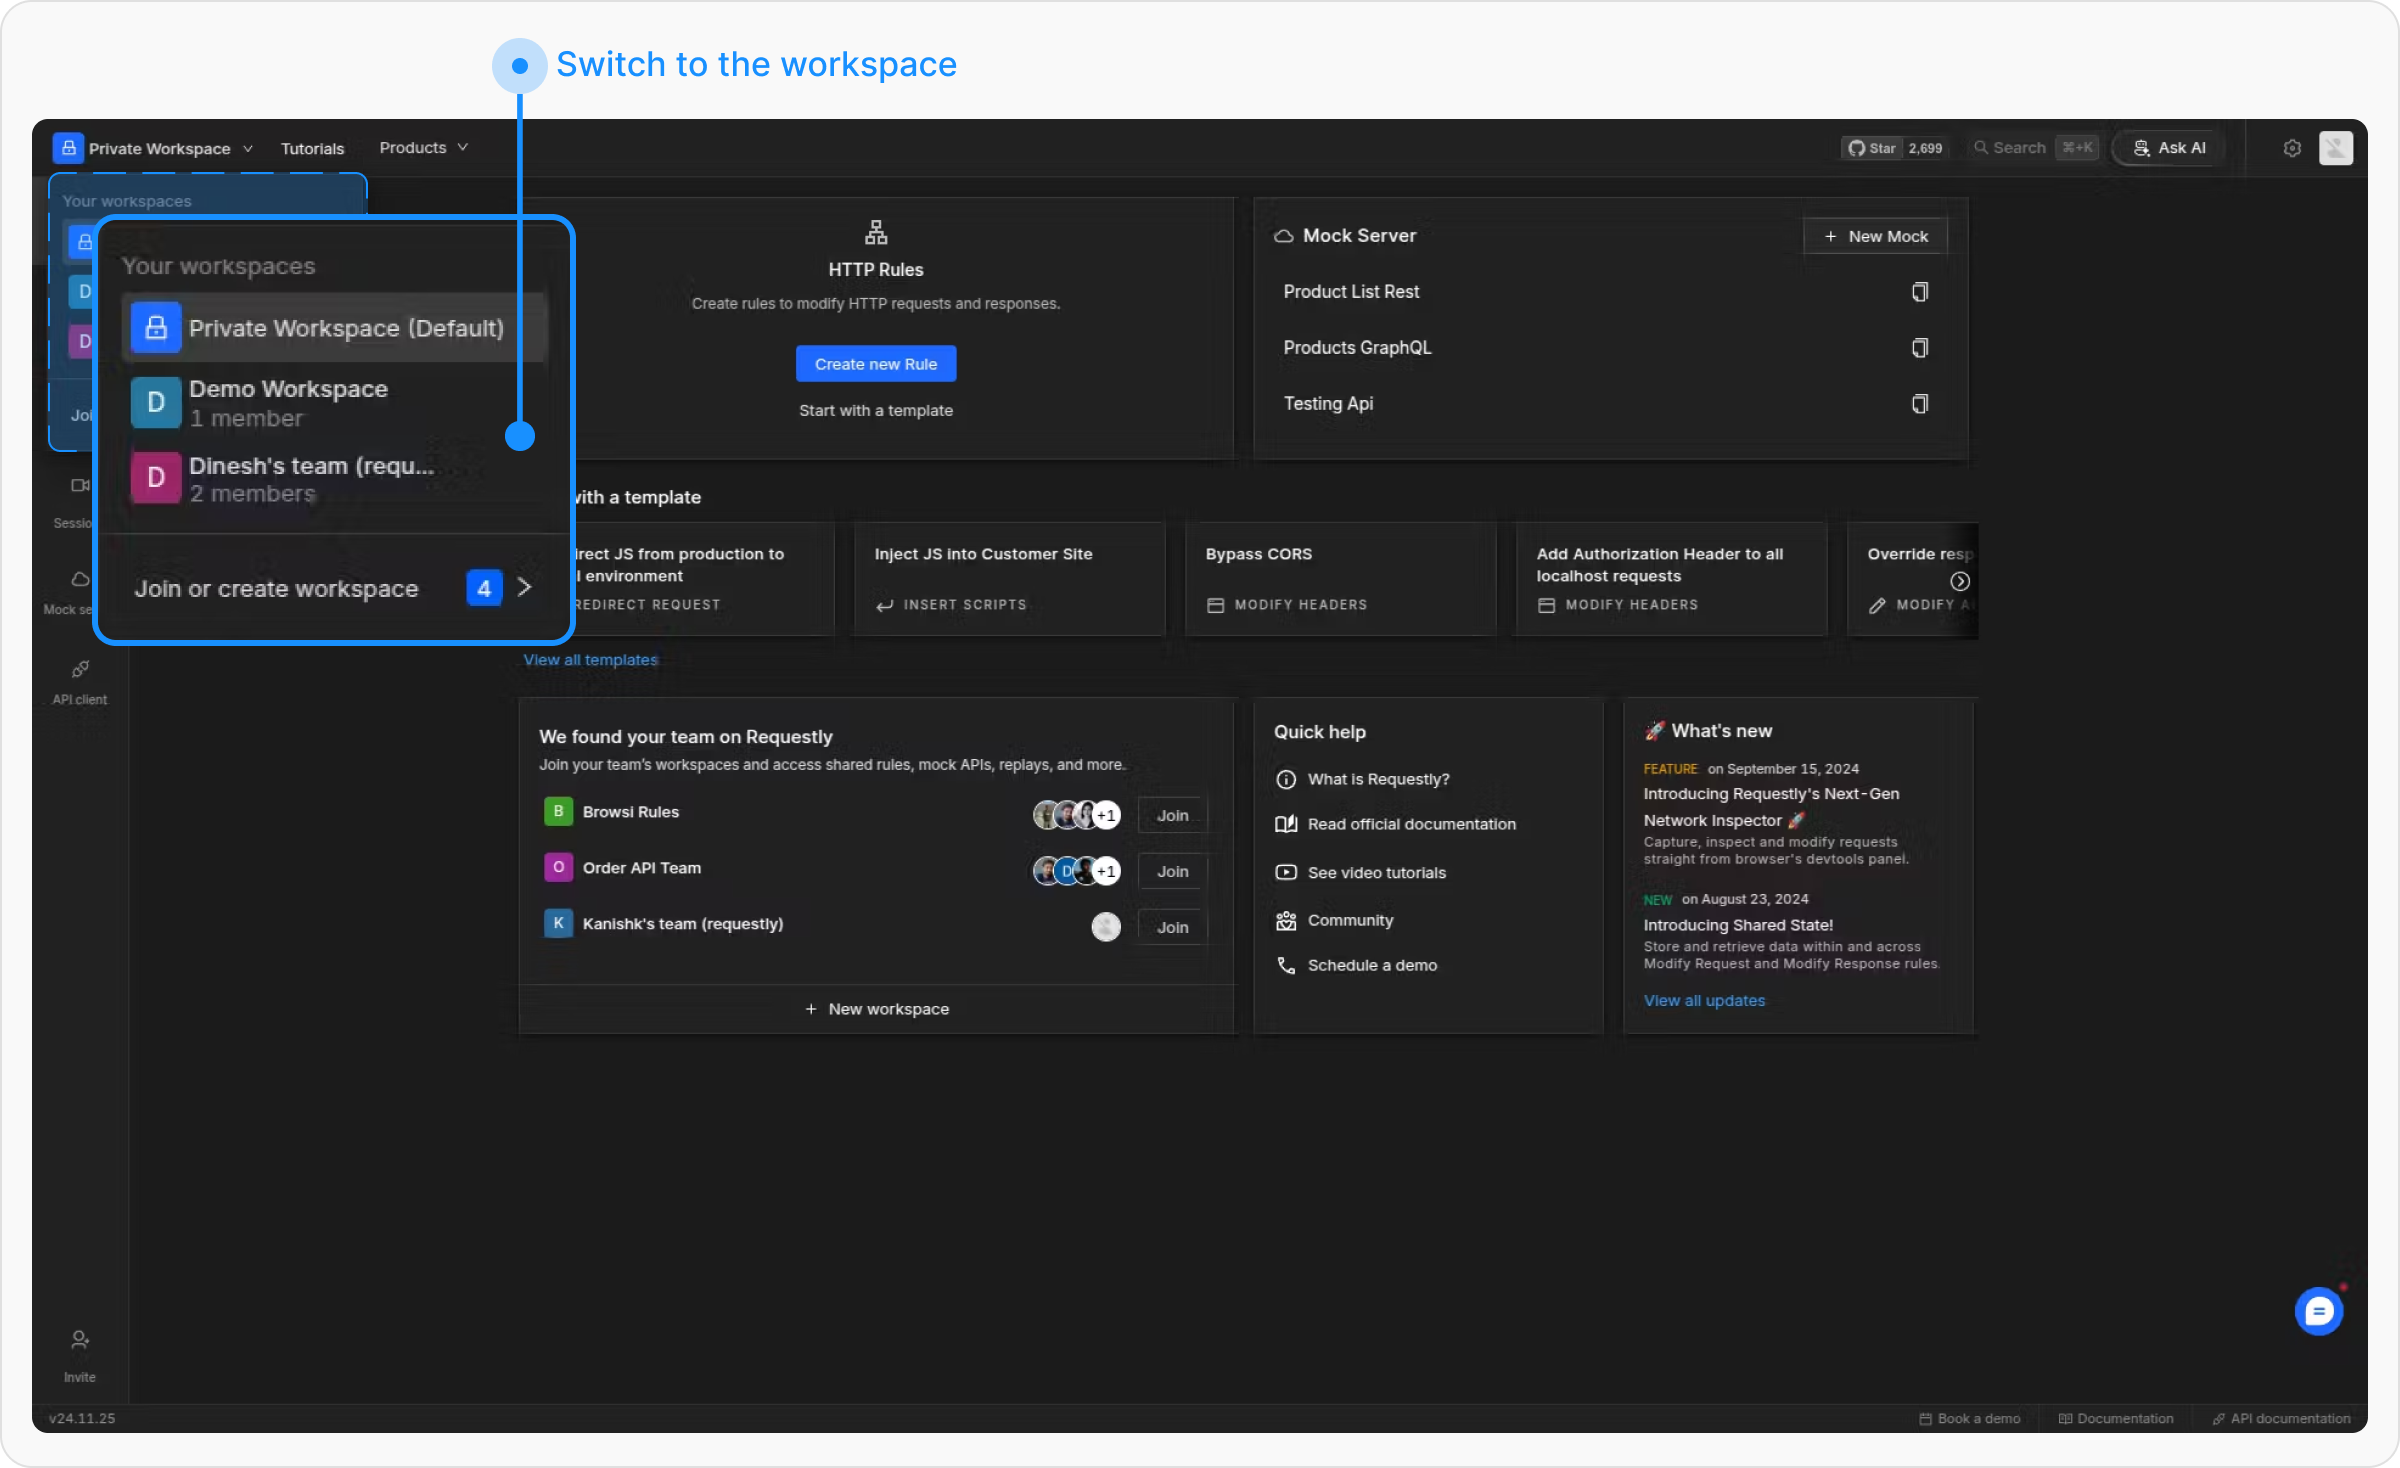
  <Step title="Switch to the project">
    Navigate to the Requestly dashboard and switch to the project where you want to add members.

    <img src="https://mintcdn.com/requestly/J2qFDsPkU9iKOyXZ/images/how-to-get-started-with-shared-workspace/233f23c4-d4ef-4dee-aed4-837c800f4cdb.png?fit=max&auto=format&n=J2qFDsPkU9iKOyXZ&q=85&s=887192ec5deaa8e62349bdb2840dcef8" alt="" align="left" fullwidth="true" width="2400" height="1468" data-path="images/how-to-get-started-with-shared-workspace/233f23c4-d4ef-4dee-aed4-837c800f4cdb.png" />
  </Step>

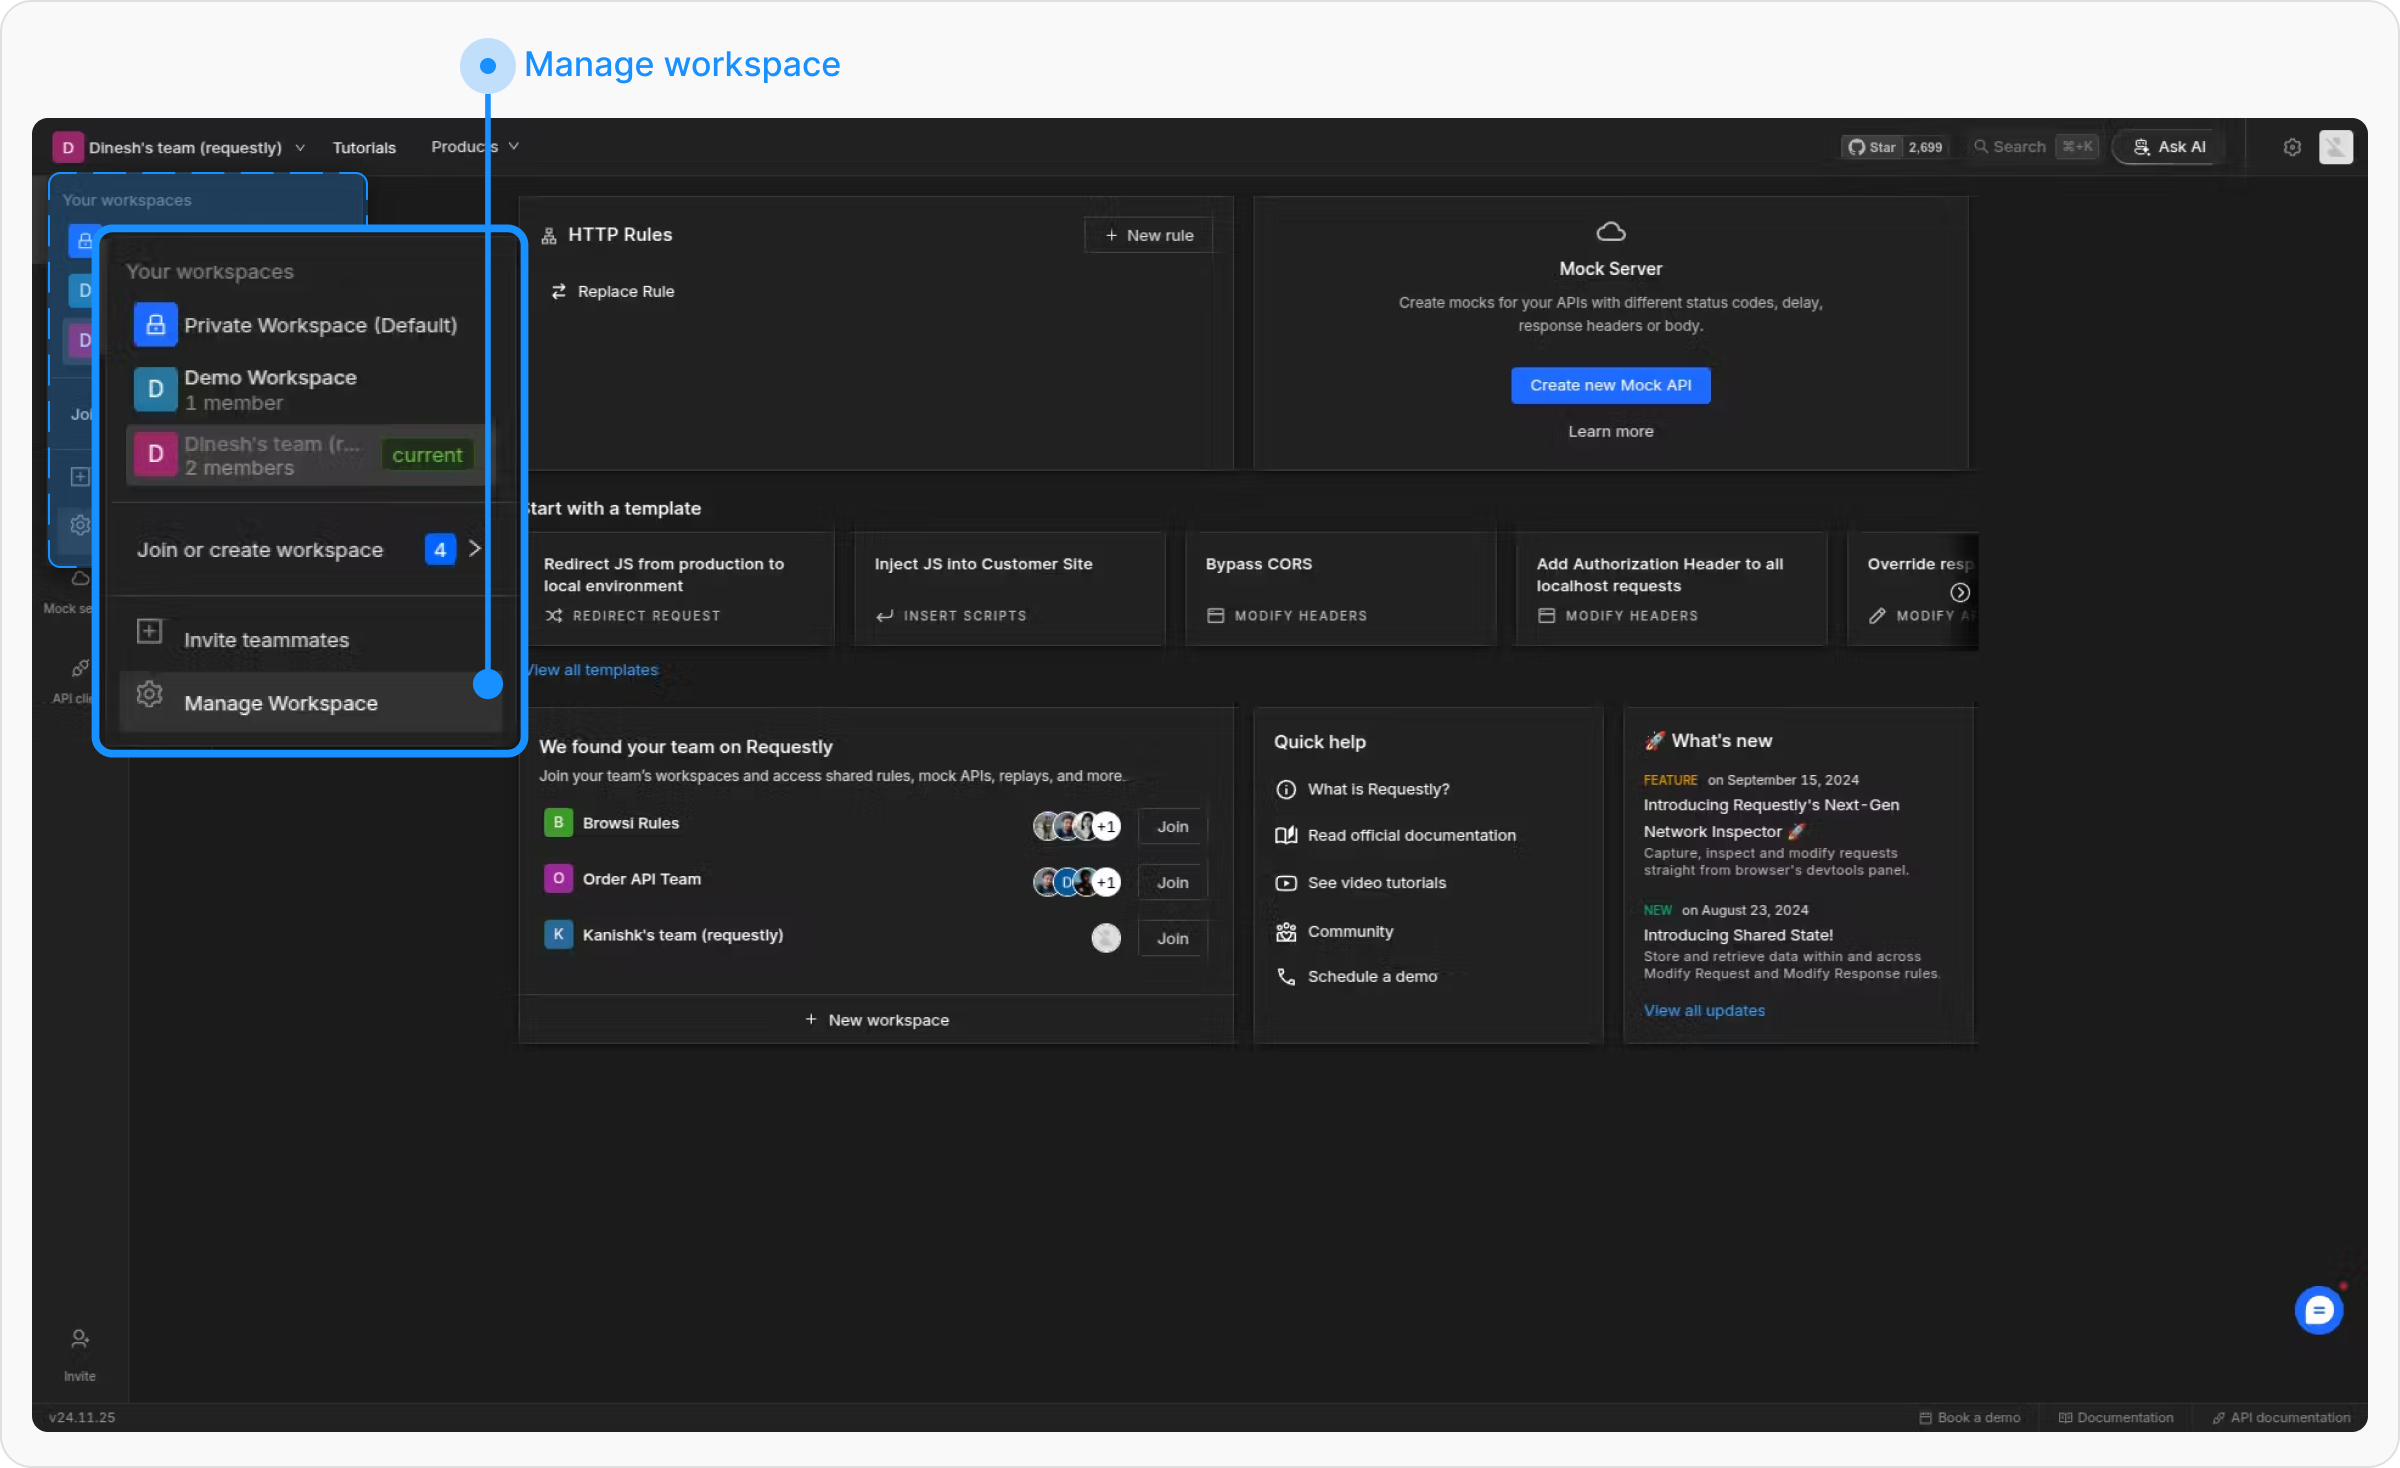
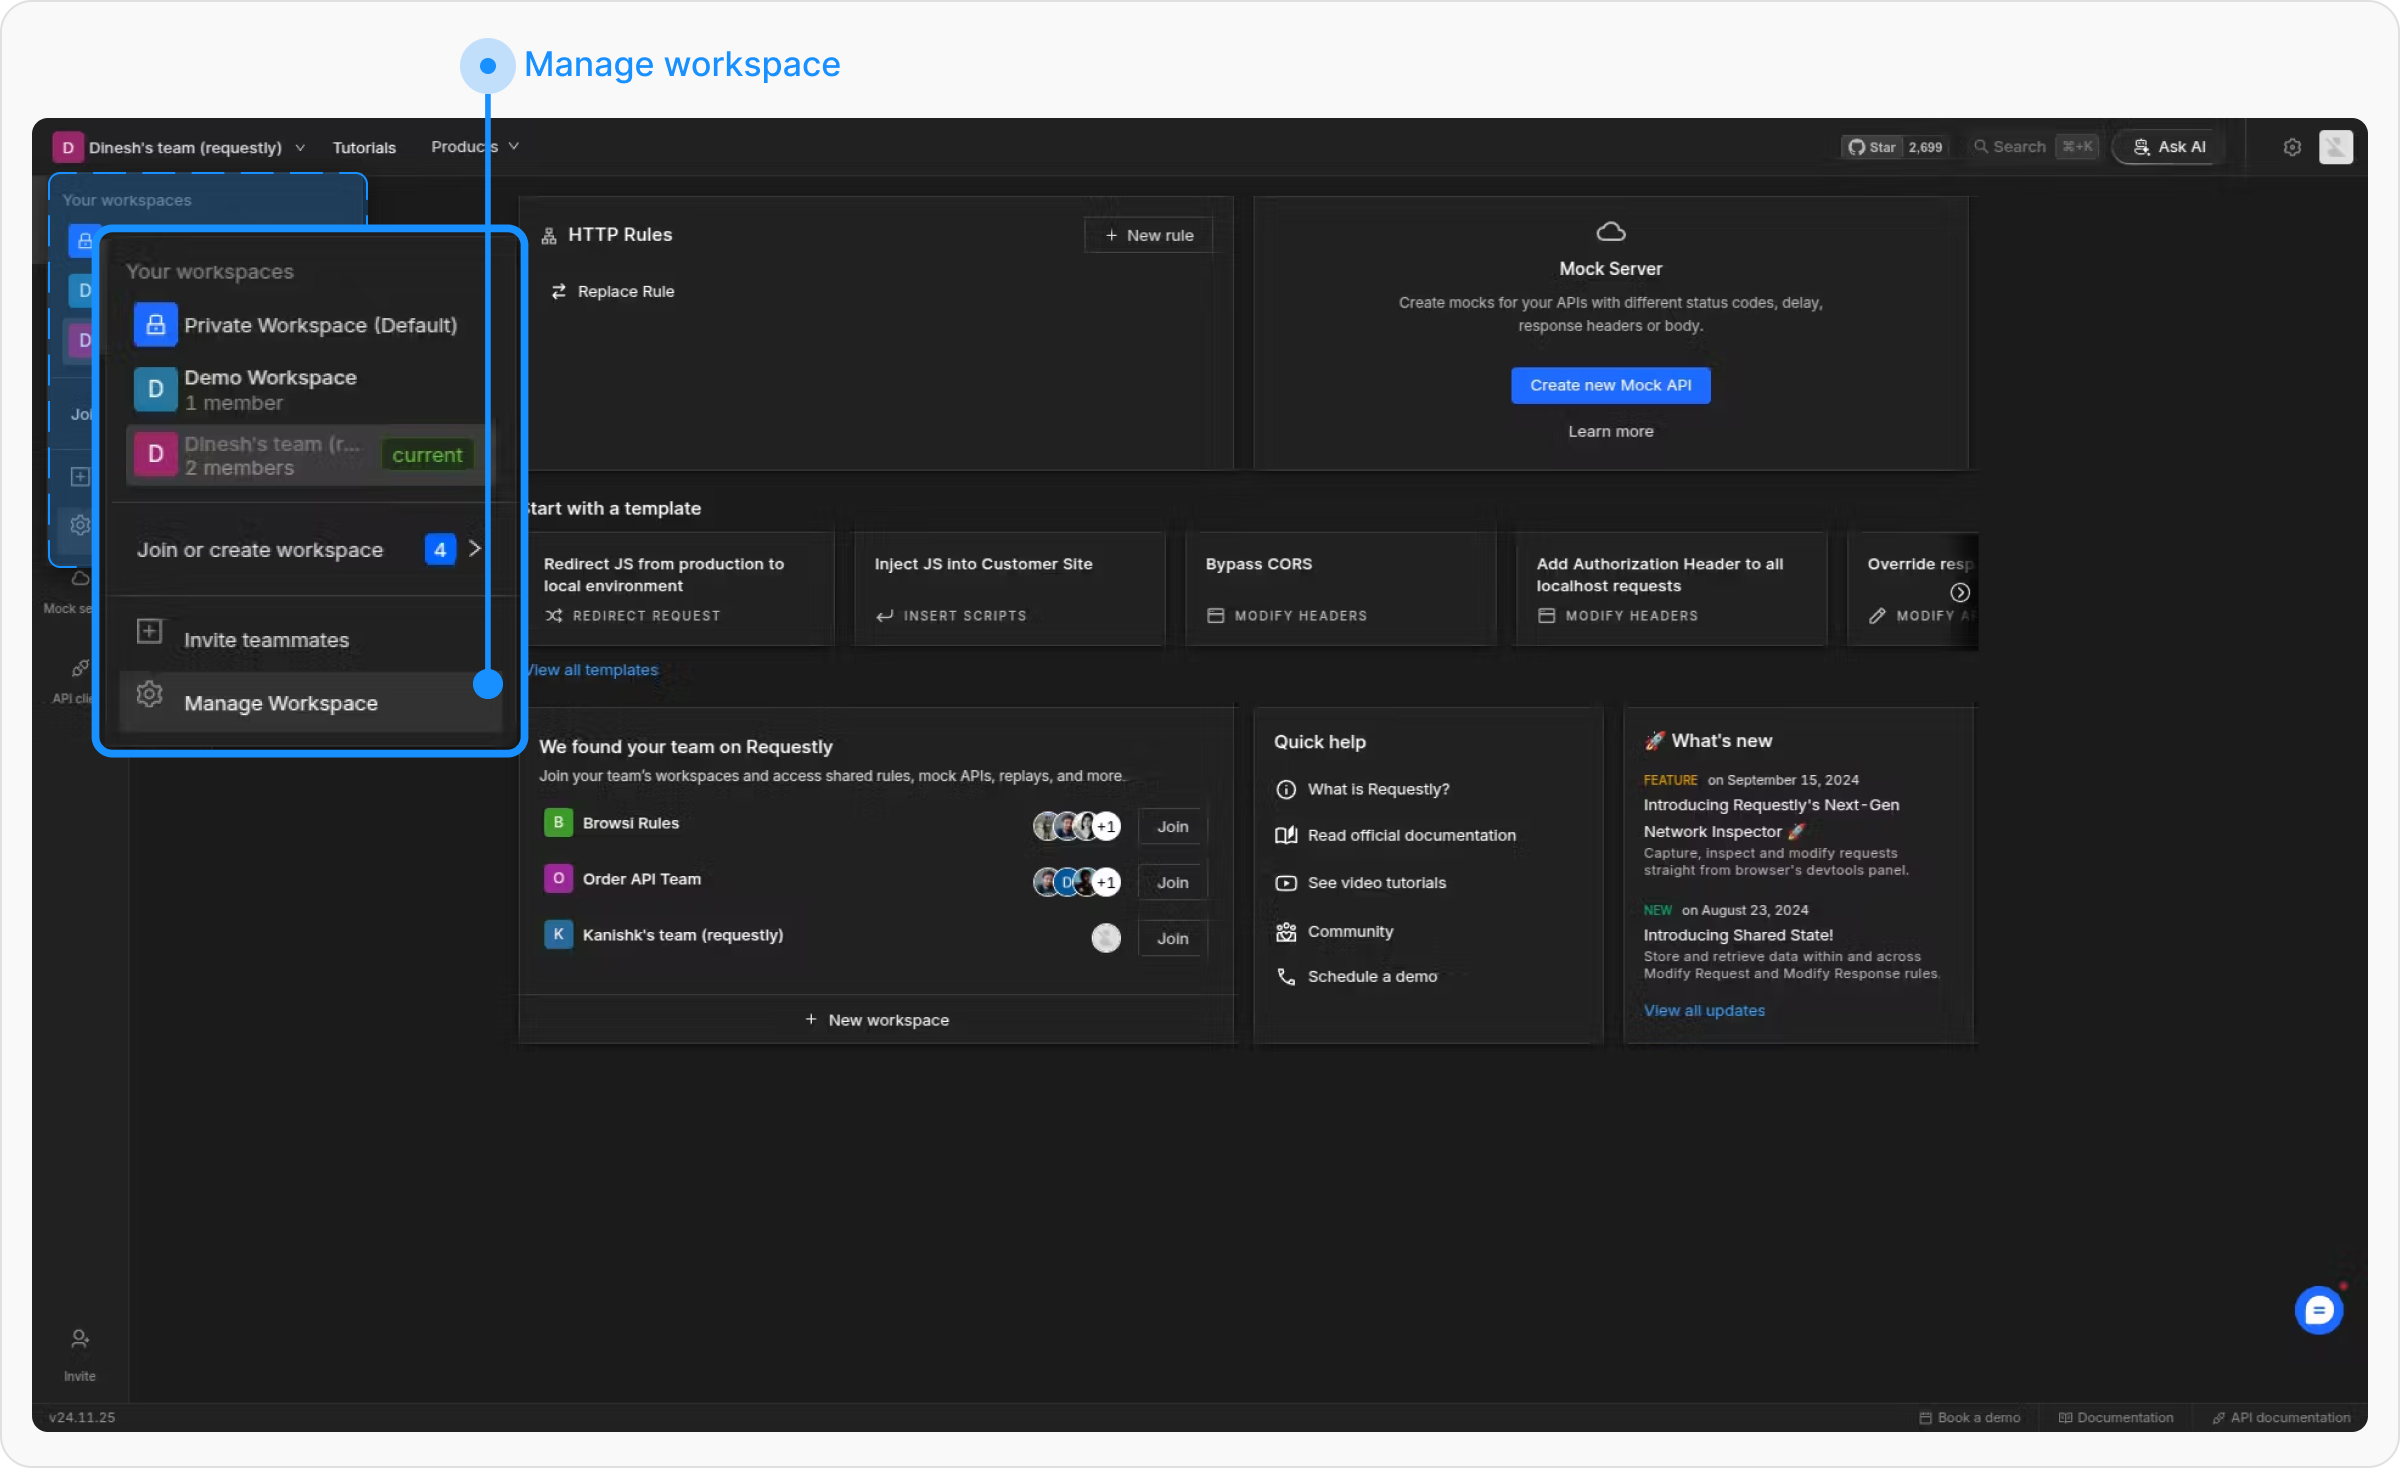
  <Step title="Open Manage project">
    Open the switch project panel and select **“Manage project”**

    <img src="https://mintcdn.com/requestly/J2qFDsPkU9iKOyXZ/images/how-to-get-started-with-shared-workspace/a5671767-467d-4b76-8a4d-31d7c774dd11.png?fit=max&auto=format&n=J2qFDsPkU9iKOyXZ&q=85&s=b018279df44d4343d1ad7a47228783bd" alt="" align="left" fullwidth="true" width="2400" height="1468" data-path="images/how-to-get-started-with-shared-workspace/a5671767-467d-4b76-8a4d-31d7c774dd11.png" />

    Here you can directly invite teammates or go to project settings to see the list of users before inviting.
  </Step>

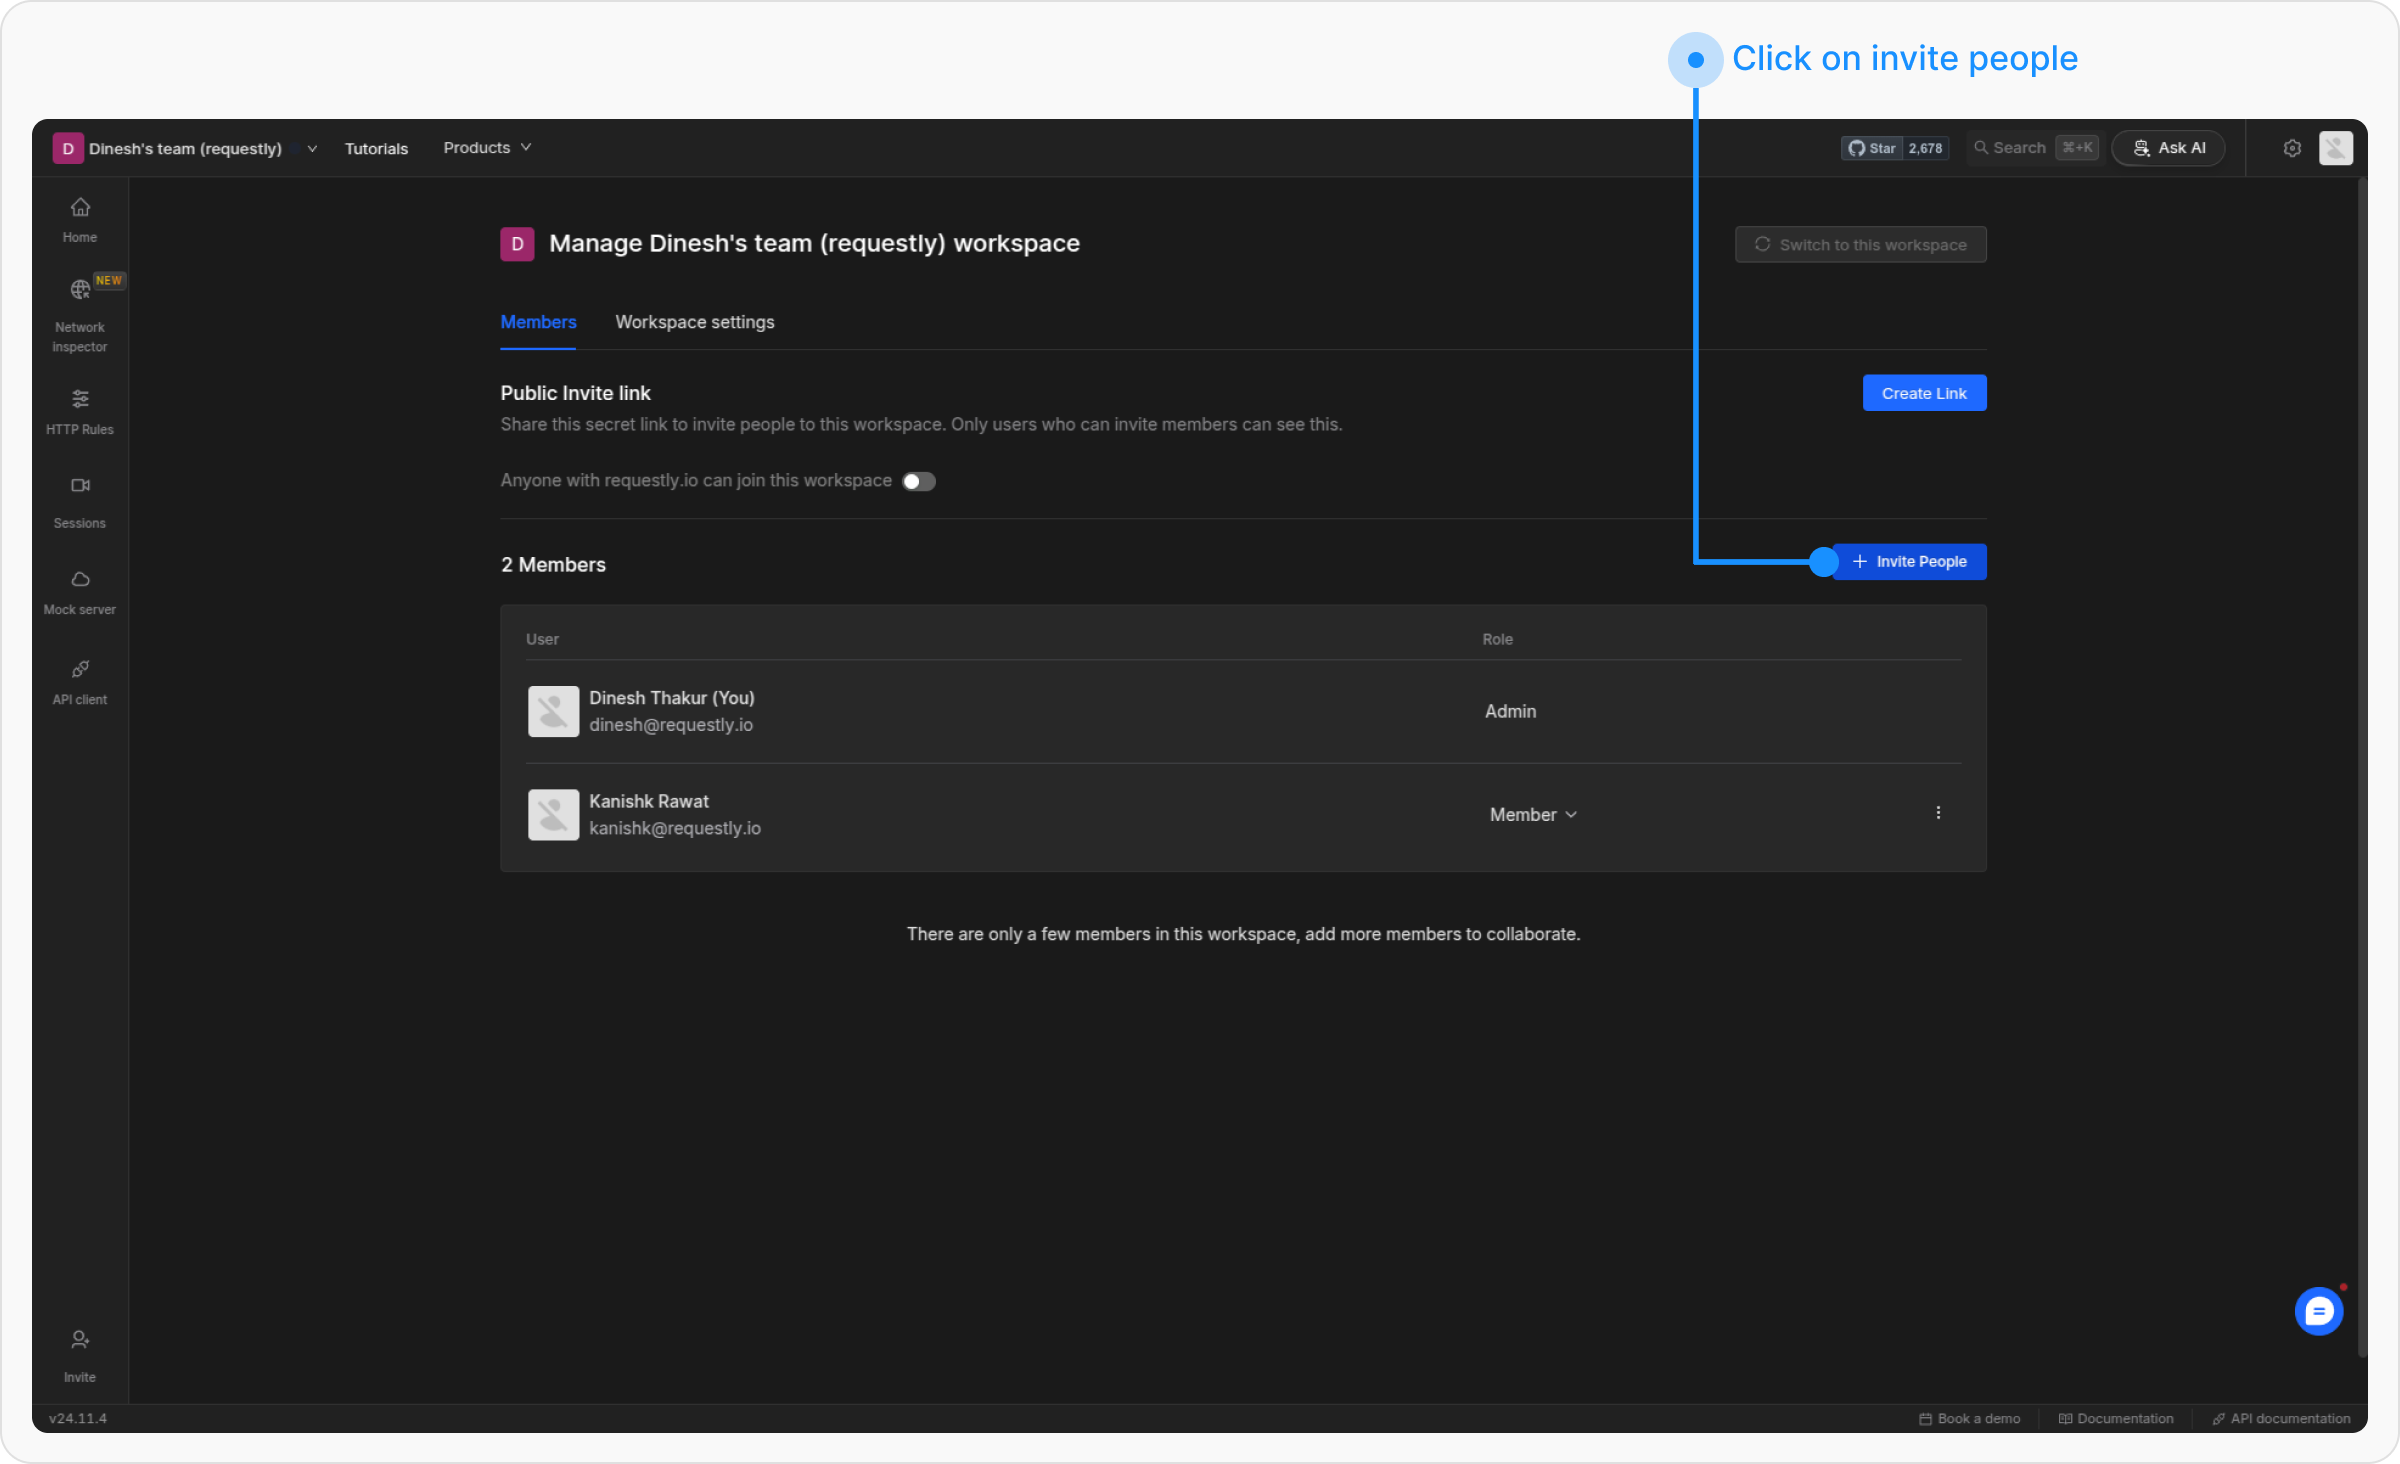
  <Step title="Invite people">
    In the project settings, click the **+ Invite People** button.

    <img src="https://mintcdn.com/requestly/J2qFDsPkU9iKOyXZ/images/how-to-get-started-with-shared-workspace/9dc9e35b-51ad-4eb2-b0b8-dcc3661102f0.png?fit=max&auto=format&n=J2qFDsPkU9iKOyXZ&q=85&s=b4d039a2317d81844de5e76d55eb1442" alt="" align="center" fullwidth="true" width="2400" height="1464" data-path="images/how-to-get-started-with-shared-workspace/9dc9e35b-51ad-4eb2-b0b8-dcc3661102f0.png" />
  </Step>

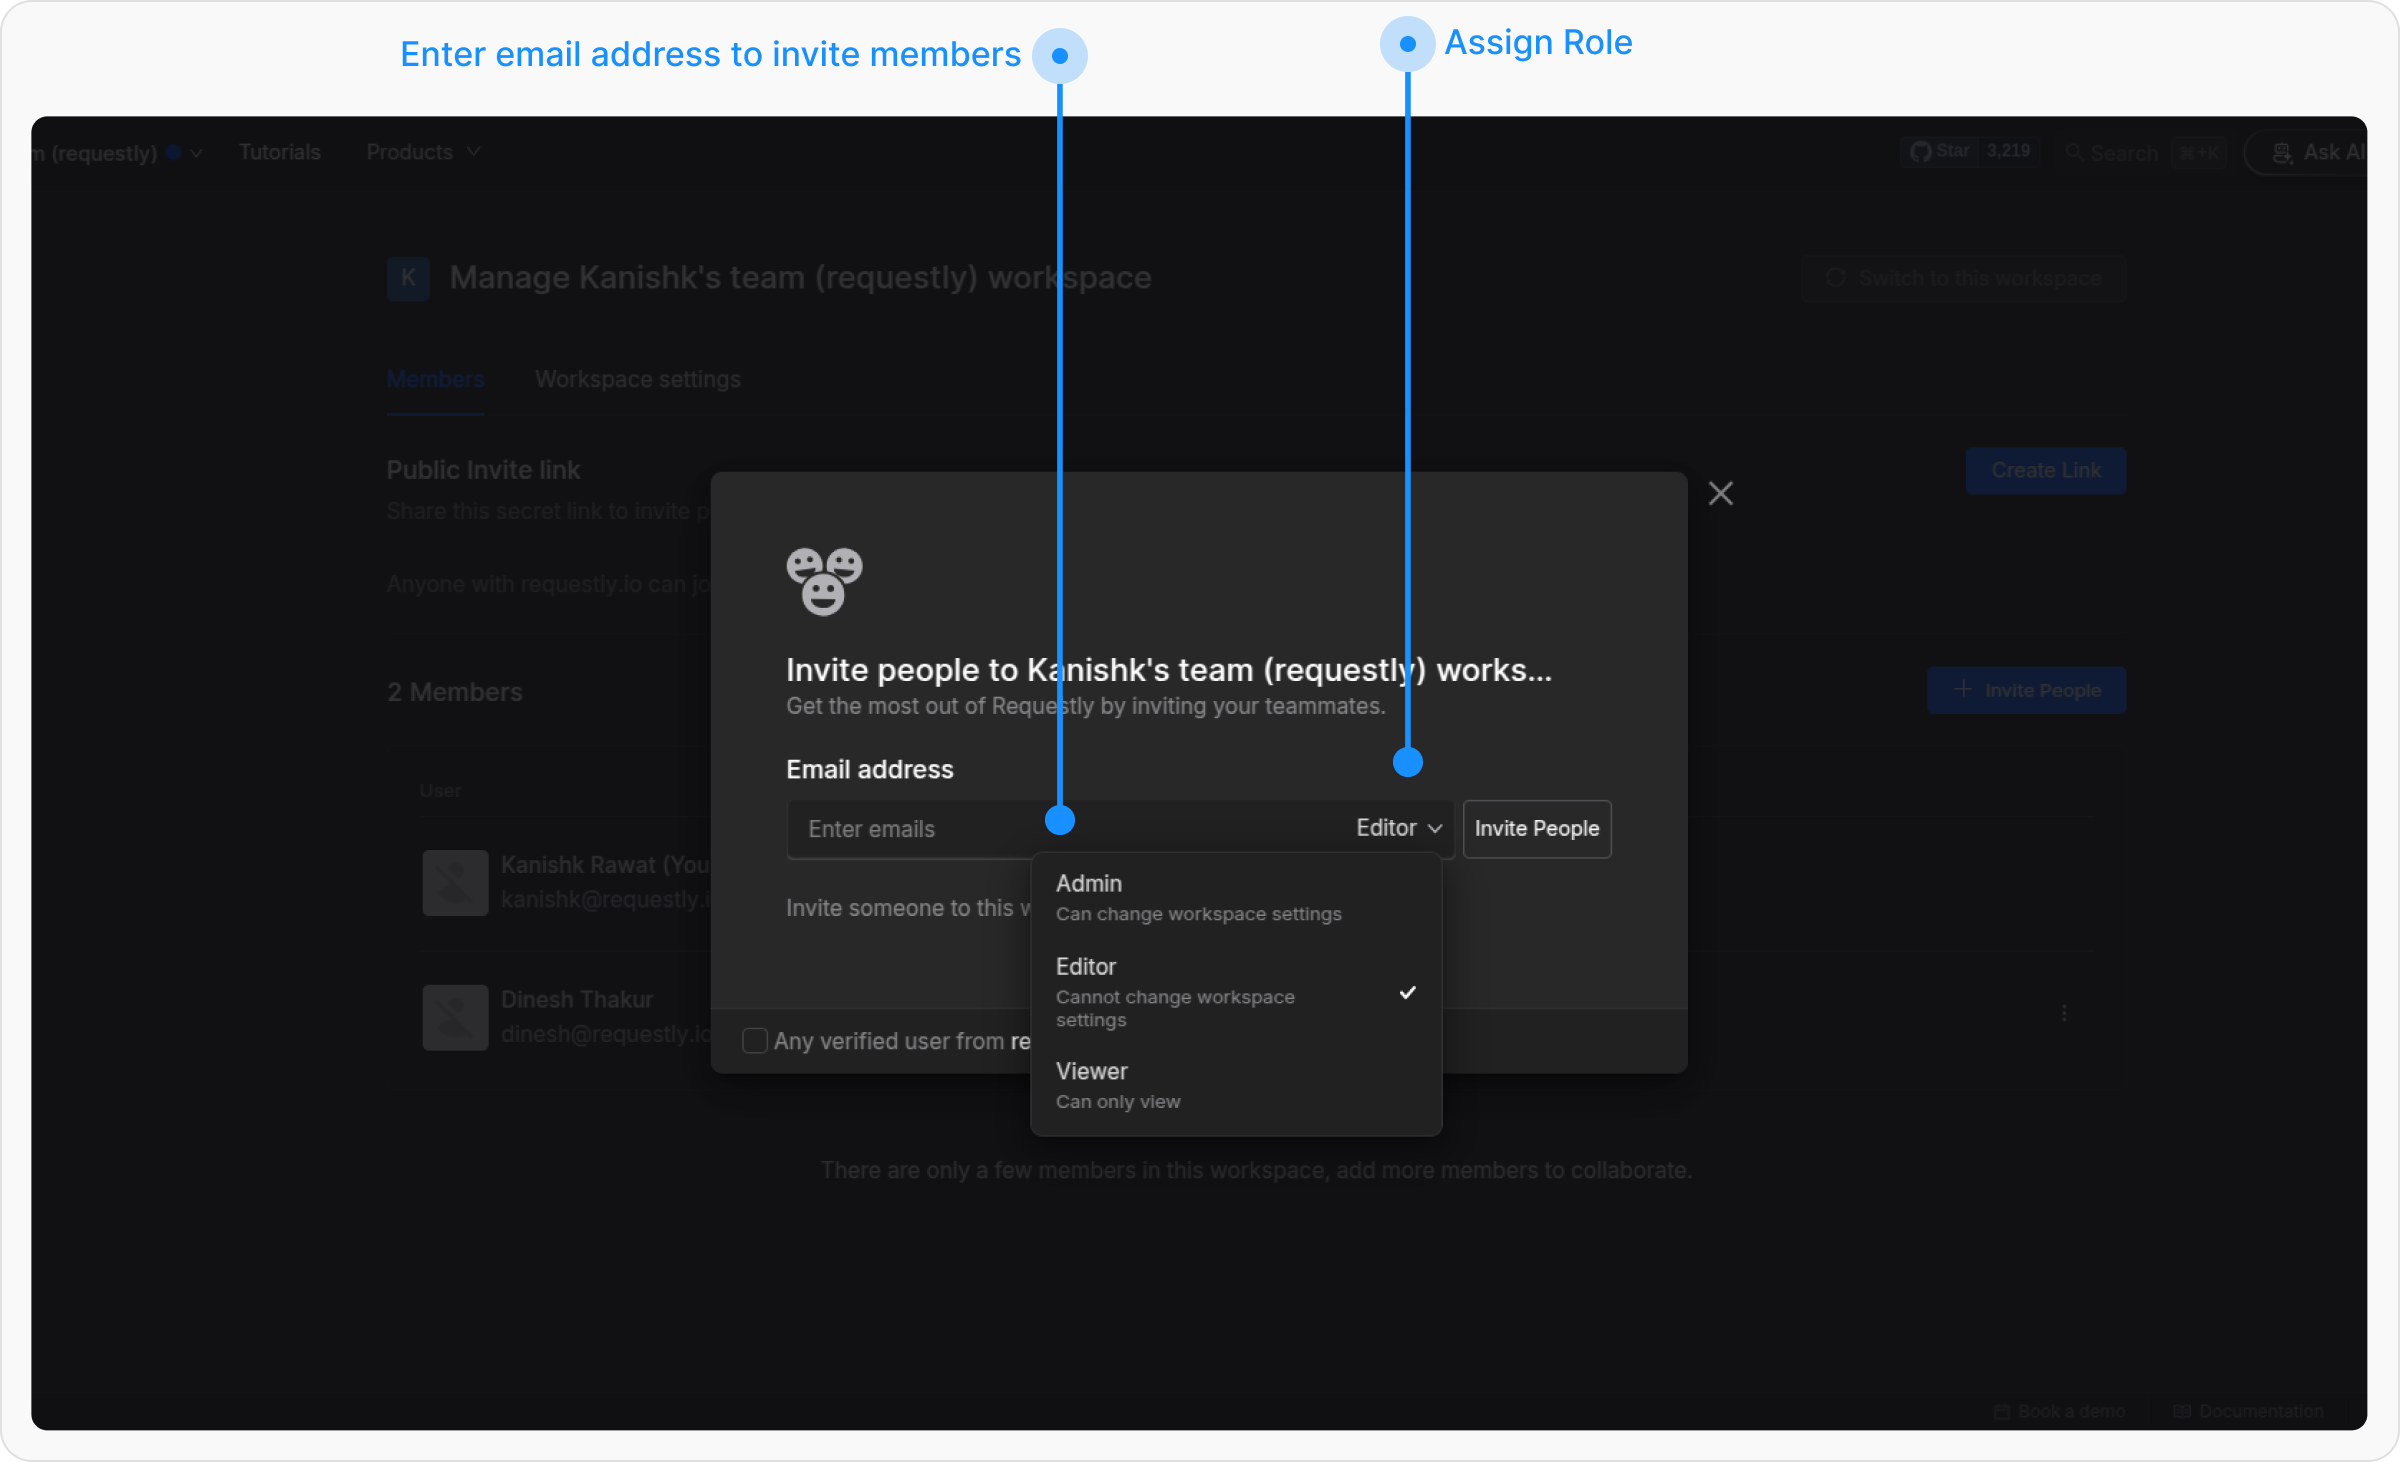
  <Step title="Invite teammates and set roles">
    Enter your teammates email addresses and assign them specific roles.

    <img src="https://mintcdn.com/requestly/J2qFDsPkU9iKOyXZ/images/how-to-get-started-with-shared-workspace/62157e63-6fcf-4c07-a28d-4deb833a49f4.png?fit=max&auto=format&n=J2qFDsPkU9iKOyXZ&q=85&s=16cb94f53cb9923d0275ff22e27bc392" align="center" fullwidth="false" width="2400" height="1462" data-path="images/how-to-get-started-with-shared-workspace/62157e63-6fcf-4c07-a28d-4deb833a49f4.png" />
  </Step>

  <Step title="Await confirmation">
    Invited members will receive an email to join the project. Once they accept, they will appear in the members list.
  </Step>
</Steps>

### Removing members

<Steps>
  <Step title="Switch to the project">
    Navigate to the Requestly dashboard and switch to the project where you want to remove members.

    <img src="https://mintcdn.com/requestly/J2qFDsPkU9iKOyXZ/images/how-to-get-started-with-shared-workspace/c2f2b1e9-1cab-4f6e-bfd4-86c1dd1a0fb6.png?fit=max&auto=format&n=J2qFDsPkU9iKOyXZ&q=85&s=fe603b18bca3a450817ddddd7bfda16e" alt="" align="center" fullwidth="true" width="2400" height="1468" data-path="images/how-to-get-started-with-shared-workspace/c2f2b1e9-1cab-4f6e-bfd4-86c1dd1a0fb6.png" />
  </Step>

  <Step title="Open Manage project">
    Open the switch project panel and select **“Manage project”**

    <img src="https://mintcdn.com/requestly/J2qFDsPkU9iKOyXZ/images/how-to-get-started-with-shared-workspace/3f8b873f-cff4-4f02-8044-63ecd70a12f2.png?fit=max&auto=format&n=J2qFDsPkU9iKOyXZ&q=85&s=e6f9ebea8e7feff110d70a65824f730b" alt="" align="center" fullwidth="true" width="2400" height="1468" data-path="images/how-to-get-started-with-shared-workspace/3f8b873f-cff4-4f02-8044-63ecd70a12f2.png" />
  </Step>

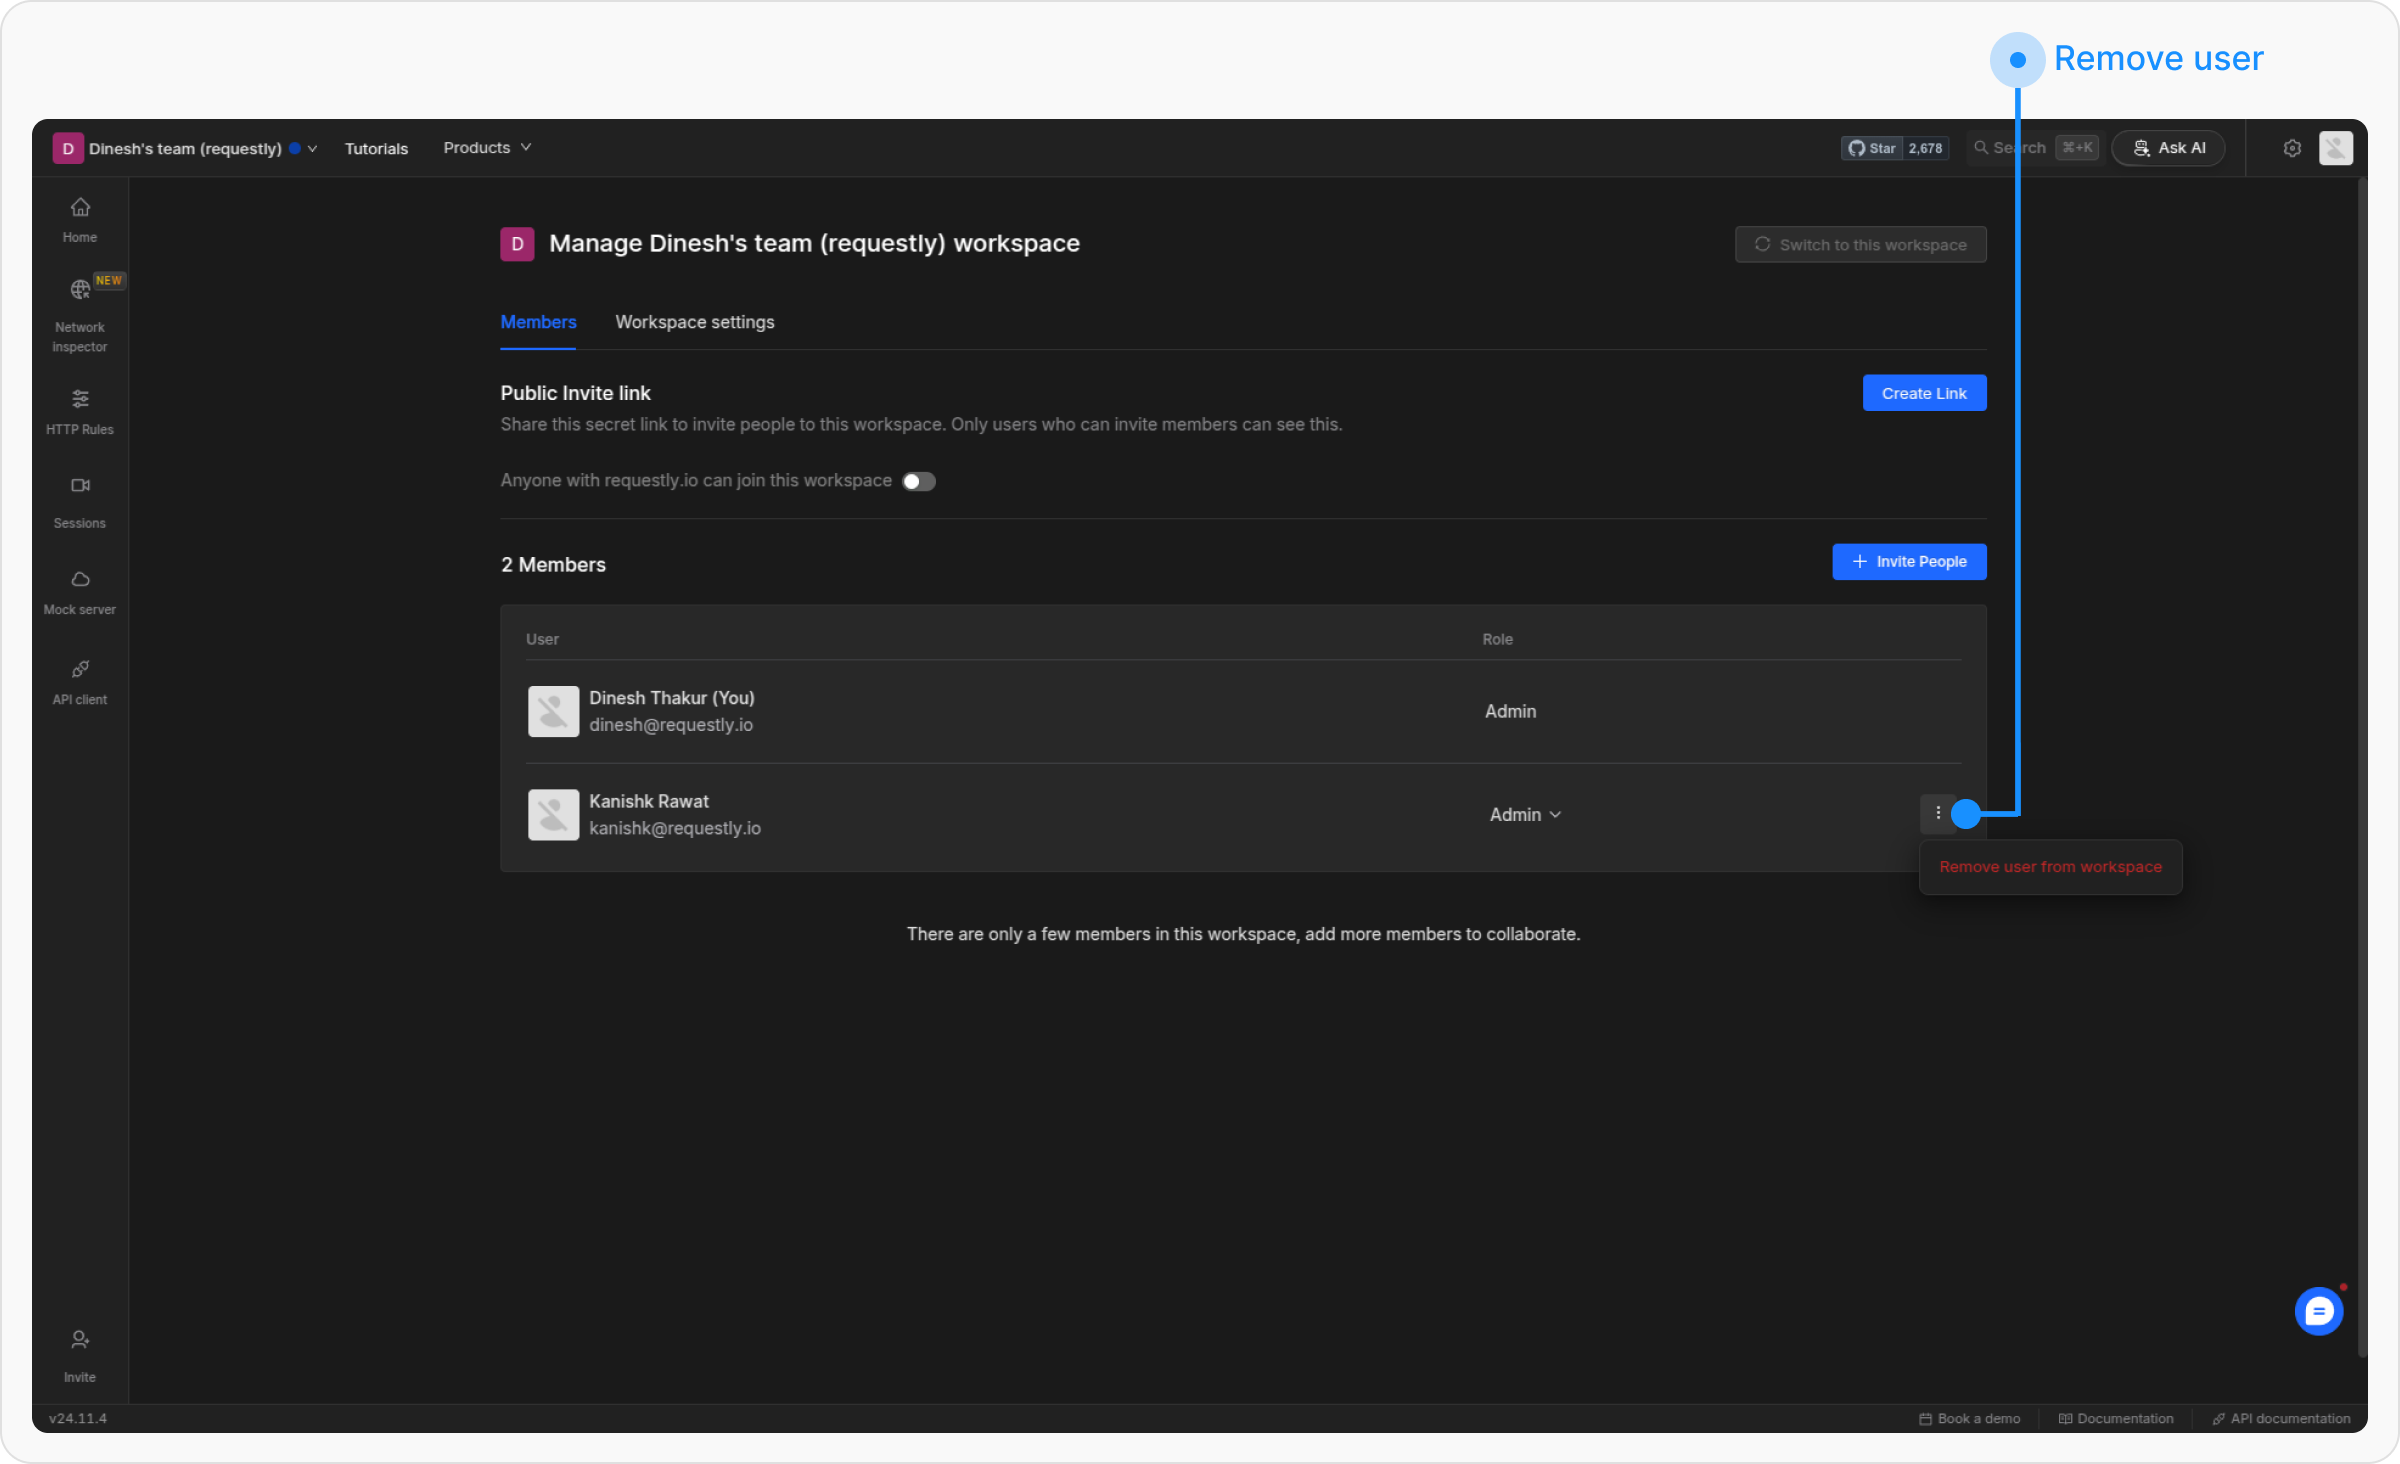
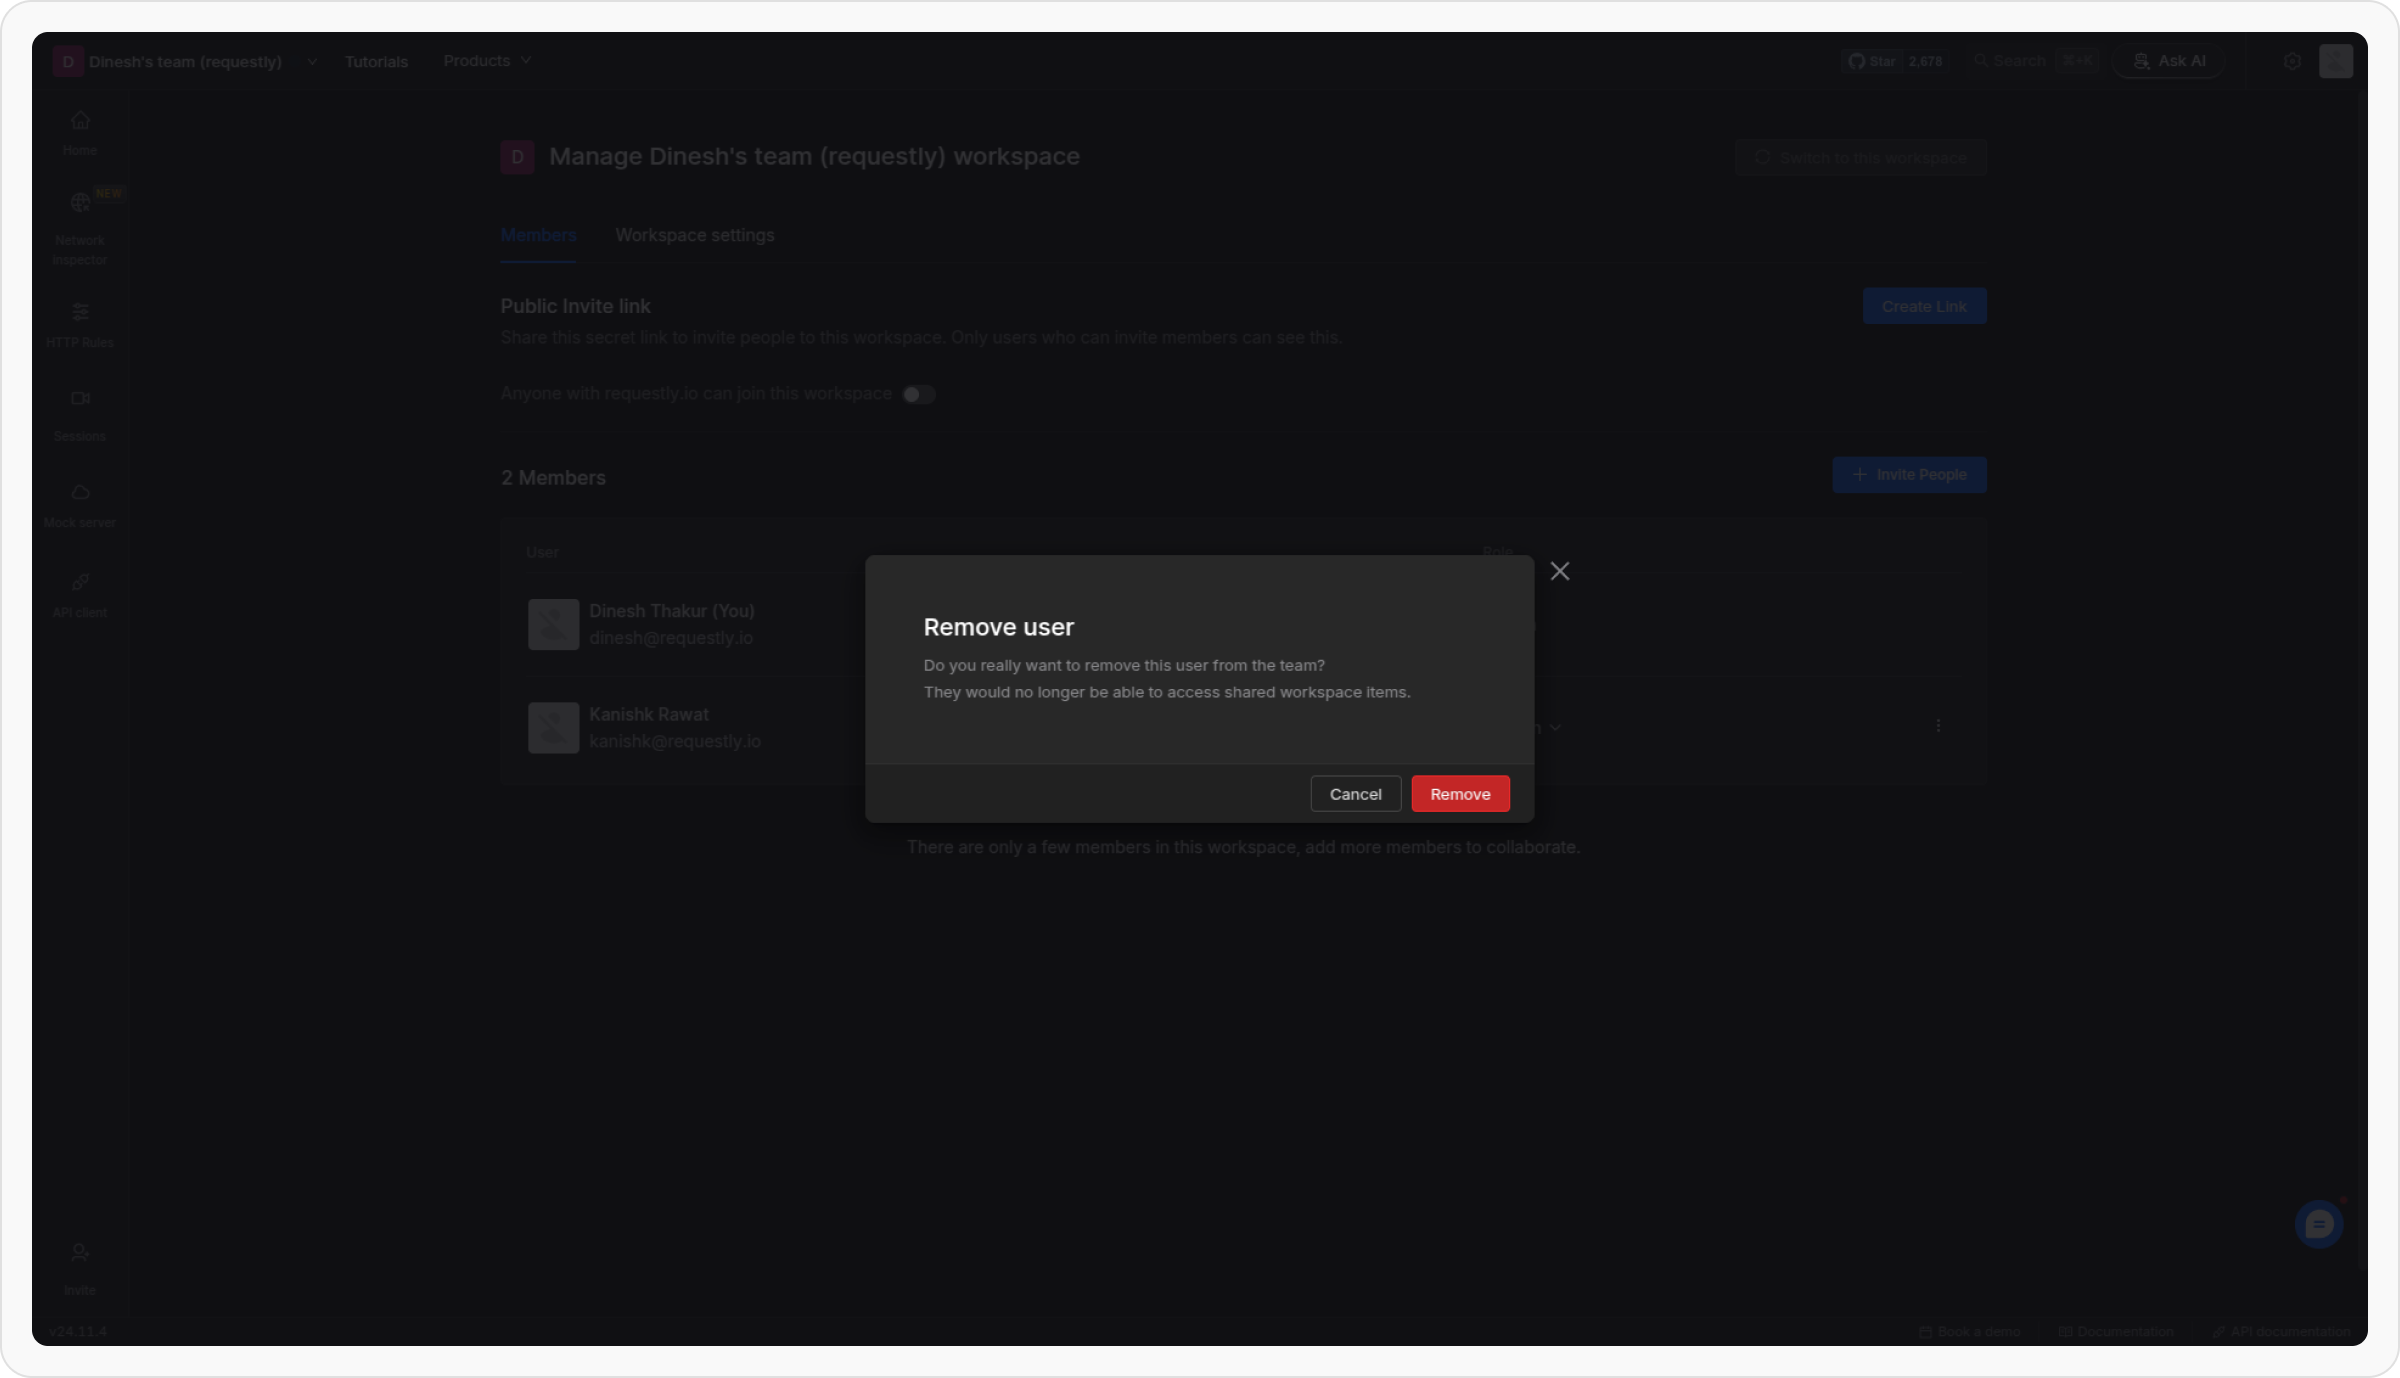
  <Step title="Remove the member">
    Locate the member you want to remove from the members’ list. Click the 3-dot menu next to their role and select **Remove user from project**.

    <img src="https://mintcdn.com/requestly/J2qFDsPkU9iKOyXZ/images/how-to-get-started-with-shared-workspace/53da708b-c0bf-44b5-b1b1-68be9493cd7c.png?fit=max&auto=format&n=J2qFDsPkU9iKOyXZ&q=85&s=a3dd15d80c31fc521636aa75bafd9dfe" alt="" align="center" fullwidth="true" width="2400" height="1464" data-path="images/how-to-get-started-with-shared-workspace/53da708b-c0bf-44b5-b1b1-68be9493cd7c.png" />
  </Step>

  <Step title="Confirm the removal">
    A confirmation prompt will appear. Confirm the action to remove the member successfully.

    <img src="https://mintcdn.com/requestly/J2qFDsPkU9iKOyXZ/images/how-to-get-started-with-shared-workspace/64736a55-a369-47b7-9df1-1c9ddd68ced0.webp?fit=max&auto=format&n=J2qFDsPkU9iKOyXZ&q=85&s=24fdb3428dcc3ab100b45d2a7dd229a2" alt="" align="center" fullwidth="true" width="2400" height="1378" data-path="images/how-to-get-started-with-shared-workspace/64736a55-a369-47b7-9df1-1c9ddd68ced0.webp" />
  </Step>

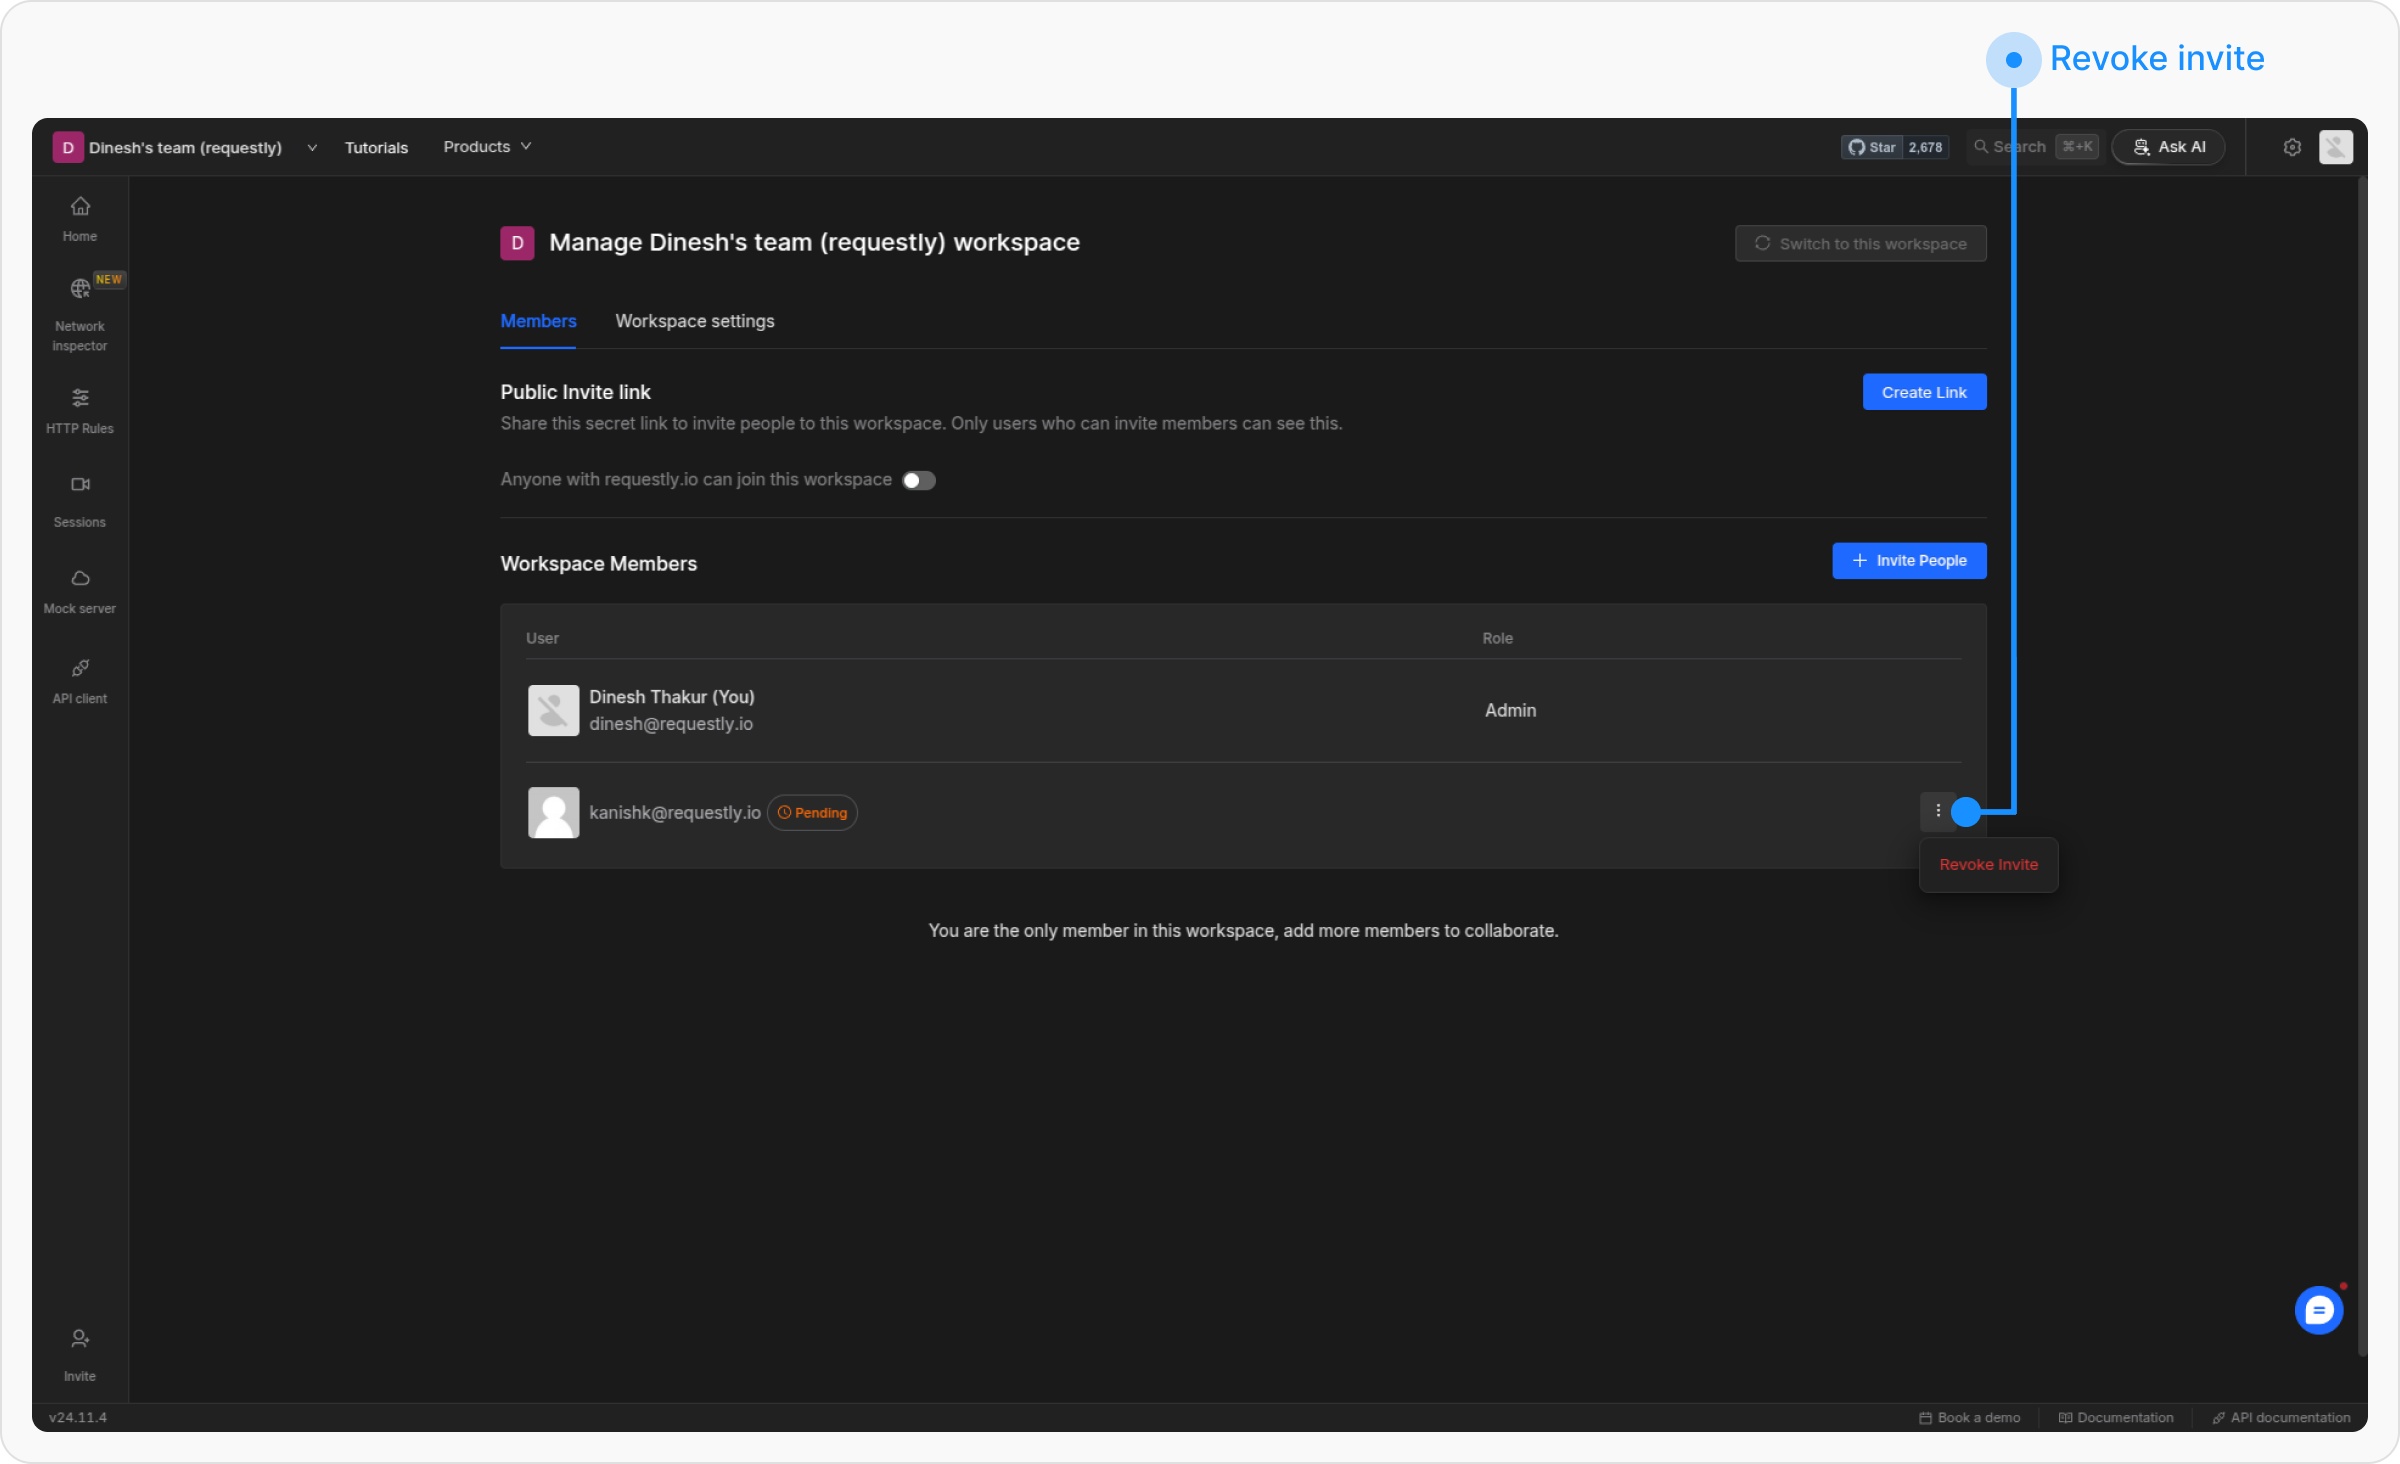
  <Step title="Revoke pending invites">
    If a member has been invited but not yet joined, you can revoke their invite from the same dropdown.
    <img src="https://mintcdn.com/requestly/J2qFDsPkU9iKOyXZ/images/how-to-get-started-with-shared-workspace/aef144cf-cf9c-403a-99bc-87ba10866a29.png?fit=max&auto=format&n=J2qFDsPkU9iKOyXZ&q=85&s=27468c0f87aaaa399560cb9a7ff151ce" alt="" align="center" fullwidth="true" width="2400" height="1464" data-path="images/how-to-get-started-with-shared-workspace/aef144cf-cf9c-403a-99bc-87ba10866a29.png" />
  </Step>
</Steps>