Availability: OAuth authorization is available in the Requestly desktop app and is rolling out gradually. If OAuth 2.0 does not appear in the auth-type dropdown, update to the latest version.
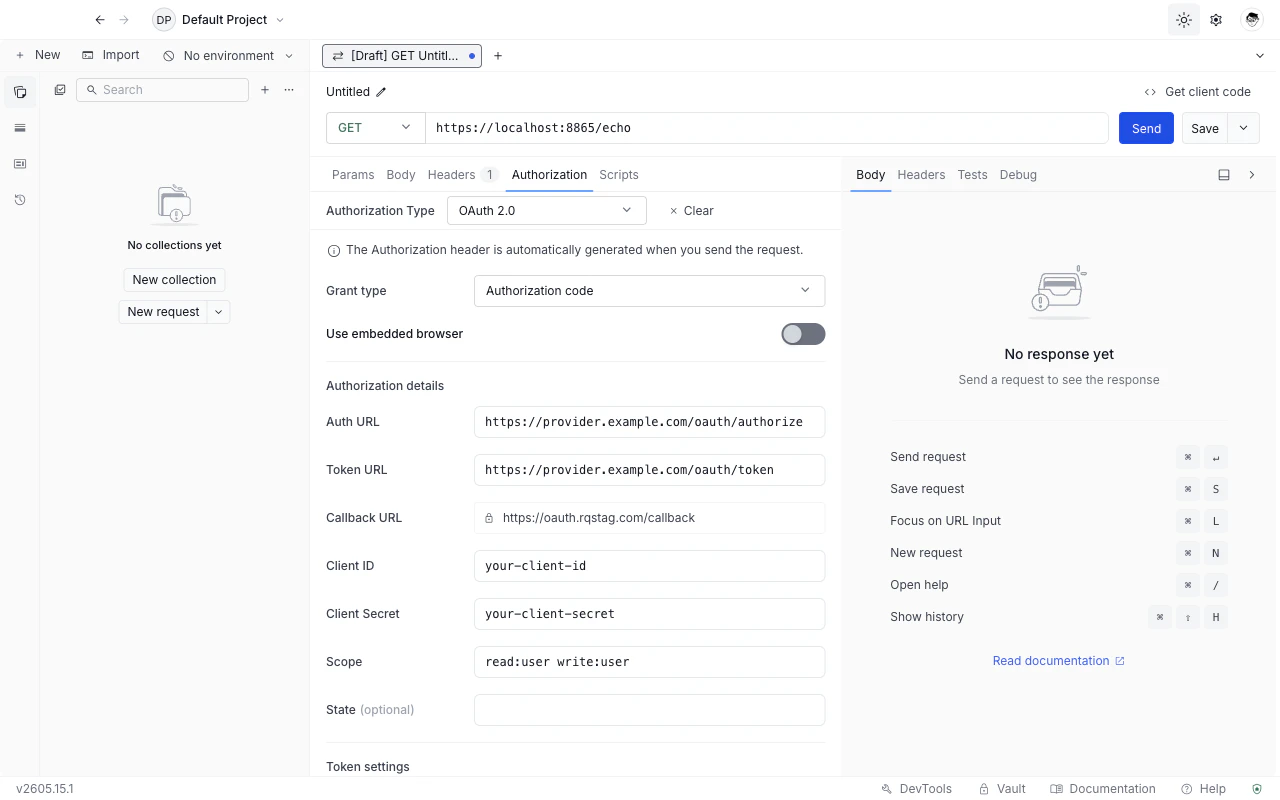
Choose OAuth 2.0 as the auth type
1
Open the Authorization tab
Open any request or collection, then go to the Authorization tab.
2
Select OAuth 2.0
Pick OAuth 2.0 from the Authorization type dropdown.
3
Pick a grant type
Use the Grant type dropdown at the top of the OAuth 2.0 form. Requestly swaps the field set to match. See Grant types below for which to pick.
4
Fill the fields and click Get token
The Get token button at the bottom of the form is enabled once all required fields are filled. Requestly runs the flow (opening the browser for grants that need user consent), stores the resulting token, and shows its status.
5
Send the request
Click Send. Requestly attaches the cached token as
Authorization: Bearer <token> (the prefix is configurable - see Token settings below).Grant types
Pick the grant that matches how the API issues tokens. If you are unsure, the provider’s documentation will tell you.Authorization code
The standard three-legged flow. Requestly opens the provider’s authorization page, the user signs in and consents, the provider redirects back with a code, and Requestly exchanges the code for a token at the token endpoint.Authorization code (PKCE)
Same as Authorization code, plus a code-challenge / code-verifier pair. Requestly generates and tracks both for you. Additional field:
The Client Secret field is optional for PKCE - public clients omit it.
Client credentials
Two-legged flow. No user, no browser.Implicit
The provider returns the token directly in the redirect URL fragment. Avoid in new integrations.Password credentials
The user’s username and password are exchanged directly at the token endpoint. Use only when you trust the client with the user’s password.Manual token
For when you already have an access token from somewhere else and just want Requestly to attach it. No flow, no refresh.Callback mode (hosted vs. embedded)
Grants that involve a browser redirect (Authorization code, Authorization code with PKCE, Implicit) expose a Use embedded browser toggle.-
Hosted callback (default): the OAuth handshake happens in your system browser, with Requestly’s hosted callback URL (
https://oauth.requestly.com/callback) catching the redirect and handing the code back to the app. The Callback URL field is auto-populated and read-only. Use this when you can registerhttps://oauth.requestly.com/callback(or the staging equivalent) with the provider. - Embedded browser: the OAuth handshake happens inside an in-app browser window. The Callback URL field becomes editable - set it to any redirect URI you have already registered with the provider. The URL is never fetched; Requestly intercepts the navigation as soon as the provider redirects to it. Use this when the provider restricts redirect URIs to URLs you control.
Whichever mode you pick, the redirect URI shown in the Callback URL field must be listed in your OAuth app’s allowed redirect URIs on the provider side. Most “invalid redirect URI” errors during the consent flow come from forgetting this step. Register the URL once in the provider’s developer console before clicking Get token.
Token settings
These cross-grant fields appear below the grant-specific fields (everywhere except Manual token).Header prefix
The scheme Requestly puts in front of the token in theAuthorization header. Defaults to Bearer, which is what almost every provider expects. Override only if the provider documents a different prefix (for example Token or an empty string).
Token selection
For providers that return both an access token and an OpenID Connect ID token in the same response. Pick which one to attach to outgoing requests:- Access token (default): the standard OAuth 2.0 access token.
- ID token: the OIDC ID token. Pick this when you are calling an endpoint that authenticates the user identity rather than authorizing API access.
Custom auth, token, and refresh parameters
Three collapsible tables for additional parameters most providers do not need:- Custom auth parameters: extra query parameters appended to the authorization URL. Use for vendor-specific extensions like
audience,prompt, orlogin_hint. - Custom token parameters: extra form fields appended to the token-exchange request body.
- Custom refresh parameters: extra form fields appended to refresh-token requests.
Token lifecycle
Once you click Get token, the panel at the bottom of the form shows the token’s status. The panel updates without you having to refresh the form.
Tokens are cached per authorization configuration. If you change a field that affects the token (Client ID, Auth URL, Scope, etc.), clear the existing token first to avoid stale cache hits.
How refreshes happen
Requestly refreshes tokens lazily, at send time. There is no background timer that pre-refreshes before expiry. Instead:- When you click Send and the cached token is still valid, Requestly attaches it as-is.
- When the cached token has expired and the provider returned a refresh token, Requestly exchanges the refresh token for a new access token before sending the request. Concurrent sends share a single refresh, so you do not end up with parallel refresh calls hitting the provider.
- When the cached token has expired and there is no refresh token, the request fails with a refresh error and the panel switches back to Token expired. Click Get token to run the grant flow again.
scope or audience parameter on refresh).
Variables and the vault
All OAuth 2.0 fields accept Requestly variables and vault references. For long-lived credentials (client secrets, RSA keys, user passwords), store the value once in the vault and reference it by name in the form. The reference is what gets exported when you share a collection; the underlying secret stays on your machine.What’s Next?
OAuth 1.0
Sign requests with the older signature-based OAuth scheme.
Vault
Store OAuth client secrets and passwords securely.
Variables
Reference OAuth credentials by name across requests.