Create Cloud-based Mocks

Learn how to create modify and manage mock apis in requestly

Mock APIs simplify application development by simulating server behavior, reducing reliance on live endpoints. Requestly’s Mock Server allows developers to create and use Mock APIs with JSON data or files for streamlined testing and debugging.

This section provides a concise guide to setting up Mock APIs, integrating them into applications, and utilizing Redirect Rules for efficient development workflows.

Creating a Mock API

1

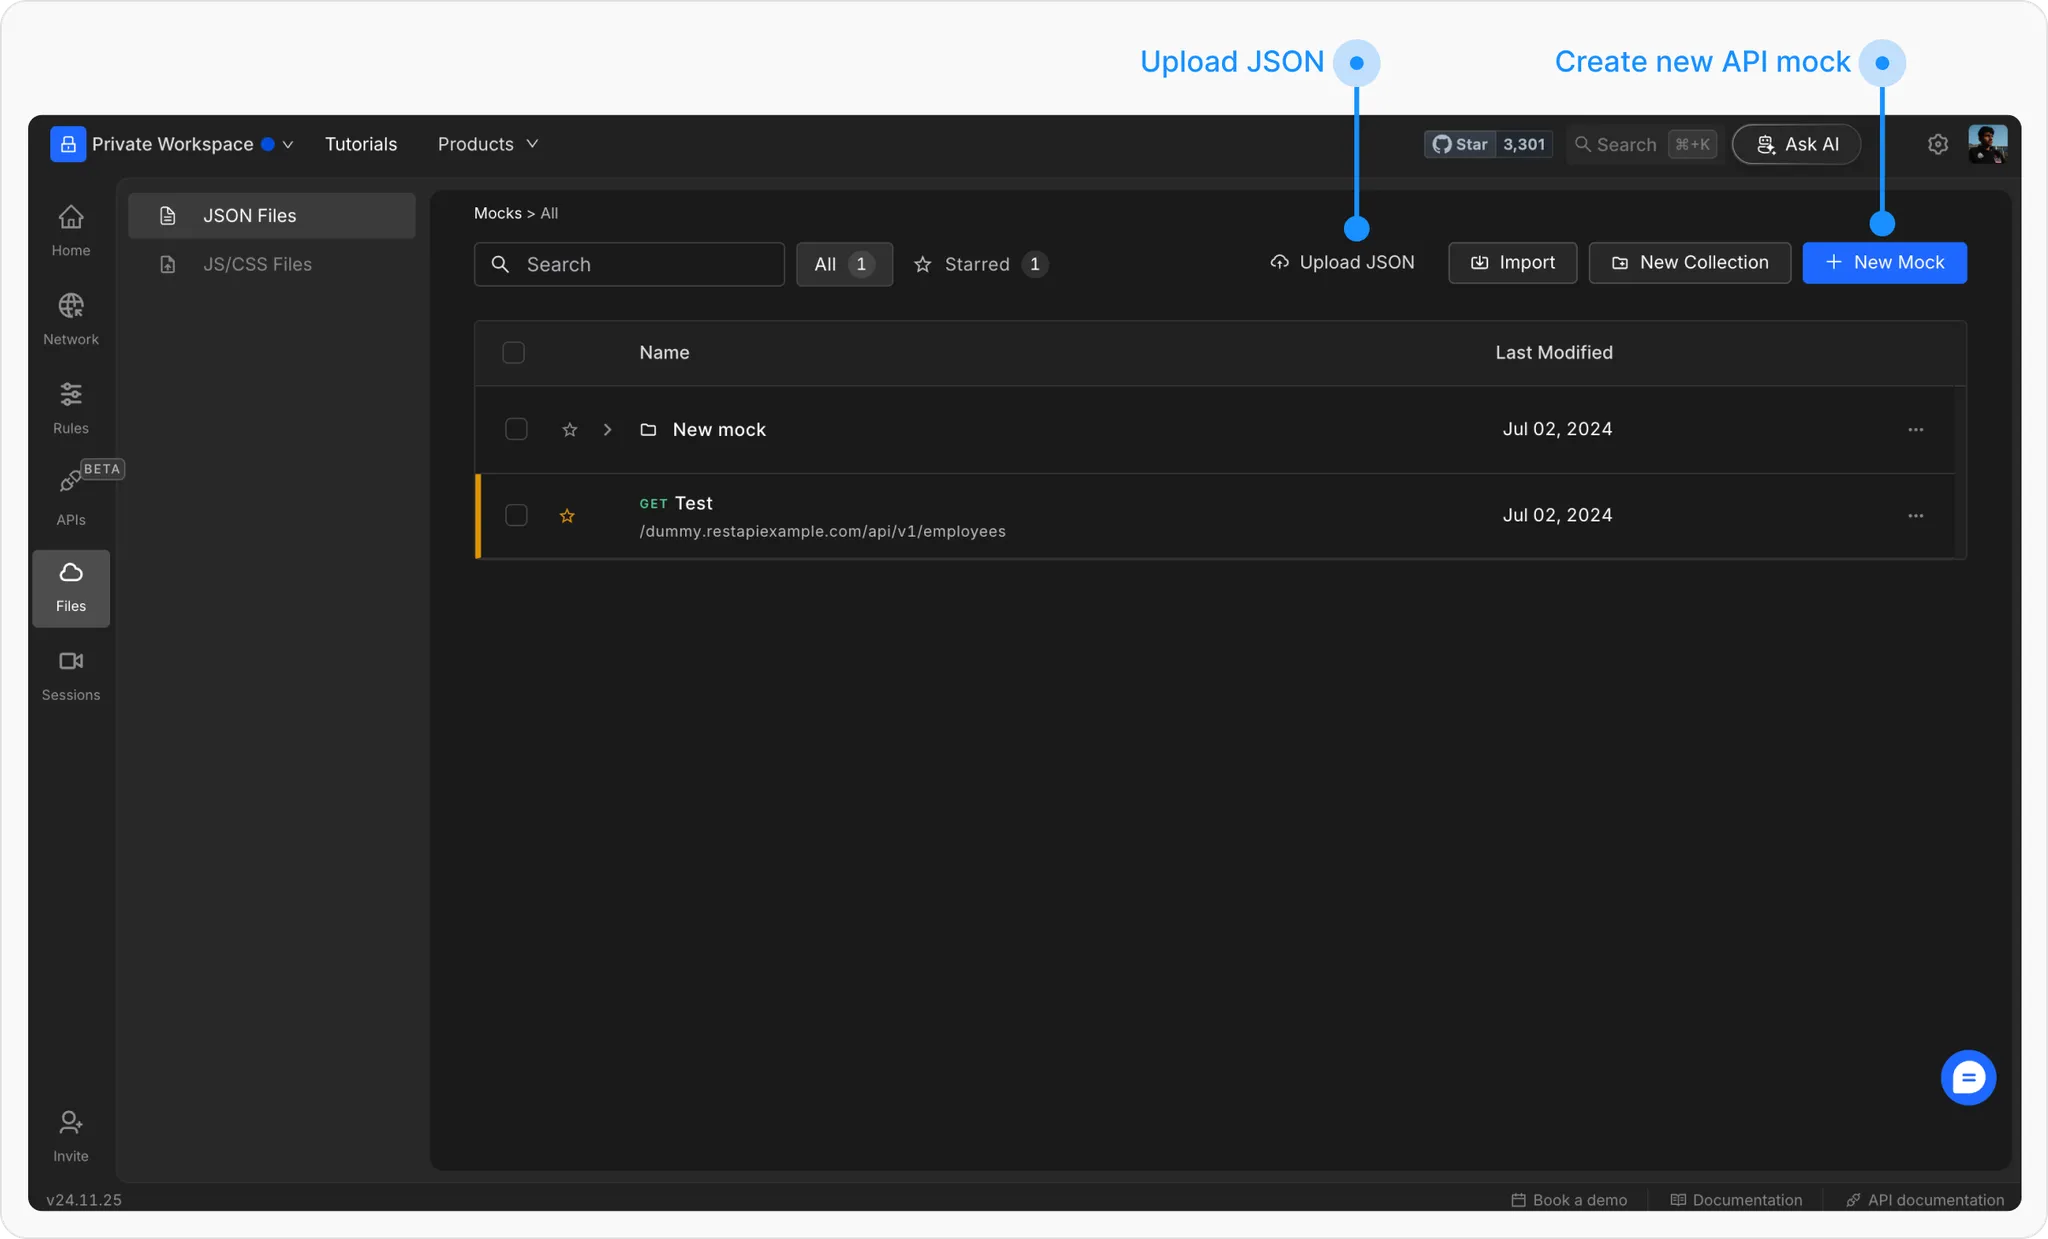
Go to the Mocks Dashboard in Requestly

From the Requestly dashboard, click on "Mock" in the left menu bar.

2

Click on "New mock" or upload a JSON file directly.

This allows you to start building a new mock API or import an existing JSON file.

3

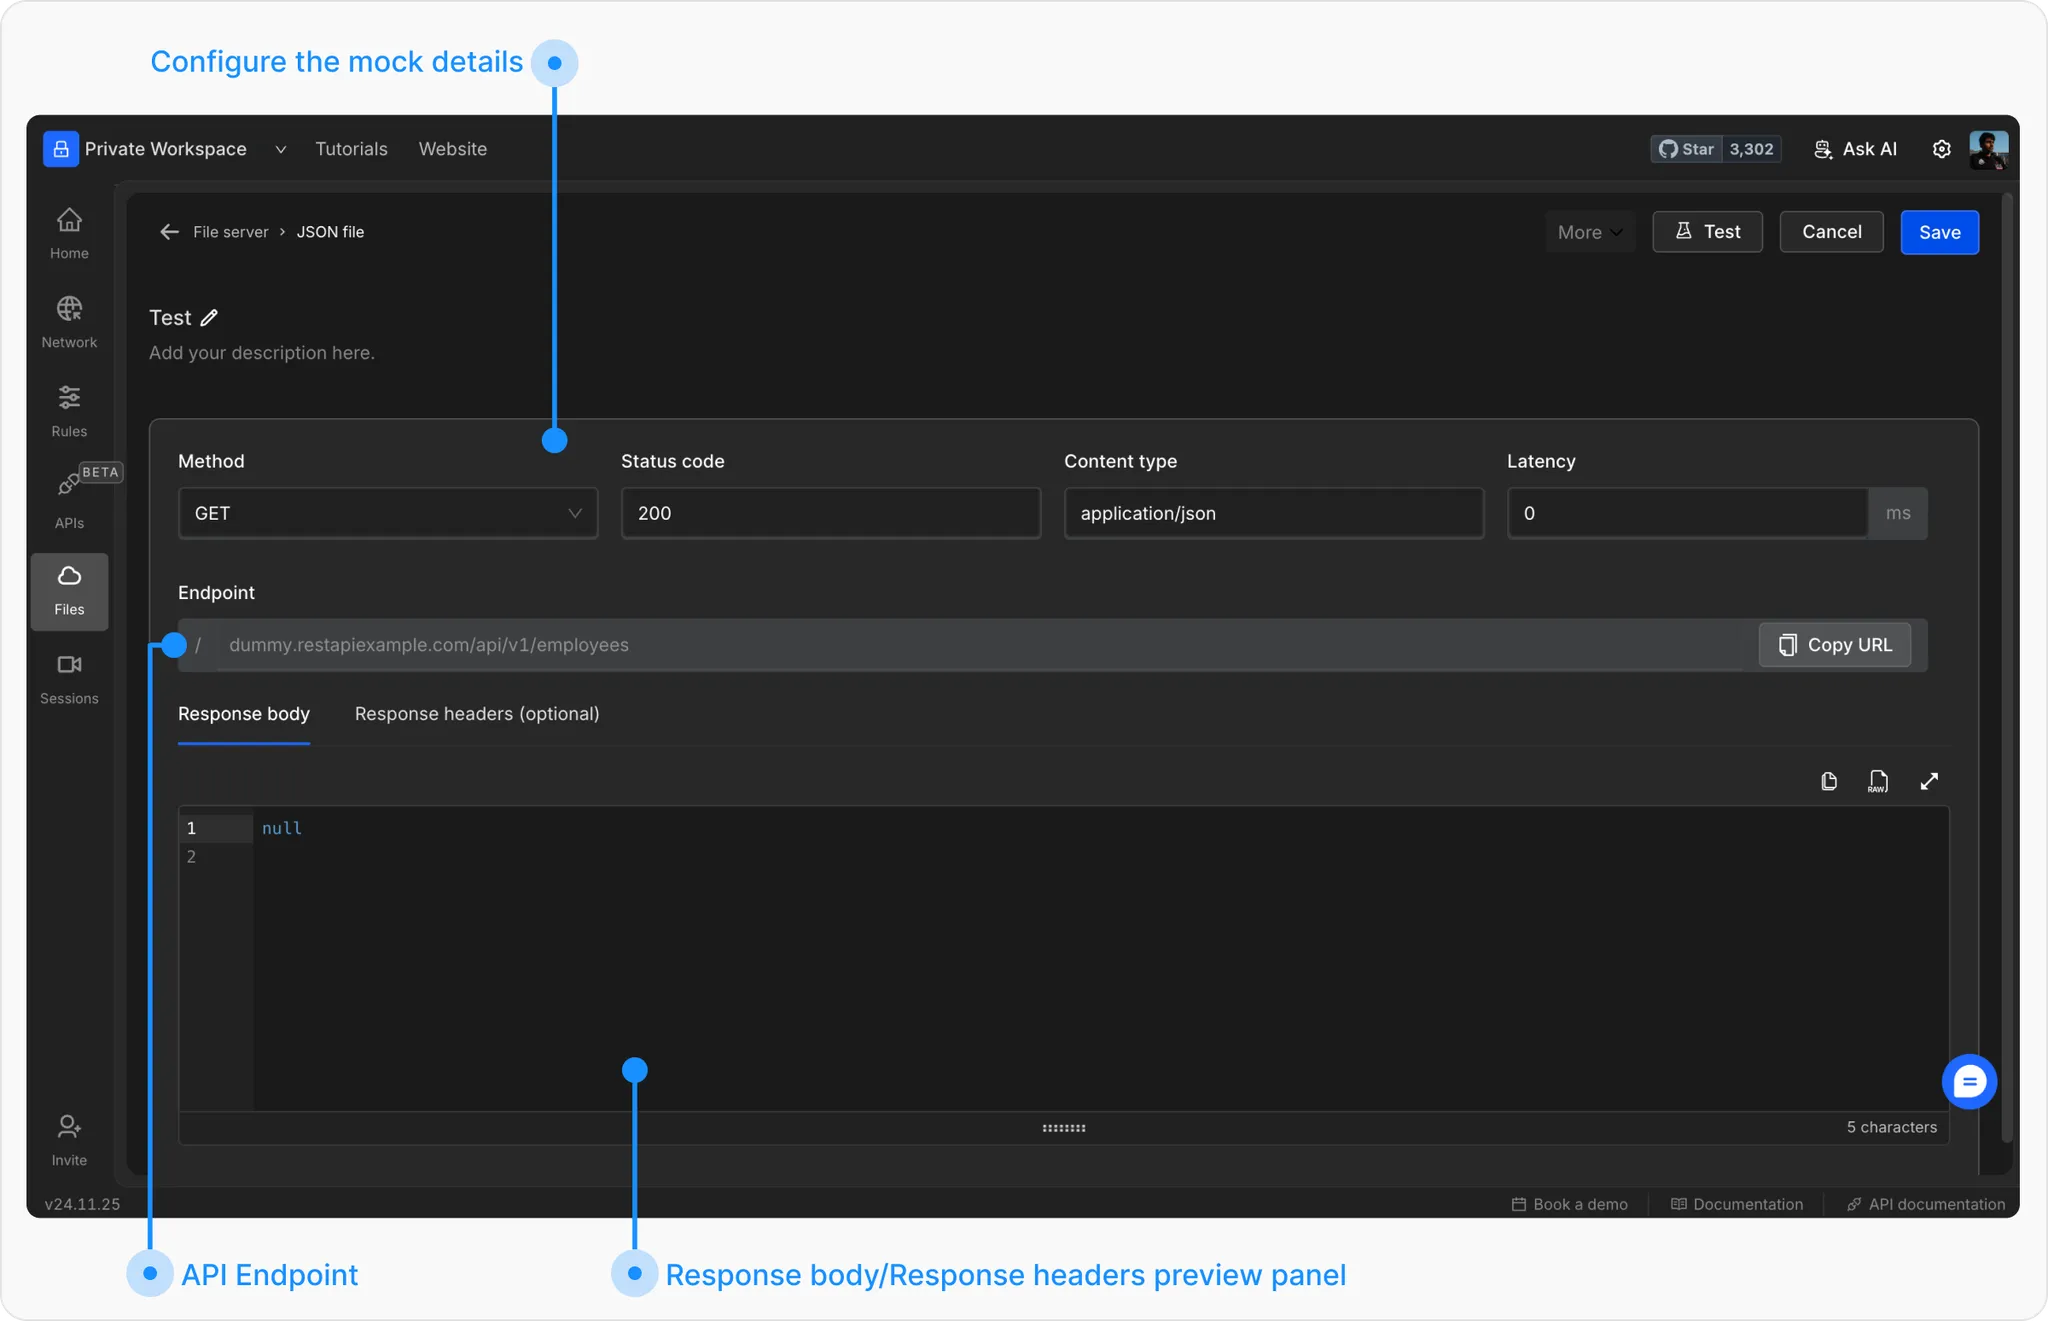
Enter the details of the Mock API.

Provide a descriptive name for the Mock API and Configure the following options on the creation screen:

  • Method: Select the HTTP method to be used (e.g., GET, POST, etc.).

  • Status: Specify the HTTP response status code (e.g., 200, 404, 500).

  • Content Type: Define the content type of the response (e.g., application/json).

  • Latency: Optionally, add a delay (in milliseconds) to simulate network latency.

  • Endpoint: Define the unique path or endpoint for the API.

  • Response Body: Provide the body of the response in JSON or plain text.

  • Response Headers (optional): Add custom headers to the response as needed.

  • Password Protection: In the "More" dropdown, you can set a password for your Mock API. If a password is set, users must include it as a query parameter (e.g., rq_password=<password>) to access the Mock API.

4

Click on "Create" to finalize your Mock API.

Once created, you can copy the generated using the “Copy URL” button.

The generated endpoint can be utilized in multiple ways:

  • Integrate the endpoint into your application to replace live API calls during testing.

  • Use tools like Postman or cURL to manually test and validate the Mock API responses.

Creating Mock Files

Mock Files in Requestly enable developers to host JS, CSS, or HTML files for testing and development purposes. Here are the steps to create a Mock File:

1

Go to the File Server in Requestly.

From the Requestly dashboard, click on "Mock" then “My Files” in the left menu bar.

2

Click on "New file" to create mock file or “Upload file” to upload JS, CSS, or HTML file directly.

This allows you to start building a new mock file or import an existing file.

3

Select the type of file you want to host.

From the popup select the type of file you want to host (HTML, CSS or JS)

4

Configure the mock

Enter the following details:

  • Name: Provide a descriptive name for the file.

  • Data: Input the file content directly or upload the file.

  • Endpoint: Define a unique endpoint for accessing the file.

5

Click on "Create" to finalize the hosted file.

Once created, you can copy the generated URL using “Copy URL” button to access the hosted file and see it in action.

Managing and Deleting Mocks

Efficiently managing and maintaining your mocks ensures a streamlined workflow and prevents clutter. Here's how you can edit, delete, or organize your mocks:

Editing a Mock API or File

1

Locate the Mock

Navigate to the Mocks Dashboard and identify the mock you wish to modify.

2

Click Edit

Here click on the mock you want to edit. or click on edit in more options (3 dots), This will open the edit page for the mock where you can configure it as required.

3

Update Details

Modify fields like the endpoint, response body, headers, or other configurations as needed.

4

Save Changes

Click the Save button to apply your updates.

Deleting a Mock API or File

1

Find the Mock

In the Mocks Dashboard, locate the mock to be removed.

2

Access Options

Click the More Options (three dots) menu beside the mock.

3

Delete the Mock

Select Delete and confirm the action in the popup dialog.

Note: Deleting a mock is permanent and cannot be undone. Ensure that the mock is no longer needed before deleting.

Managing Mock Collections

Mock collections provide a structured way to manage your mocks. Each collection can optionally include a static “path” that is automatically prepended to the mock endpoints within that collection. This feature is particularly useful for versioning your mocks or making a collection of similar mock endpoints, ensuring consistency and clarity across different versions of your API.

Key Benefits:

  • Efficient Organization: Group related mocks together, making it easier to manage and locate them.

  • Better Versioning: Utilize the static "path" feature to prepend a version identifier or other relevant prefixes to your mock endpoints, simplifying the process of updating and managing multiple versions of your API.

Example:

Consider a collection for API version 1.0:

  • Collection Path: /api/v1

  • Mock Endpoints:

    • /users

    • /products

With the collection path, the actual mock endpoints become:

  • /api/v1/users

  • /api/v1/products

This approach ensures that all endpoints within the collection are easily versioned, improving maintainability and clarity.

Creating a New Collection:

1

Go to the Mocks Dashboard

From the Requestly dashboard, click on "Mock" in the left menu bar.

2

Click on "New Collection"

In the top right side of the table click on new collection

3

Enter the details of the Mock Collection.

  • Name: Give the collection a name.

  • Collection Path: A path which gets prepended to all the mocks inside this collection. For example, if the collection path is "/api/v1", then all the child mocks’ endpoints will start with this path.

  • Description: Provide a brief description of the collection.

4

Click on "Save" to finalize the collection.

Moving Mocks into a Collection:

Once the collection is created, you can move mocks into it:

  1. Click on the options button on the right of the mock you want to move and select "Move."

  2. Select the appropriate collection and click "Move."

Testing a Mock API

Once you have saved a mock API, you can test it in the Requestly API Client to ensure the received response matches your expectations.

1

Open the Mock API

Open the mock API from the list of mocks available in the Mocks Dashboard.

2

Click the Test Button

In the top header of the mock API, click the Test button to initiate the testing process.

3

Test from the API Client pop up

A dialog box will open with the endpoint URL field and the request method already pre-populated in the user interface for your convenience.

4

Send the Request

Click the Send button to trigger the request and view the response. The response body and headers returned by the mock API will be displayed in the interface.

This confirms that the mock API is functioning as expected and can now be integrated into your application for further use.

Pre-Configured Mocks

Requestly provides several pre-configured mock APIs for quick testing and validation:

More predefined mocks coming soon!

Templating in Mocks

Templating in mocks allows dynamic responses by using handlebars-like syntax ({{}}) and special methods. This enables you to customize your mock API responses based on input parameters, headers, or other request attributes.

urlParams

Define parameters in the mock endpoint using a colon (:).

For example:

  • Endpoint: /book/:id

  • Template Usage: {{urlParams id}}

This allows dynamic values from the id parameter to be included in the mock response body.

Dynamically include request header values in your response.

For example:

  • Template Usage: {{header content-type}}

  • This will render the value of the content-type header in the response body.

method

Include the HTTP request method in your mock response.

For example:

  • Template Usage: {{method}}

  • This will render the HTTP method (e.g., GET, POST) used in the request.

statusCode

Include the original status code in your response template.

For example:

  • Template Usage: {{statusCode}}

  • This renders the status code directly into the response body.

Suggestions

If you have ideas for additional templating methods that would benefit your use case, let us know!

Import and Export Mocks

Requestly allows you to easily import and export mocks using JSON files. This feature streamlines the process of sharing or reusing mocks across projects.

Steps to Import Mocks

1

Access the Import Option

Go to Mock Server. Under the My Mock APIs section, click on the Import button.

2

Upload the JSON File

Select the JSON file containing the mocks you wish to import. Confirm the mocks to be imported and click Import.

Steps to Export Mocks

1

Select the mocks you want to export

Check all the mocks you want to export using the checkboxes.

2

Click on export

In the bottom popup click on export

3

Export the Mocks

Requestly will prepare the mocks for export. Click on the Export Mocks button to download the JSON file.

Updated on