

Scripts in Requestly allow you to extend and customize your API requests and responses dynamically using JavaScript. These scripts enable you to manipulate requests before they are sent (Pre-request scripts) or process responses after they are received (Post-response scripts). With access to the full request and response objects, you can achieve advanced automation, validations, and transformations.
Pre-Request Scripts
Pre-Request Scripts run before the API request is sent to the server. They allow you to modify request attributes, such as headers, body, query parameters, or even the URL. Pre Scripts are useful for adding authentication tokens, generating timestamps, or altering the request dynamically based on certain conditions.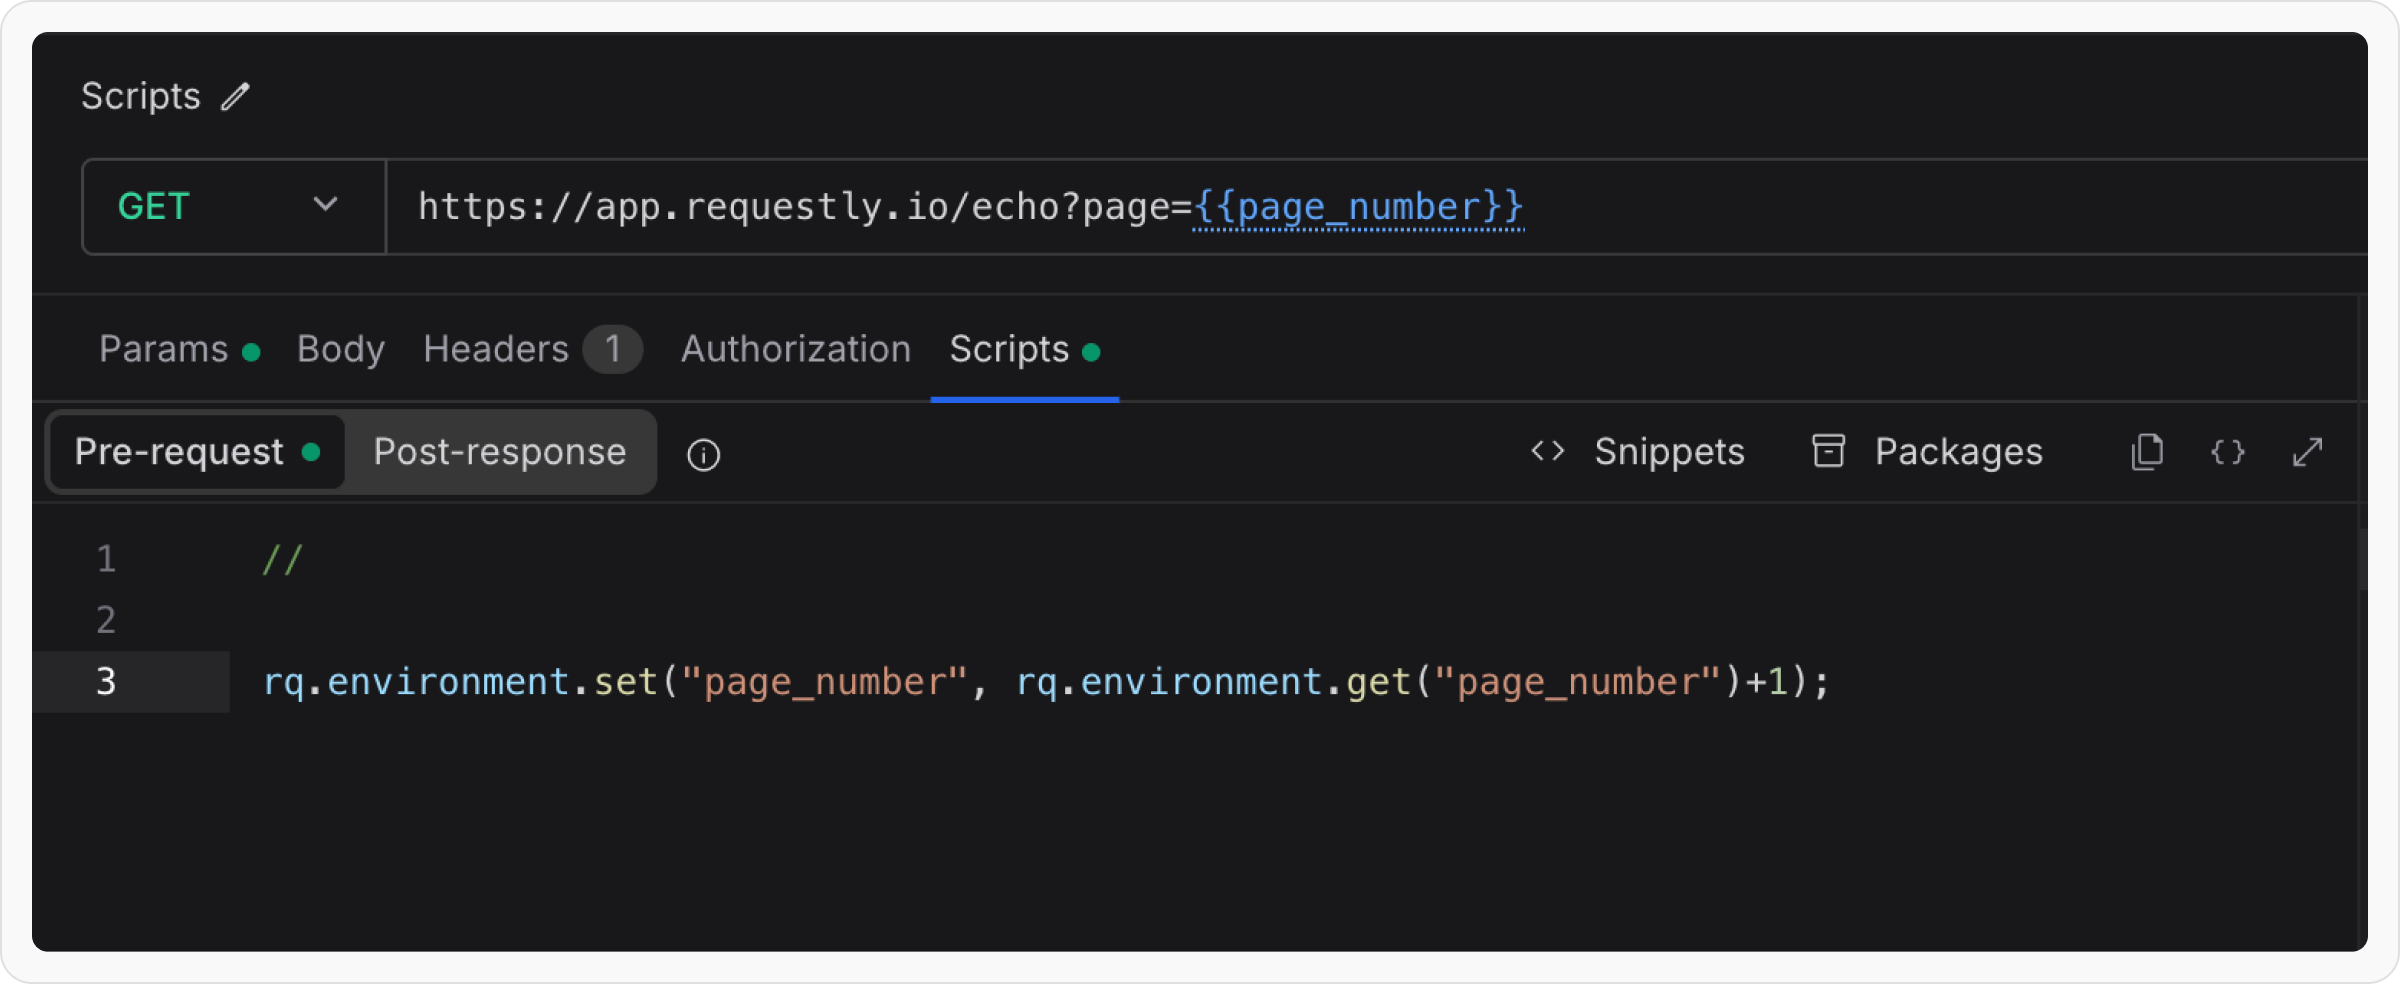
{{page_number}} to get value of page number.
Post-Response Scripts
Post-Response Scripts run after the API response is received. They allow you to process response data, validate outputs, or log details for debugging. Post Scripts are useful for transforming the response body, validating response codes, or storing results for further use.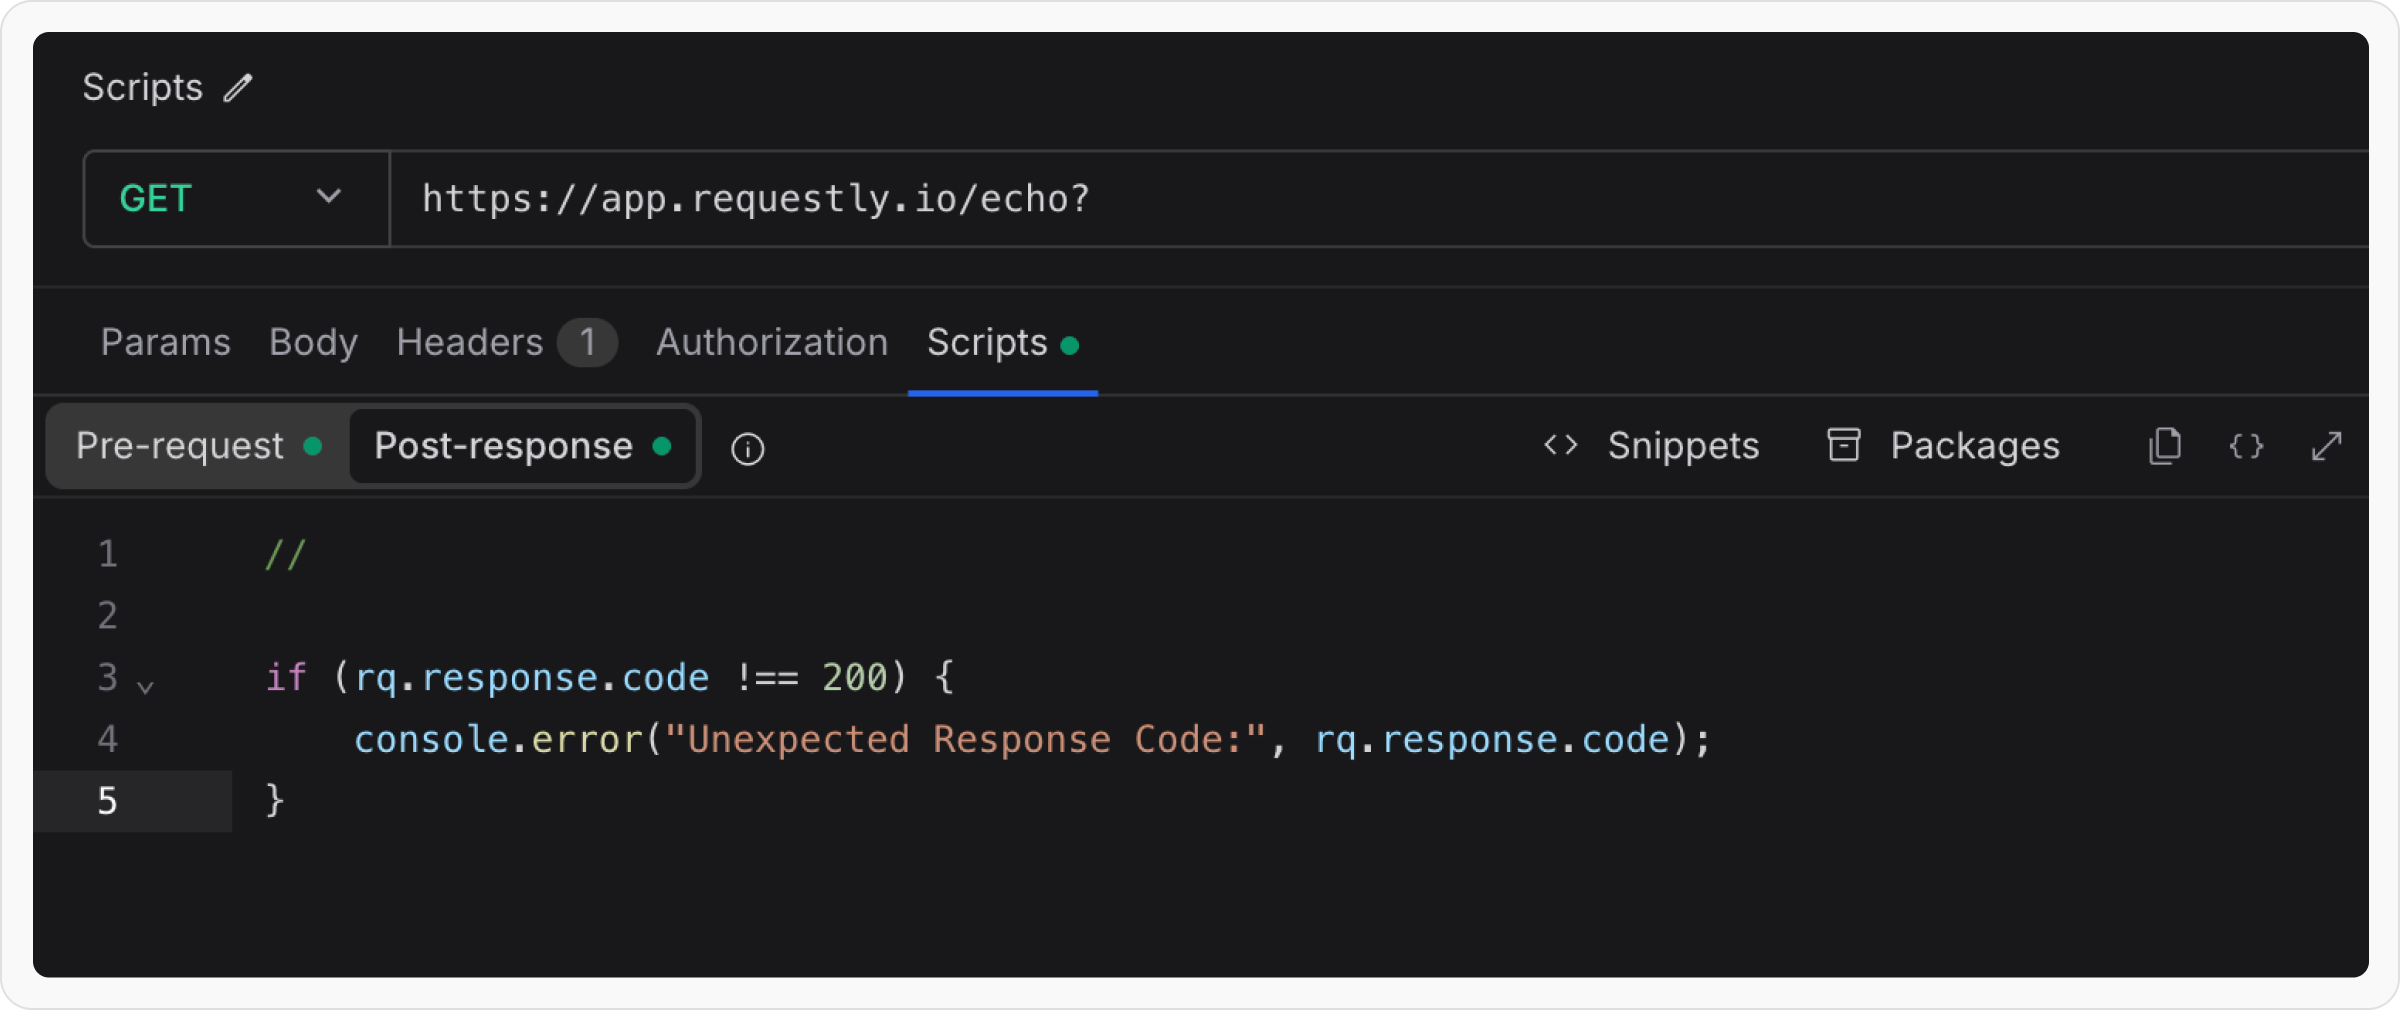
Viewing Console Logs from Scripts
You can useconsole.log() or console.error() in your Pre-Request and Post-Response Scripts to debug your logic and inspect values at runtime. The logs appear in Requestly’s built-in DevTools panel and are tagged with #script so you can filter them quickly.
1
Open DevTools
Click the DevTools button in the application footer at the bottom of the window. The panel docks to the bottom of the workspace with a Console tab selected by default.To see logs for just one request, send the request and open the Debug tab in the response area instead. It shows DevTools scoped to that request’s most recent execution.
2
Filter logs from your scripts
In the Console tab’s search box, type #script to show only logs produced by your Pre-Request and Post-Response Scripts and hide system events and network summaries.
Requestly JavaScript API rq
Requestly provides a robust set of JavaScript properties and methods to interact with API requests, responses, environments, and global variables. The rq object is available in all pre-request and post-response scripts, giving you full control over your API workflow.
Available Objects
The Requestly JavaScript API consists of the following main objects:rq.request
Access and manipulate API request details including method, headers, body, URL, and query parameters. Use this in both pre-request and post-response scripts to read or modify request data.
Quick Example:
rq.response
Access API response details including body, headers, status code, and response time. Primarily used in post-response scripts to process and validate API responses.
Quick Example:
rq.sendRequest
Send an HTTP request from inside a script and read its response. Use it to fetch a token before the main request runs, call a second endpoint, or poll a status URL. Available in both pre-request and post-response scripts.
Quick Example:
rq.execution
Control how a request runs: read where it sits in your collection, skip it, set which request the collection runner goes to next, and run another saved request.
Quick Example:
rq.variables
Read a variable from whichever scope defines it, and write temporary values for the current session. This is the object to reach for when you want a value and do not care where it lives.
Quick Example:
rq.environment
Manage environment-specific variables dynamically. Environment variables are scoped to a specific environment (dev, staging, production) and can be used across multiple requests.
Quick Example:
rq.collectionVariables
Manage collection-scoped variables. Collection variables are only accessible within requests that belong to a specific collection and persist across all environments.
Quick Example:
rq.globals
Manage global variables accessible across all collections and environments. Use for truly universal configuration and state.
Quick Example:
rq.test
Write tests to validate API responses and ensure your APIs work as expected. Tests help automate quality assurance in post-response scripts.
Quick Example:
rq.expect
Write assertions for API testing using the powerful Chai.js assertion library. Use with rq.test to validate response data.
Quick Example:
rq.info
Access execution metadata including request name, iteration index, and event name. Useful for tracking progress in collection runs and implementing iteration-specific logic.
Quick Example:
rq.iterationData
Access data from CSV or JSON files during collection runs. Each iteration receives different data from the file, enabling data-driven testing.
Quick Example:
rq.visualizer
Render a custom visualization of the response - a chart, a table, or formatted HTML - shown behind a Visualize button in the response body. Available in both pre-request and post-response scripts.
Quick Example:
Using Dynamic Variables in Scripts
Requestly provides dynamic variables, which are built in values that automatically generate common data such as timestamps, UUIDs, and random values. You can access them in scripts using the rq.$variableName() syntax. Quick Example:rq.$randomUUID()- Generate unique identifiersrq.$timestamp()- Current Unix timestamprq.$isoTimestamp()- ISO 8601 timestamprq.$randomInt()- Random integerrq.$randomEmail()- Random email addressrq.$randomFirstName()- Random first namerq.$randomCompanyName()- Random company name
Chaining API requests
When one request depends on the output of another, use a post-response script on the first request to extract the values you need, then reference them from the second request using{{variable_name}} placeholders. The same pattern covers auth-token flows, “create then update” sequences, and conditional logic that decides what the next call should send.
The flow has three pieces:
- Post-response script on the prerequisite request. Parse the response and write the values into a variable scope.
- Reference the variables from the next request’s URL, headers, query params, or body using
{{variable_name}}syntax. See Using variables in API requests. - Run the requests in order, either manually or by adding them to a collection and using the Collection Runner.
Example: pass dynamic data from one request to the next
A collection with two requests:Get Users followed by Add User. The post-response script on Get Users checks whether the target user already exists. If they don’t, it stages fresh data for the second request to consume.
Post-response script on Get Users:
Add User:
{{new_user_name}} and {{new_user_email}} with whatever the post-response script wrote. Anything the next request needs (an id from a POST to feed a follow-up PATCH, an auth token from a login call, an order number returned by a checkout step) follows the same shape.
Picking a variable scope
For values that exist only to bridge one request to the next, prefer runtime scope. It stays local to your device and does not pollute your saved environment with one-off state. Reach for environment or collection scope when the value (an auth token, a tenant id) is meaningful beyond the immediate chain.
For the full per-scope reference, see Runtime variables, rq.variables, rq.environment, rq.collectionVariables, and rq.globals.
Sharing code between scripts
The section above passes data between scripts through a variable scope. To share code — a helper function you want every request in a collection to call — you do not need a variable, and you do not need to repeat the helper in each request. Every script in one run shares a single scope: the collection-level script, each folder-level script, the request’s own pre-request script, and its post-response script.Example: define a helper once, call it from every request
Collection pre-request script:auth too — the shared scope spans the whole
request, not just the pre-request phase.
Why there is no var in front of auth
The missing keyword is doing the work, and the reason is ordinary JavaScript scoping.
Each script runs wrapped in its own function. A var, let, const, function or class
declaration is scoped to the function it appears in, so it is discarded as soon as that script
finishes — a later script has no way to reach it.
An assignment with no keyword does not declare anything. auth = { ... } sets a property on the global
object, and that global object is the one thing every script in the run shares, so the value outlives
the script that created it:
globalThis.auth = { ... } does exactly the same thing and says so explicitly. Prefer it if a
bare assignment reads as a mistake to you or your reviewers.
What the shared scope does and does not keep
- It lasts for one run. Every request in a Collection Runner run shares it. Sending a single request from the editor is a run of one.
- A script timeout discards it. If a script is killed for exceeding its time budget, the scope is thrown away and the next run starts clean.
- It holds values, not saved state. Nothing here is persisted. For data that must outlive the run, write it to a variable scope as described above.
To share code across collections — or to keep it in one place and version it — author a Custom Package
instead and
require() it. See Import packages into your scripts.Encoding request payloads
Some APIs require the body to be transformed before it goes on the wire, for example Base64-encoding a JSON envelope. Compute the transformed value in a pre-request script and write it back withrq.request.body.update(value) (or plain assignment, rq.request.body = value) — the value is sent exactly as your script produced it, byte for byte, with no variable resolution applied to it. Headers, query parameters, the URL, and the method are writable the same way. See rq.request for the full mutation surface, and Signing requests when the transformation is a signature.
Base64 encoding with Buffer
require('buffer') is available in scripts. It is the recommended path because it handles non-ASCII characters correctly.
Pre-request script:
Content-Type to whatever the server expects — an explicit header row always wins, typically text/plain or application/octet-stream for a raw Base64 string, or application/json if the encoded value is wrapped inside a JSON envelope.
Base64 encoding with btoa
btoa and atob are available as globals. They are convenient when the payload is plain ASCII:
Buffer over btoa when the payload may contain non-ASCII characters. btoa throws on anything outside the Latin-1 range.
Decoding a Base64 response
Mirror the encoding pattern in a post-response script:rq.response.bodyEncoding to tell binary from text before decoding:
Signing requests
Some APIs require a signature computed over the request body. Compute it in a pre-request script and write the body and the signature header onto the request together. The body is sent exactly as your script produced it, byte for byte, with no variable resolution applied afterwards, so the signature always matches the payload it was computed over. You do not need to stage the signed value in a variable and reference{{signature}} from the request. That older pattern can send a signature computed for a previous payload.
HMAC signatures
Node’scrypto module is available via require('crypto'), and HMAC works in both Safe and Developer script modes:
createHash) and symmetric ciphers.
RS256 and other asymmetric signatures
The asymmetric functions ofrequire('crypto') (createSign, createVerify, generateKeyPair and their siblings) are not available in Safe mode, which is the default. Use a signing library written in pure JavaScript instead: it does not rely on platform crypto, so it behaves the same in both modes.
Install jsrsasign from npm (available in the desktop app), then sign in a pre-request script:
-----BEGIN PRIVATE KEY-----) or PKCS#1 (-----BEGIN RSA PRIVATE KEY-----) form. PS256 and HS256 work the same way.
Keys, and what signing costs
Keep private keys and signing secrets in the Vault or as environment secrets, never in the script itself. Signing with a private key is slower in Safe mode than in Developer mode: roughly 1.4 seconds against 0.45 seconds for one RS256 signature on a 2048-bit key, because the arithmetic runs in JavaScript rather than in native code. Loading the library is not what costs; the signature is. Switch the request to Developer mode if that per-request cost matters more to you than running inside the sandbox, unless your organization has restricted scripts to Safe mode - see Organization resources. See Import packages into your scripts for everythingrequire() can load, both built in and from npm.